Audacity lets you record your voice, edit out mistakes, add music, and turn separate audio tracks into a finished production. It’s free, open source, and available for Windows, Mac, and Linux.
To make the tools easier to understand, I’m going to build a 30-second radio commercial for the Kevin Cookie Company. We’ll record a voiceover, bring in some music, fix uneven volume, rearrange clips, and apply effects before exporting the finished audio. These same skills work for interviews, classes, narration, and plenty of other recording projects. The cookies are optional.
What You'll Learn
- Configure recording devices and monitor input levels to avoid clipping before recording.
- Select, trim, move, split, and copy audio to shape the timing of a project.
- Balance voice and music using gain, amplification, Auto Duck, noise reduction, and compression.
- Save an editable Audacity project, then export a finished WAV or MP3 file.
Table of Contents
- Download Audacity and Get Familiar With the Workspace
- Set Up Your Recording Before You Press Record
- Record Your Voice and Read the Waveform
- Play, Select, and Zoom Into Audio
- Import Music and Save Your Audacity Project
- Balance Music and Voice With Gain, Mute, and Solo
- Delete Unwanted Audio
- Fix Uneven Volume With the Envelope Tool and Amplify
- Move Clips, Add Pauses, and Reuse Audio
- Automatically Lower Background Music With Auto Duck
- Trim the Ending and Apply a Fade Out
- Reduce Background Noise and Smooth Out Speech
- Check the Finished Mix and Export WAV or MP3
Download Audacity and Get Familiar With the Workspace
Start at the official Audacity website and select the download option for your operating system. Download the installer, run it, and complete the installation.
When you launch Audacity, you’ll start with a blank project. The main areas you’ll use are:
- Menus: File, Edit, View, Effect, and other commands across the top.
- Transport controls: Record, Play, Stop, Pause, and buttons for moving to the beginning or end.
- Audio device controls: Your microphone, recording channels, and playback device.
- Level meters: Visual feedback for recording and playback volume.
- Track area: The workspace where recorded and imported audio appears as waveforms.
- Timeline: The time ruler that helps you position and measure audio.
The menu locations and toolbar arrangement can vary by Audacity version, but the basic workflow is the same: configure your audio, record or import it, edit it, and export the result.
Set Up Your Recording Before You Press Record
Choose a project sample rate
The project rate, also called the sample rate, describes how many audio samples are taken each second. In the interface used here, that setting appears in the lower-left corner.
Think of a video camera taking a series of still frames. Play those frames together, and you get motion. Digital audio also uses individual samples to represent a continuous signal.
A sample rate of 44,100 Hz means 44,100 samples per second. That’s the rate used for audio CDs. Higher rates capture more samples and produce larger files, but they do not necessarily create an audible improvement for a typical speech recording.
For this commercial, I’m using 48,000 Hz. Rates from 44,100 Hz through 96,000 Hz are among the options discussed here, but there’s no need to choose the highest number simply because it’s available.
Select an audio host on Windows
On Windows, the audio host menu offers several ways for Audacity to communicate with your audio hardware:
- MME: An older option with broad compatibility. I’m leaving this selected for the example.
- Windows DirectSound: Another Windows audio option.
- Windows WASAPI: A newer option that can offer lower latency.
You don’t need to change this setting just to get started if the default works correctly.
Choose your microphone, channels, and speakers
Select the microphone you want Audacity to record. If your computer has both a built-in microphone and an external microphone, make sure you choose the right one.
Next, choose the recording channels:
- Mono: One channel, suitable for the standard microphone used in this example.
- Stereo: Separate left and right channels, useful when your source actually provides stereo audio.
Finally, select your playback device. This is where Audacity will send the sound when you play your project, such as your speakers or another connected audio device.
Monitor your microphone levels
Click the recording level meter to start monitoring your microphone, then speak at the volume you expect to use during the recording.
Avoid hitting 0 dB at the top of the recording meter. When the input is too loud, the signal can clip. Instead of preserving the peaks of the waveform, the recording cuts them off, losing detail and introducing distortion.
If the level is too low or repeatedly reaches the red area, adjust the recording volume. Your microphone or audio hardware may also have its own level control, so check that as well.
You can customize the meter’s position by dragging its toolbar out of the top area. Resizing it can also change it from a horizontal meter to a vertical one. If you want to return everything to its original arrangement, use View > Toolbars > Reset Toolbars.
Before committing to an hour-long class or interview, make a short test recording and listen back. Finding a level problem after ten seconds is much better than finding it after an hour.
Record Your Voice and Read the Waveform
If you made a disposable test track, use the X in its track controls to remove it. Then you’re ready for the real recording.
- Click the red Record button.
- Wait a moment before speaking so you capture some room sound.
- Record your voiceover.
- Click Stop when you finish.
That small buffer at the beginning serves two purposes. It gives you space before the first word, and it provides a sample of background noise that you can use later with Noise Reduction.
For my commercial, I record an enthusiastic opening about the Kevin Cookie Company, a comparison with other cookie brands, and a closing line directing people to the company website. Toward the end, I accidentally move farther away from the microphone, making the closing section quieter. That gives us something useful to fix.
Audacity displays the recording as a waveform:
- Horizontal position represents time. Earlier audio is on the left, and later audio is on the right.
- Waveform height represents amplitude. Larger waves generally correspond to louder sections.
- Nearly flat areas indicate pauses or very quiet sound.
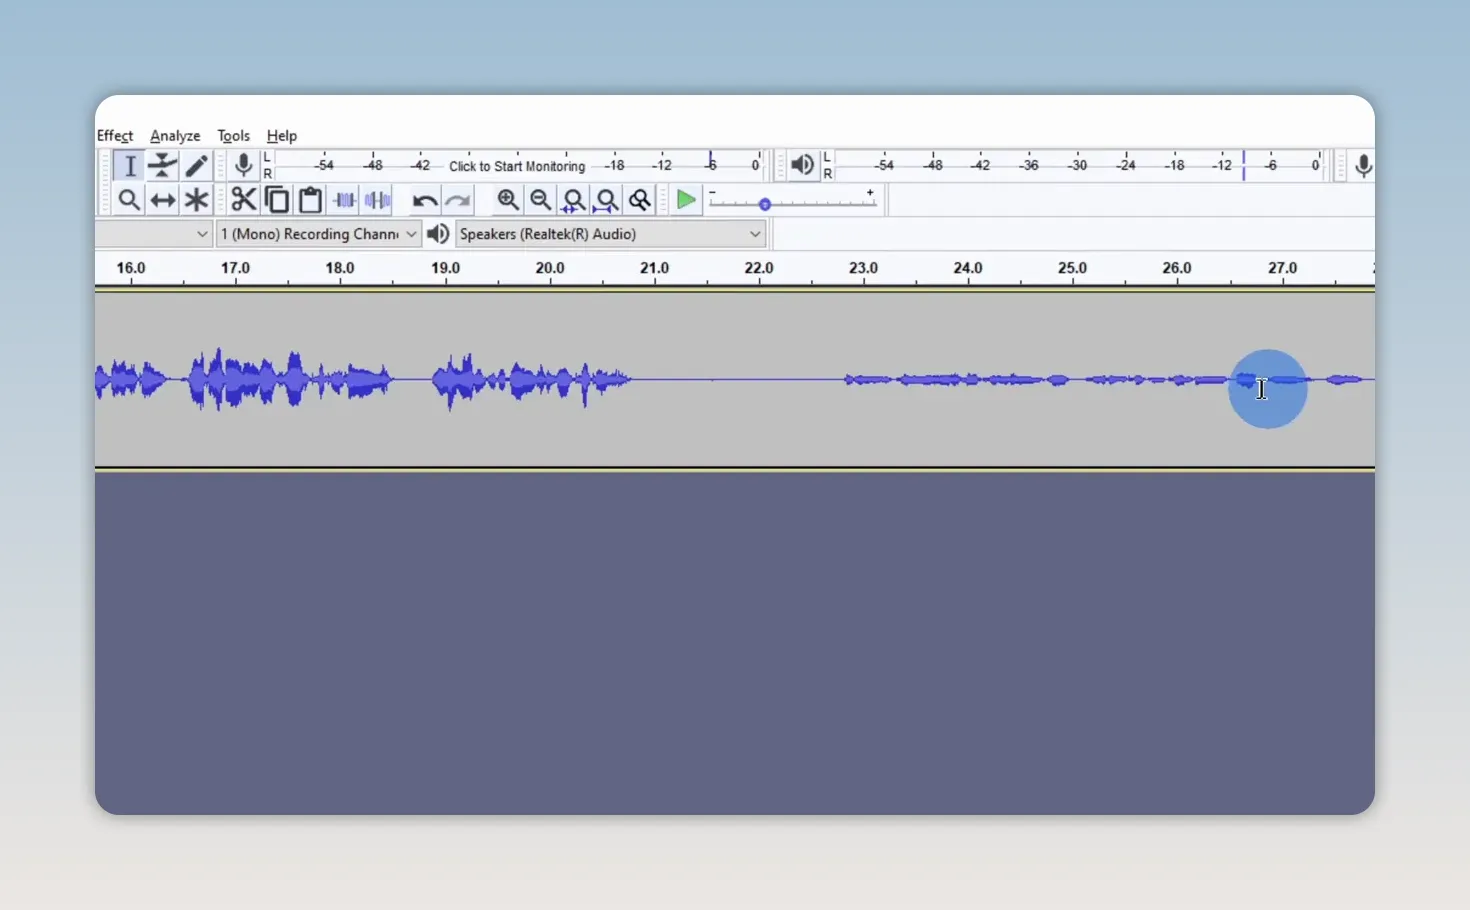
As you become familiar with a recording, you’ll start recognizing phrases, pauses, and emphasized words just by their shapes. The waveform helps you navigate, but listening is still how you confirm what needs changing.
Play, Select, and Zoom Into Audio
Use playback controls and shortcuts
Click in a track to set a starting position, then click Play or press Spacebar.
- Spacebar: Start or stop playback. Stopping returns the playback position to where you started.
- P: Pause playback, then press it again to resume from the paused position.
- Shift + Spacebar: Loop playback in the interface used here.
- Home: Jump to the beginning.
- End: Jump to the end.
Hover over a button to see its associated shortcut. That’s a convenient way to learn the controls as you work.
Select a section of the recording
Choose the Selection Tool, or press F1, then click and drag across the waveform. Press Spacebar to hear only the selected area.
To refine the selection, move to either edge until the pointer changes, then drag that edge inward or outward. You can also use Shift-click to adjust a selection boundary.
A selected region can be looped, too. For example, I can select the opening “Mmm” sound and repeat it while checking the edit. Twice is probably plenty, even for cookies this good.
The timeline above the track also supports quick playback. Selecting a region on that ruler gives you another way to hear a particular passage without changing the audio itself.
Zoom in for precision
The Zoom Tool lets you inspect a small section more closely. In this interface, left-clicking zooms in and right-clicking zooms out. You can also drag across an area with the Zoom Tool to fill the display with that region.
The toolbar provides separate zoom-in and zoom-out buttons, along with Fit Project to Width, which brings the entire recording back into view.
If you zoom in far enough, you can see the individual sample points that make up the recording. For ordinary editing, though, you’ll usually work at a scale where words and pauses are easy to distinguish.
Import Music and Save Your Audacity Project
A voiceover is a good start, but some background music will make this commercial feel more complete.
To add audio to your existing project, use File > Import > Audio, or drag an audio file from your computer into the Audacity workspace. Audacity adds it as another track. You can also use File > Open, with Ctrl + O as the shortcut, to open an audio file.
Once you have multiple tracks and some work invested, save the project.
- Open File > Save Project.
- Choose Save Project As.
- Enter a name and select a location.
- Save the Audacity project file.
In this example, the project is saved as an AUP3 file.
Saving a project and exporting audio are different tasks. The project preserves your separate tracks and editing arrangement so you can return to the work. Exporting creates a playable audio file, such as WAV or MP3, for distribution.
We’re not finished editing yet, so keep the project saved and leave exporting until the end.
Balance Music and Voice With Gain, Mute, and Solo
When I first play the imported music with the voiceover, the music completely overpowers the speech. It might be a catchy track, but people still need to hear what we’re selling.
Use the music track’s Gain slider in the left-hand track controls to lower its playback level. Play both tracks together and adjust the music until the voice is easy to understand while the music remains audible underneath.
Gain changes the level of the whole track. It’s a useful first step before making more detailed volume changes.
When you want to focus on editing the voice, use either of these controls:
- Mute: Silences that particular track. Mute the music to hear the voice alone.
- Solo: Lets you focus on the selected track while the other tracks are silenced.
With only two tracks, either approach works. Solo becomes particularly convenient when you have several tracks and want to concentrate on just one.
Delete Unwanted Audio
My original commercial includes a section talking down Mrs. Fields, Nabisco, and other cookie brands. Our legal team would prefer that I keep the focus on our own cookies. Fair enough.
To remove an unwanted sentence:
- Play the recording to locate the beginning and end of the passage.
- Choose the Selection Tool.
- Drag across the section you want to remove.
- Adjust the selection boundaries as needed.
- Press Delete.
- Play across the edit to check the transition.
The later audio in the edited track moves forward to close the space. In this case, the introduction now leads directly into the closing website line.
Pauses are helpful landmarks because they appear as flatter sections of the waveform. Use those visual clues to narrow down the edit, then listen to make sure you haven’t removed part of a word.
Fix Uneven Volume With the Envelope Tool and Amplify
The opening of my voiceover is much louder than the closing line because I moved away from the microphone. There are a couple of ways to address that.
Shape volume changes with the Envelope Tool
The Envelope Tool lets you change volume over time. Select it, then click along the track to add control points. Drag those points to raise or lower the level.
By placing points before and after an adjustment, you can control where a volume change begins and how gradually it happens. This is useful when you want a passage to rise or fall rather than changing the entire track’s gain.
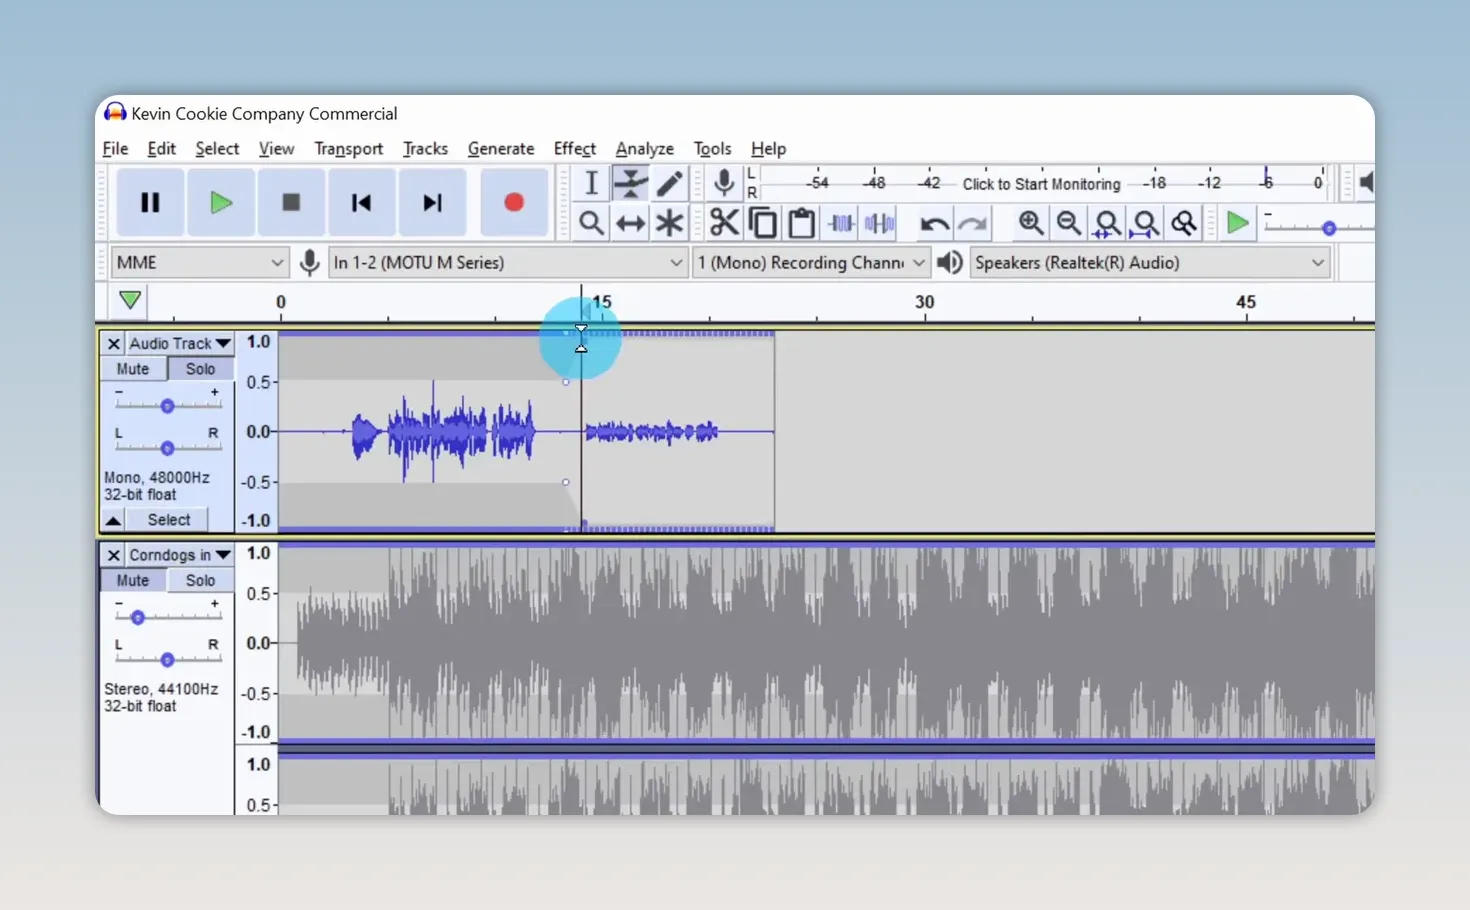
To remove a control point, drag it away from the track. For my quiet closing line, the envelope adjustment isn’t giving me the increase I want, so I remove those points and try Amplify instead.
Raise a quiet passage with Amplify
The Amplify effect changes the level of a selected section. Its dialog lets you specify either an amplification amount or a new peak amplitude.
- Play a section that already sounds right and note its peak on the playback meter.
- Select the quieter passage.
- Open Effect > Amplify.
- Set the new peak amplitude to a level similar to the reference passage.
- Apply the effect and listen across the transition.
My opening peaks at roughly minus 7 to minus 8 dB, so I use about minus 7 dB as the new peak target for the closing line. That’s a reference for this particular recording, not a universal target for every project.
After applying the effect, the two waveform sections are closer in size, and the change in speaking volume is much less distracting.
Move Clips, Add Pauses, and Reuse Audio
Align the voiceover with the music
The opening has some unused time before the commercial gets going. For a radio spot, I’m paying for every second, so I don’t want unnecessary dead space.
You can select and delete unwanted space, but moving clips is useful when you want to preserve the audio and change its position.
In the interface used here, select the Time Shift Tool, then drag a clip left or right along the timeline. I first move the music so it begins near the start, then position the voiceover so the speech begins with a drum hit.
Use the waveforms as alignment guides, then play the tracks together to check the timing. A visually neat alignment still needs to sound right.
Insert silence for better pacing
After removing the competitor comparison, the voiceover ends before the 20-second mark. I have a 30-second commercial to fill, so a little more separation between sentences will improve the pacing.
One option is to generate silence:
- Place the cursor where you want the pause.
- Choose Generate > Silence.
- Select the time format you prefer.
- Enter a duration, such as five seconds.
- Confirm to insert the silence.
This adds a gap in the voiceover while the music can continue underneath.
Split a clip and move the pieces independently
Another approach is to split the recording:
- Place the cursor at the desired split point.
- Choose Edit > Clip Boundaries > Split.
- Use the Time Shift Tool to move the second clip.
The split creates separate clips that you can position independently. Moving the second clip to the right leaves a gap between the sentences without inserting recorded audio.
Copy, paste, and cut audio
The familiar editing shortcuts also work on selected audio:
- Ctrl + C: Copy.
- Ctrl + V: Paste.
- Ctrl + X: Cut.
You’ll also find these commands in the Edit menu.
I like the opening “Mmm” enough to use it again. I select that sound, copy it, place the cursor after the closing line, and paste. Now the commercial ends with a final little endorsement from someone who clearly enjoys the product.
Automatically Lower Background Music With Auto Duck
The music now sits at a reasonable level, but I want it quieter during speech and louder in the gaps. I could build those changes manually with the Envelope Tool. Auto Duck can do the work automatically.
Auto Duck uses a separate control track, in this case the voiceover, to decide when the selected audio should become quieter.
- Move the voiceover track directly below the music track. You can drag the track from its control area to change the track order.
- Select the portion of the music you want to process.
- Leave the voiceover control track unselected.
- Open Effect > Auto Duck.
- Preview the result, adjust the settings if needed, and apply the effect.
The settings control how quickly the music drops, how long it remains lowered, and how it returns to its previous level. I use the defaults as a starting point for this commercial.
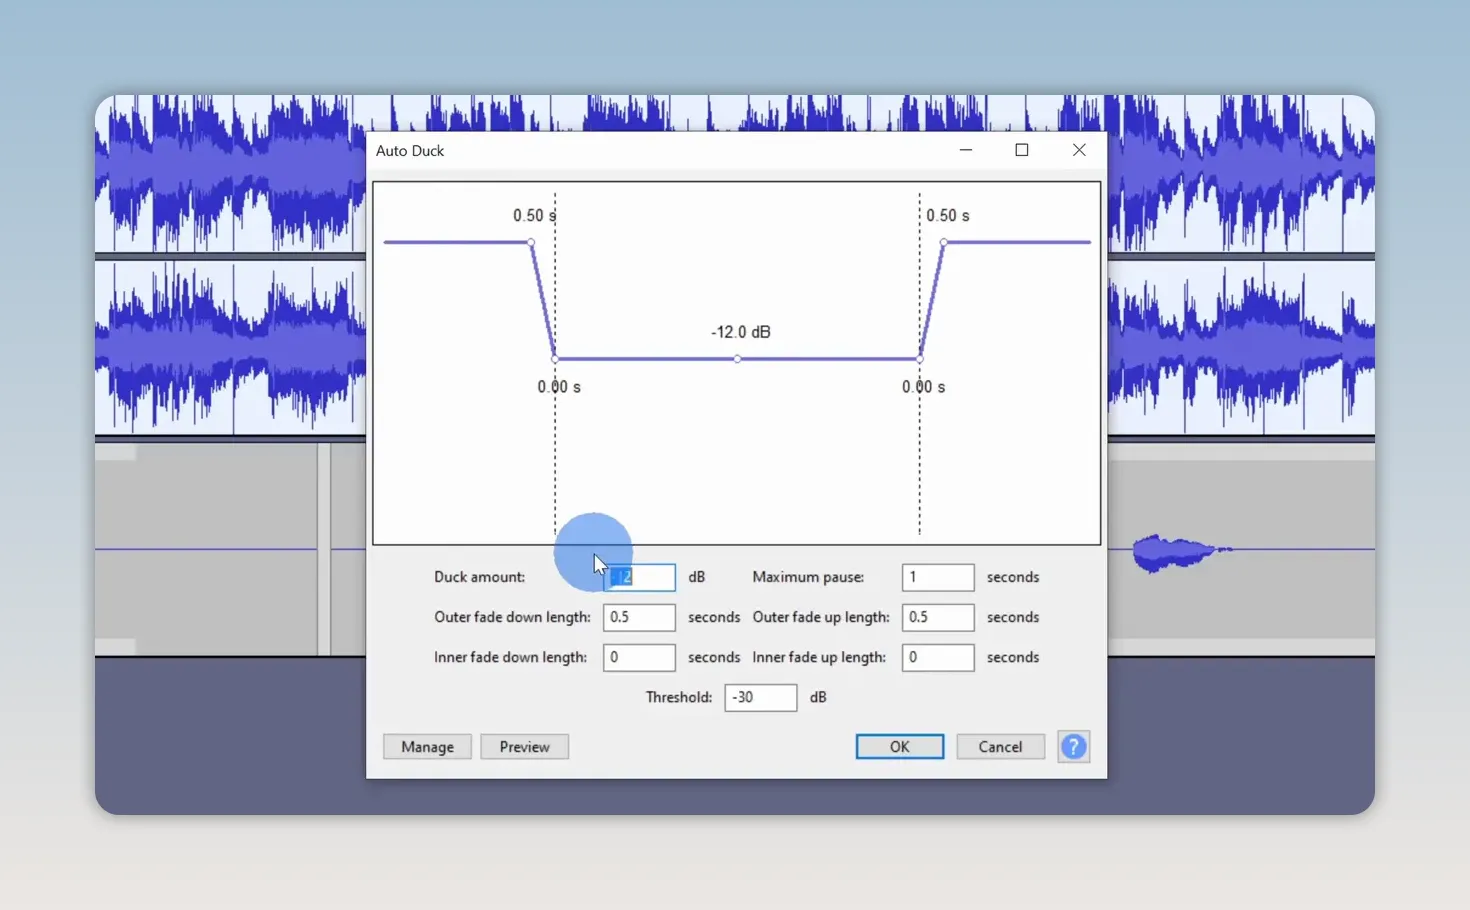
After processing, the music waveform becomes smaller wherever the voice is active and larger during the pauses.
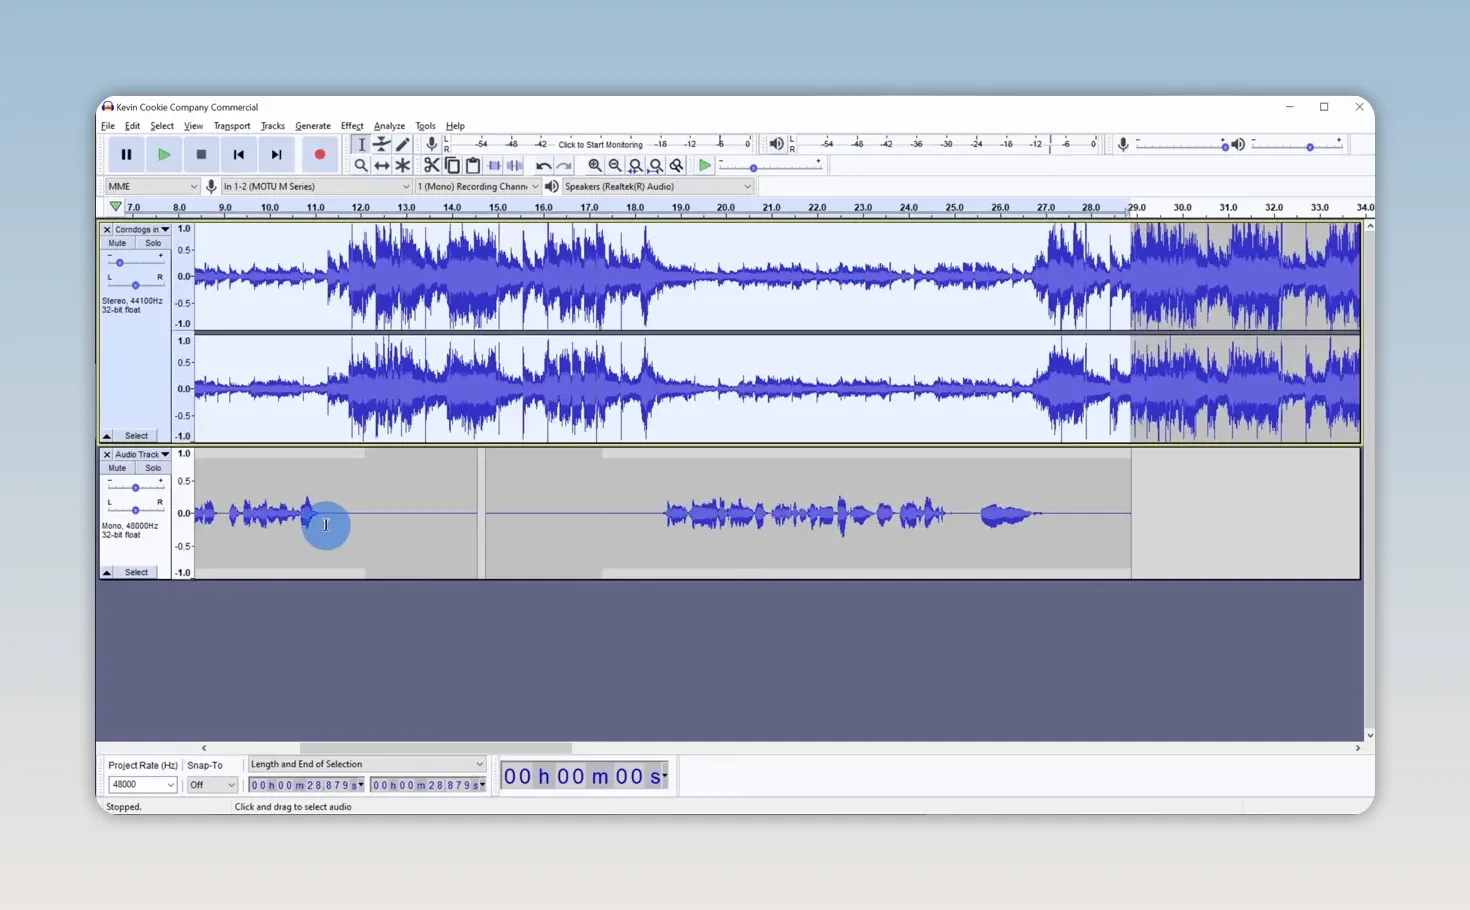
This gives the speech more room without leaving the music unnecessarily quiet throughout the entire commercial. For more detail about the controls, the Audacity Auto Duck documentation is a useful reference.
Trim the Ending and Apply a Fade Out
The imported music lasts well over a minute, but the commercial needs to end at 30 seconds.
Zoom out to see the entire project, select the music after the 30-second mark, and press Delete. Then listen to the ending.
A straight cut can sound abrupt, especially in the middle of music. To soften it:
- Select the final portion of the music.
- Choose Effect > Fade Out.
- Play the ending again.
The waveform tapers toward silence instead of stopping suddenly. That small adjustment makes the ending feel much more intentional.
Reduce Background Noise and Smooth Out Speech
Use Noise Reduction with a room-noise sample
If your recording contains a steady fan or air-conditioner hum, Noise Reduction can help reduce it. This is where that room sound at the beginning becomes useful.
The process has two stages:
- Select a section containing only the unwanted background sound, without speech.
- Open Effect > Noise Reduction and click Get Noise Profile.
- Select the voice recording you want to clean up.
- Open Noise Reduction again.
- Choose the reduction settings and apply the effect.
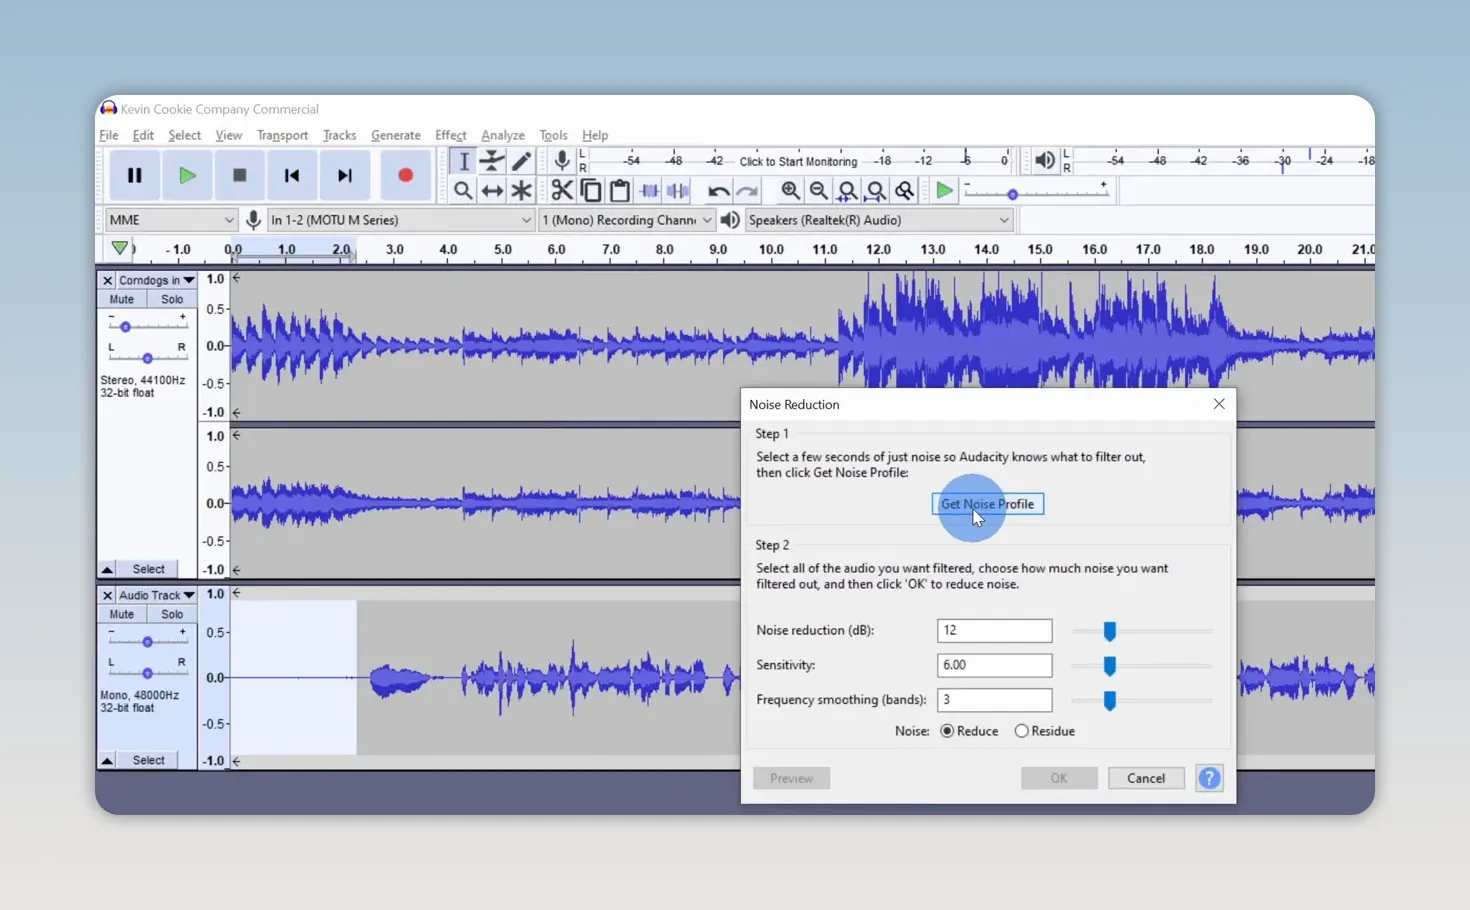
The noise profile tells Audacity what sound to target. The dialog also includes a mode for isolating the noise rather than keeping the cleaned-up recording, so make sure you’re using the reduction option for the finished voice track.
My recording room is already quiet, so the difference is subtle. The result depends on the noise in your recording and the settings you use. Listen to the processed voice rather than assuming that stronger reduction is always better.
Use compression to reduce large volume differences
Even after amplifying the quiet closing line, individual words may still vary in level. Some words are emphasized, while others are much softer. That difference is called dynamic range.
A compressor reduces the difference between louder and quieter passages. With an appropriate output gain adjustment, it can make softer details easier to hear without allowing the loudest words to dominate.
Select the voiceover, then open Effect > Compressor. The dialog offers several controls for tailoring the response. For this example, I apply the default settings and listen to the result.
The goal is more consistent speech, not simply the largest possible waveform.
Audacity includes many other effects, including options to change speed and pitch. Experimenting is a good way to learn them, but apply each effect for a reason and check how it changes the sound.
Check the Finished Mix and Export WAV or MP3
Before exporting, play the entire commercial from beginning to end. Hear it as one finished piece rather than a collection of individual edits.
- Does the opening start at the right moment?
- Is every spoken line clear over the music?
- Do the cuts and pauses sound natural?
- Does the music rise between sentences without becoming distracting?
- Does the final fade end cleanly at the intended duration?
Once everything sounds right, save the project again. Then create the file you’ll distribute.
- Open File > Export.
- Choose an audio format.
- Enter a filename and select the destination.
- Review the format and encoding settings.
- Confirm the mixdown prompt if one appears.
- Add metadata if desired, then finish the export.
The main format choices in this example are:
- MP3: Uses lossy compression to create a smaller file, with a quality tradeoff that depends on the export settings.
- WAV: Can store uncompressed audio and generally creates a much larger file.
Since this commercial is only 30 seconds long, I choose WAV. The export dialog also offers encoding choices. In the example, I change the default 16-bit setting to a 32-bit option; choose the encoding that suits the intended destination rather than assuming a larger setting is always necessary.
Audacity then confirms that the separate tracks will be mixed into one stereo file. This creates the finished mix while the saved Audacity project remains the place to return for track-level editing.
You can also enter metadata such as an artist name and track title. Compatible audio applications can display those details. It’s fine to leave them blank if you don’t need them.
Once exported, the audio file is ready to email, upload, or send to its destination. We’ve gone from a raw microphone recording to an edited commercial with balanced music, consistent speech, controlled pauses, and a clean ending. Finally, the world can hear about these cookies.
Made with VideoToBlog using 🔊 How to use Audacity to Record & Edit Audio | Beginners Tutorial


