Your data contains all sorts of hidden insights. SQL gives you a way to get to them, whether you need a customer list, a report of your largest orders, or a breakdown of revenue by customer.
When I worked at Microsoft as a product manager on office.com, I used SQL to answer questions like how many people clicked a particular button. That information helped us decide whether to make the button more prominent or move it somewhere else. Without the data, we would have been guessing.
You do not need a computer science degree or any previous SQL experience to get started. We’ll use free tools and a sample database from the Kevin Cookie Company. Yes, even a cookie company needs to keep track of its customers and orders. We’re not writing everything down on paper.
This tutorial focuses on retrieving data for reporting and analysis. You’ll learn how to select, filter, combine, sort, and summarize data, then use a visual query designer to put those pieces together with less typing.
What You'll Learn
- Set up free SQL Server tools and restore a sample database for hands-on practice.
- Retrieve, filter, and sort records using readable SQL queries.
- Connect related tables with joins and summarize data with aggregate functions.
- Use SSMS Query Designer to generate SQL through a visual interface.
Table of Contents
- What Is SQL?
- Install SQL Server and SQL Server Management Studio
- Restore the Kevin Cookie Company Sample Database
- Understand Tables, Keys, and Relationships
- Write Your First SELECT Query
- Filter Data with WHERE
- Combine Tables with JOIN
- Sort Results with ORDER BY
- Use Functions for Dates, Counts, and Totals
- Summarize Data with GROUP BY
- Build Queries Visually with Query Designer
- Turn Database Records into Useful Answers
What Is SQL?
SQL stands for Structured Query Language. You can pronounce it “S-Q-L” or “sequel.” It is a language for interacting with databases.
SQL can retrieve data, filter results, sort records, and combine information from multiple tables. It can also create database objects and add, update, or delete data, but those operations are outside our focus here.
A relational database organizes data into tables that can be connected through related values. At the Kevin Cookie Company, for example, we have customer information, orders, and product information. Instead of keeping everything in one enormous file, we separate those subjects into related tables.
The software that manages a relational database is called a relational database management system, or RDBMS. Popular options include Oracle, PostgreSQL, Microsoft SQL Server, and MySQL. They do like their acronyms.
We’ll use Microsoft SQL Server. I have a little Microsoft bias, but it is also a widely used option with free tools for learning. The core concepts transfer to other systems, although some syntax and functions differ. The PostgreSQL SQL tutorial, for example, covers many of the same foundational ideas in another database system.
Install SQL Server and SQL Server Management Studio
We need two separate pieces of software:
- Microsoft SQL Server: The database engine that stores and processes the data.
- SQL Server Management Studio, or SSMS: The graphical application we’ll use to connect to the engine, explore the database, and write queries.
Choose a free SQL Server edition
Open the SQL Server downloads page and find the Developer and Express editions. Either works for this exercise.
- Developer: Provides full functionality for development and testing, not for running production business workloads. This is the edition I’m using.
- Express: Can be used for production business purposes, but has resource and feature limits. For the SQL Server 2019 version used here, those include a 10 GB maximum relational database size and a four-core compute limit.
The exact limits and installer screens can vary by version, but neither edition’s limitations get in the way of these exercises.
Run the installer. You’ll find three installation choices:
- Basic: A straightforward installation using default settings.
- Custom: Lets you choose components and configure more installation options.
- Download Media: Downloads installation files that you can reuse on other machines.
Choose Basic for this walkthrough and complete the installation.
Confirm that SQL Server is running
You may finish installing and wonder where the application went. SQL Server runs as a service, so you should not expect a query window to appear on your desktop.
Open SQL Server Configuration Manager from the SQL Server program group. Check that the SQL Server service is running. Configuration Manager also provides controls to start, stop, pause, or restart the service.
If its start mode is Automatic, the instance starts when your PC boots. We only need to confirm that it is running; no configuration changes are necessary for this exercise.
Install SSMS and connect
Download and install SQL Server Management Studio, then launch it.
- In the connection dialog, select your installed SQL Server instance.
- For the default local installation used here, the server name is the PC’s name. If it is not filled in, use the server-name dropdown and choose Browse for more, then expand Database Engine.
- Leave authentication set to Windows Authentication.
- Click Connect.
Once connected, you’ll see Object Explorer on the left. It displays the server and folders such as Databases and Security. You can connect to additional servers from Object Explorer or disconnect when you no longer need a connection. For now, we’ll work with one local server and its Databases folder.
Restore the Kevin Cookie Company Sample Database
Rather than building a database from scratch, we’ll restore one that already contains data. Download the Kevin Cookie Company sample database backup.
- In Object Explorer, right-click Databases and select Restore Database.
- Choose Device as the source.
- Click the ellipsis button, then choose Add.
- Locate and select the downloaded backup file.
- Confirm the file selection and click OK to restore the database.
After the successful restore message appears, expand KCC under Databases, then expand Tables. You should find four tables: Customers, Orders, Order_Product, and Product.
If you want to compare the underlying data in a familiar format, there is also a sample Excel workbook with the flat file and separate tables.
Understand Tables, Keys, and Relationships
Before writing queries, it helps to understand how the data fits together. That makes it much easier to ask the database the right questions.
Why use separate tables?
Imagine one giant file containing every order, the customer’s name and address, and each cookie’s details. Every time a customer placed another order, their contact information would repeat. Product names would repeat again and again, too.
Instead, an order can store a customer ID, such as customer 5. The Customers table stores the details for customer 5. We can connect the two when we need the customer’s name or phone number.
This organization reduces unnecessary repetition. The process is called normalization. In our sample database:
- Customers contains customer details and contact information.
- Orders contains order information and a reference to the customer.
- Order_Product connects orders to the products included in them.
- Product contains product information.
Fields, records, and schemas
Right-click the Customers table and choose Select Top 1000 Rows. SSMS generates a query and displays the results underneath it.
The results look a lot like a spreadsheet. Columns are also called fields, and rows are also called records.
Notice that information such as address, city, and state is stored in separate fields. Keeping those values separate makes it easier to filter and retrieve just the information you need, such as every customer in a particular state.
You’ll also see table names beginning with dbo.. This is the schema name. A schema groups database objects and can also be used when managing access. We’ll stick with the default dbo schema.
Primary keys identify individual records
A primary key uniquely identifies a record. It may consist of one column or a combination of columns.
Could a customer’s name be the primary key? Not reliably. In our sample, Tres Delicious appears twice because it has two different headquarters. Phone numbers and addresses can repeat, too.
The CustomerID identifies a specific customer record without that ambiguity.
In Orders, the primary key is OrderID. A customer can place multiple orders, so CustomerID repeats there and cannot uniquely identify an order.
In Order_Product, the combination of OrderID and CookieID forms the primary key. Neither column identifies an individual record on its own.
Use a database diagram to see the connections
Expand Database Diagrams under KCC and open the included diagram. You can also right-click that folder to create a new diagram.
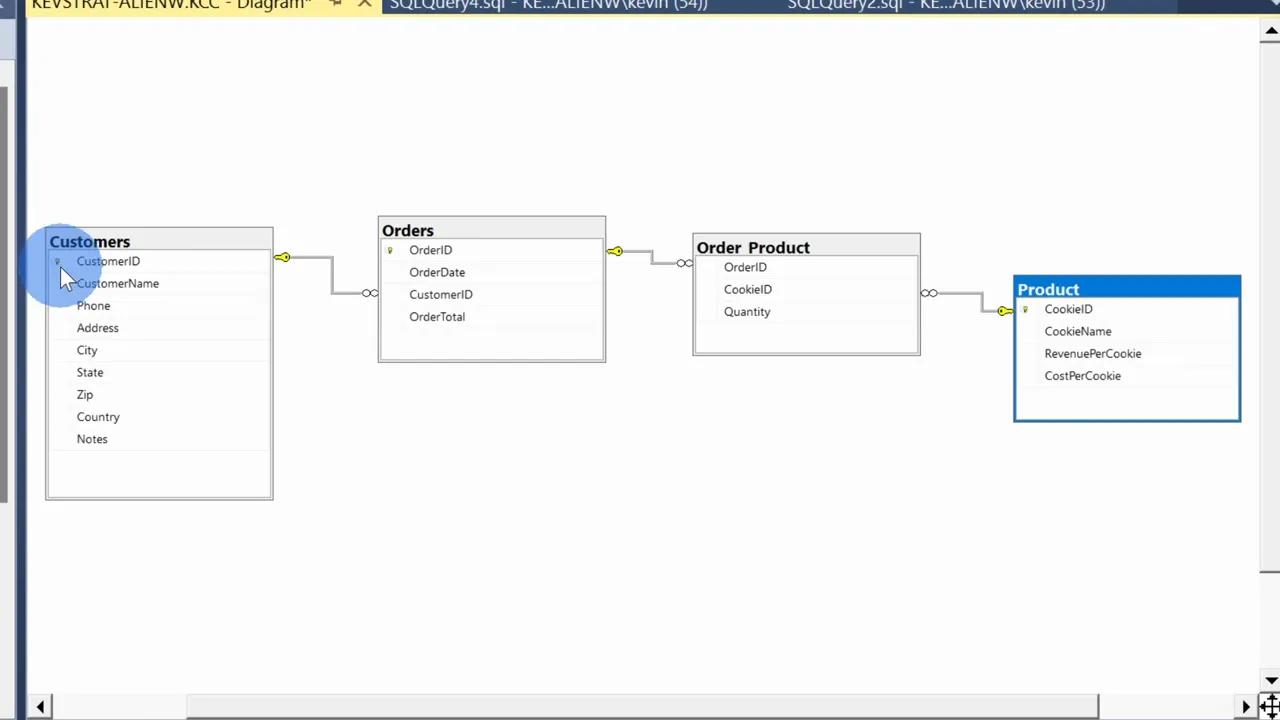
The key icons indicate primary keys. The relationship lines show how the tables connect:
- One customer can have many orders.
- One order can include many products through Order_Product.
- One product can appear in many order-product records.
The infinity symbol marks the “many” side of a one-to-many relationship. This diagram becomes particularly useful when we start joining tables.
Check column names and data types
In Object Explorer, expand a table and then expand Columns to inspect its fields. You can also right-click the table and choose Design to see column names and data types.
Data types matter when writing conditions. For example, CustomerID is an integer, so it represents a whole number, not a letter or customer name.
Write Your First SELECT Query
Click New Query or press Ctrl+N. Check that the database dropdown above the editor is set to KCC.
To retrieve customer names, enter:
SELECT CustomerName
FROM dbo.Customers;
SELECT identifies the data you want. FROM identifies the table it comes from.
Click Execute or press F5. You should get a list of customer names. That’s your first query. Not too bad, right?
Retrieve multiple columns
Separate column names with commas. To include the notes associated with each customer:
SELECT CustomerName, Notes
FROM dbo.Customers;
Keep Object Explorer’s Columns folder expanded while you work. It gives you a handy reference for the exact field names.
Specify the database explicitly
If you switch the active database to master and run the same query, it fails because that database does not contain dbo.Customers.
You can avoid relying on the dropdown by including the database name:
SELECT CustomerName, Notes
FROM KCC.dbo.Customers;
The three parts identify the database, schema, and table. The remaining examples assume that KCC is selected in the database dropdown.
Make column headings readable with aliases
An alias changes a result’s column heading without renaming the underlying database column:
SELECT CustomerName AS [Customer Name]
FROM dbo.Customers;
Here, the square brackets let us include a space in the heading.
Return unique values with DISTINCT
To get each customer name only once:
SELECT DISTINCT CustomerName
FROM dbo.Customers;
Tres Delicious now appears once in the results. DISTINCT removes duplicate values from the result, not records from the database.
Select every column or limit the number of rows
The asterisk selects all columns:
SELECT *
FROM dbo.Customers;
For a small sample, add TOP:
SELECT TOP (3) *
FROM dbo.Customers;
This returns up to three records. It does not mean the three largest or most recent records unless you also specify an appropriate sort order.
Below the query, SSMS shows whether execution succeeded. The status area also reports the number of rows returned and execution time, which becomes useful as queries grow more complex.
Filter Data with WHERE
Retrieving everything is a useful starting point, but analysis usually means narrowing the results. A WHERE clause specifies which records to include.
Find an exact text value
To find customers in Washington:
SELECT *
FROM dbo.Customers
WHERE State = 'Washington';
Text values go inside single quotation marks. This query returns the sample customer based in Seattle, Washington.
Spaces, indentation, and line breaks make queries easier to read without changing their meaning. You can also add comments:
-- Return customers in Washington state.
SELECT *
FROM dbo.Customers
WHERE State = 'Washington';

/* This is another way to write a comment. */
Exclude a value
Use <> for “not equal to”:
SELECT *
FROM dbo.Customers
WHERE State <> 'Washington';
SQL Server also accepts != for the same comparison. In the sample data, this returns the five other customer records.
Match alternatives with OR and IN
Use OR when either condition can qualify a record:
SELECT *
FROM dbo.Customers
WHERE State = 'Washington'
   OR State = 'New York';
As you add more alternatives, IN makes the condition easier to read:
SELECT *
FROM dbo.Customers
WHERE State IN ('Washington', 'New York', 'Utah');
To exclude those states instead, use NOT IN:
SELECT *
FROM dbo.Customers
WHERE State NOT IN ('Washington', 'New York', 'Utah');
Require multiple conditions with AND
To find the Tres Delicious customer record located in the United States, both conditions must be true:
SELECT *
FROM dbo.Customers
WHERE CustomerName = 'Tres Delicious'
  AND Country = 'United States';
You can combine AND and OR, but be deliberate about grouping. To require the customer name and allow either of two countries:
SELECT *
FROM dbo.Customers
WHERE CustomerName = 'Tres Delicious'
  AND (
      Country = 'United States'
      OR Country = 'France'
  );
Parentheses make the intended logic explicit. Without them, SQL evaluates AND before OR, which could include other customers in France rather than restricting both country choices to Tres Delicious.
Find text patterns with LIKE
What if you want customer names beginning with A rather than one exact name?
SELECT *
FROM dbo.Customers
WHERE CustomerName LIKE 'A%';
The percent sign matches any number of characters after the A. In the sample database, two customer names match.
Use NOT LIKE 'A%' to return names that do not begin with A.
Filter numeric values and ranges
Switch to the Orders table. To retrieve orders exceeding $1,000:
SELECT *
FROM dbo.Orders
WHERE OrderTotal > 1000;
You can also use >= for greater than or equal to, < for less than, and <= for less than or equal to.
For a range, use BETWEEN:
SELECT *
FROM dbo.Orders
WHERE OrderTotal BETWEEN 1000 AND 2000;
BETWEEN includes both endpoints. Orders totaling exactly $1,000 or exactly $2,000 qualify.
Combine Tables with JOIN
The Orders table tells us which customer ID placed an order, but an ID alone is not especially helpful if we need to call that customer. The customer’s name and phone number live in Customers.
A JOIN brings related information together:
SELECT
    O.OrderID,
    O.OrderDate,
    O.OrderTotal,
    C.CustomerName,
    C.PhoneNumber,
    C.CustomerID
FROM dbo.Orders AS O
INNER JOIN dbo.Customers AS C
    ON O.CustomerID = C.CustomerID;
There are three important pieces here:
- The selected columns: We retrieve order information from Orders and contact information from Customers.
- The table aliases:
OandCare shorter names for the two tables. - The join condition:
ON O.CustomerID = C.CustomerIDdefines how records match.
Simply adding CustomerName to a query against Orders is not enough. You must also join the table that contains it.
INNER JOIN returns matching records
An INNER JOIN returns records where the join condition finds a match on both sides. In this example, it returns orders with matching customer records.
A customer without orders does not appear. An order without a matching customer would not appear either.
Writing JOIN by itself is equivalent to writing INNER JOIN.
RIGHT OUTER JOIN keeps every record on the right
Replace INNER JOIN with RIGHT OUTER JOIN in the example to keep every customer, whether or not they have an order.
Customers is the right-hand table in that query. The sample results now include one customer without an order. Its order-related fields show NULL because there is no matching order record.
LEFT OUTER JOIN keeps every record on the left
Using LEFT OUTER JOIN instead keeps every order because Orders is the left-hand table.
In our sample, every order has a matching customer, so the result looks the same as the inner join. If an order lacked a matching customer, its customer-related fields would contain NULL.
The important question is: Which side’s records do I need to preserve when no match exists?
Resolve ambiguous column names
Both tables contain CustomerID. If you select that name without specifying a table, SQL Server reports an ambiguous column name.
Use the table alias to clarify which one you mean: C.CustomerID selects it from Customers, while O.CustomerID selects it from Orders. Qualifying columns also makes the query easier to follow.
Sort Results with ORDER BY
To organize orders by their total, add ORDER BY at the end of the query:
SELECT OrderID, OrderDate, OrderTotal
FROM dbo.Orders
ORDER BY OrderTotal;
The default is ascending order, from smallest to largest. You can state that explicitly with ASC.
To put the largest orders first, use DESC:
SELECT OrderID, OrderDate, OrderTotal
FROM dbo.Orders
ORDER BY OrderTotal DESC;
You can add the same clause to the joined query, using ORDER BY O.OrderTotal DESC.
Use Functions for Dates, Counts, and Totals
SQL Server includes functions that perform common tasks, such as getting the current date, counting records, and adding values together. Microsoft’s SQL Server functions reference provides a broader list.
Create a rolling date filter
Suppose you want orders from the past month. You could type a specific cutoff date, but you would need to update it each time you run the report.
Instead, calculate the cutoff:
SELECT *
FROM dbo.Orders
WHERE OrderDate >= DATEADD(month, -1, GETDATE());GETDATE()returns the current date and time.DATEADD(month, -1, GETDATE())subtracts one month from that value.- The
WHEREclause keeps orders on or after the calculated cutoff.
Run it again next week and the cutoff updates automatically. This is a rolling one-month cutoff, not the previous full calendar month.
Because the sample data contains historical orders, your current-date results may differ or contain no matching records. That does not necessarily mean the query is wrong.
Count orders with COUNT
To return the number of matching orders instead of every order record:
SELECT COUNT(*) AS [Order Count]
FROM dbo.Orders
WHERE OrderDate >= DATEADD(month, -1, GETDATE());
COUNT(*) counts the rows that match the filter. When I ran this against the sample at the time of the demonstration, it returned 16 orders.
Add order totals with SUM
To calculate revenue for the same period:
SELECT SUM(OrderTotal) AS [Total Revenue]
FROM dbo.Orders
WHERE OrderDate >= DATEADD(month, -1, GETDATE());
The sample returned more than $17,000 for that period. Not too bad for a cookie company.
Summarize Data with GROUP BY
A single total is useful, but what if you want revenue broken down by customer? That is where GROUP BY comes in.
SELECT
    CustomerID,
    SUM(OrderTotal) AS [Total Revenue]
FROM dbo.Orders
WHERE OrderDate >= DATEADD(month, -1, GETDATE())
GROUP BY CustomerID;
The filter first restricts the matching orders. The grouping then collects them by customer ID, and SUM calculates a separate total for each group.
Notice that CustomerID appears in both SELECT and GROUP BY. It identifies the groups, while SUM(OrderTotal) summarizes the values within each group.
Build Queries Visually with Query Designer
Now for a handy shortcut. SSMS includes a Query Designer that generates SQL as you choose tables, columns, filters, and grouping options.
Knowing the SQL basics is still valuable because you can understand and check what it produces. But you do not have to type every part of a query yourself.
Select tables and columns
- Open a new query window.
- Right-click inside the editor and choose Design Query in Editor.
- Select Customers and Orders. Hold Ctrl to select both.
- Click Add, then close the table-selection dialog.
- Select CustomerName, OrderID, OrderDate, and OrderTotal from the displayed tables.
The designer displays the tables and their relationship at the top, selected fields in a grid, and generated SQL underneath.
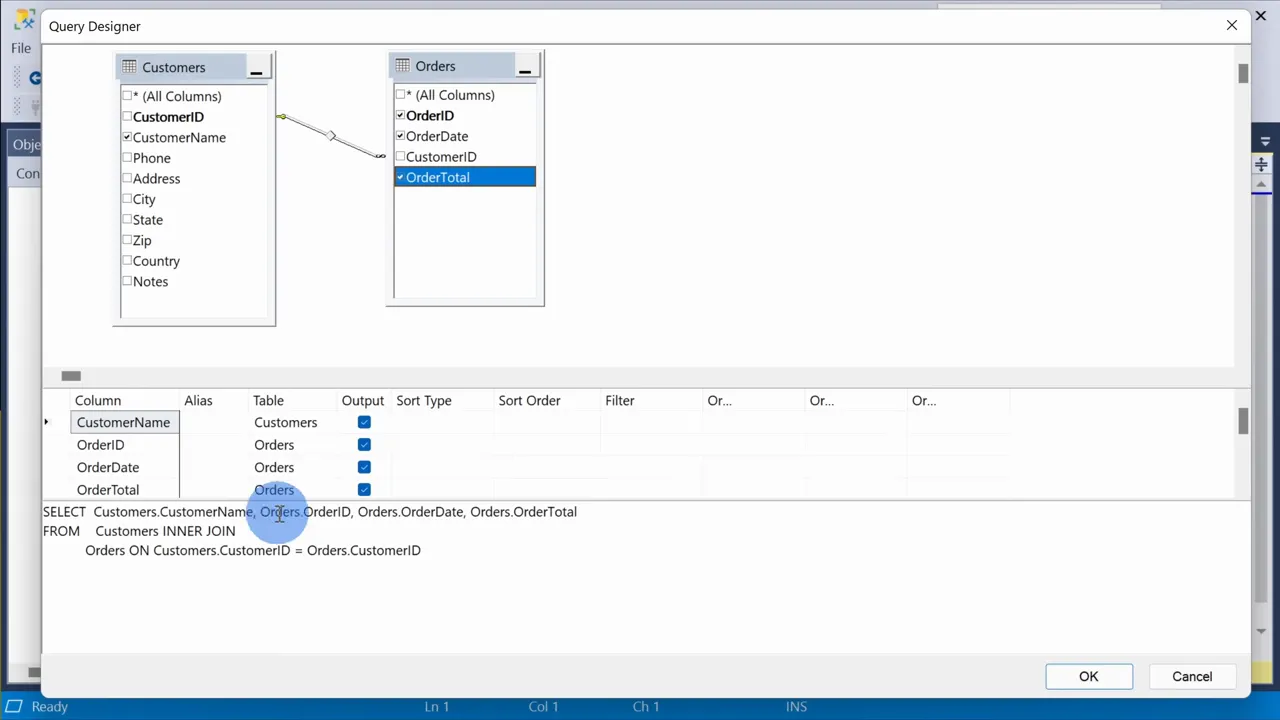
Click OK, then execute the generated query. You’ll get customer names alongside their order IDs, dates, and totals.
Add aliases, filters, and sorting
To reopen an existing query in the designer, highlight it in the editor, right-click, and choose Design Query in Editor.
From the grid, you can:
- Add an alias: Enter Customer Name in the Alias field to create a readable heading.
- Filter records: Add a condition in the Filter field for OrderDate. The demonstration used a fixed cutoff of February 18, 2022.
- Hide a filtered field: Clear the Output checkbox for OrderDate to keep its filter without displaying the date in the results.
- Sort results: Choose a sort type and, when sorting multiple fields, a sort order.
The generated SQL changes as you adjust those settings. A fixed date remains fixed, though. For a reusable rolling report, use the DATEADD and GETDATE expression introduced earlier.
Build a grouped revenue query
You can also summarize results visually:
- Right-click the designer’s diagram area and enable Group By.
- Keep CustomerName as the grouping field.
- Set OrderTotal to Sum.
- Remove OrderID so the report summarizes by customer rather than individual order.
- Keep the date condition as a filter rather than another grouping field.
- Click OK and execute the generated SQL.
The result shows customer names with their summed order totals for the selected period. That is a fairly involved query assembled through a visual interface.
Turn Database Records into Useful Answers
You now have the building blocks for practical SQL reporting: SELECT chooses fields, WHERE filters records, JOIN connects tables, ORDER BY sorts results, and aggregate functions with GROUP BY turn individual records into summaries.
A good way to practice is to change one part of a working query at a time. Choose another state, adjust an order-total range, switch a join type, or change the grouping. Then check whether the results answer the question you intended to ask.
SQL is approachable once you break it into those pieces. And being able to get answers directly from your data is a pretty useful superpower to have at work.
Made with VideoToBlog using SQL Tutorial for Beginners


