You can make text float above your hand, turn a sentence into a song, or ride a bike behind a tree and come out running on the other side. Those effects might sound complicated, but CapCut gives you some surprisingly simple tools to pull them off.
These are 11 of my favorite CapCut tips, from a quick setting that saves time on every project to masks that combine two moments into one convincing scene. The walkthroughs use both desktop and mobile. Menu names and feature availability can vary by version, so use the named tools as your guide.
What You'll Learn
- Disable the default mobile ending and use automatic tools to speed up repetitive editing tasks.
- Layer videos with overlays, automatic cutout, and chroma key to combine footage.
- Use keyframes for gradual animation and tracking to attach text to moving objects.
- Align actions and apply a split mask to create a convincing transformation effect.
Table of Contents
- 1. Remove the Default CapCut Logo Ending
- 2. Choose Between CapCut Mobile, Web, and Desktop
- 3. Convert Text to Speech, or Even a Song
- 4. Edit to the Beat with Match Cut
- 5. Overlay One Video on Another
- 6. Use a Green Screen with Chroma Key
- 7. Animate Zooms and Pans with Keyframes
- 8. Generate and Style Auto Captions
- 9. Add a Punch-In Jump Cut
- 10. Make Text Follow a Moving Object
- 11. Combine Clips with Masks for a Transformation Effect
- Build on the Basics
1. Remove the Default CapCut Logo Ending
When you create a new project on mobile, CapCut can automatically add an ending clip with its logo. You can select that clip on the timeline and delete it, but there’s an easier way if you never want it included.
- Return to the CapCut home screen.
- Tap the settings gear.
- Turn off Add default ending and confirm if prompted.
New projects will no longer include that logo ending. It’s a small change, but it saves you from repeating the same cleanup step every time you start an edit.
This setting controls the automatically added ending clip, not every possible type of branding.
2. Choose Between CapCut Mobile, Web, and Desktop
CapCut isn’t just a mobile video editor. You can also edit in a browser or install the desktop app for Windows or Mac. You can find the available options through CapCut’s website.
The biggest workflow difference is where your media lives:
- Web: Choose Get started for free to open the browser editor. You need to upload your clips to the cloud before using them in your project.
- Desktop: Download the Windows or Mac app to work with clips stored locally on your computer, without uploading them first.
- Mobile: Edit directly on your phone and use the mobile workflows described throughout this guide.
In the versions used for these examples, mobile had the broadest feature set, desktop was close behind, and the web editor was the most basic. The important point is that the three experiences aren’t necessarily identical. If you can’t find a tool on one platform, check which version the steps use.
3. Convert Text to Speech, or Even a Song
CapCut can read your text aloud, but some of its voice options go a step further: they sing it. The vocalist voices are some of my favorites because even a very ordinary sentence can suddenly sound pretty epic.
- Add a text object to your project.
- Type the words you want spoken or sung.
- Keep the text object selected and open Text-to-speech.
- Preview the available voices.
- Choose a standard voice for speech or a vocalist option for singing, then generate the audio.
For my example, I use a completely unbiased sentence: “Kevin is the best.” A regular voice reads it aloud. A vocalist turns it into a little musical performance.
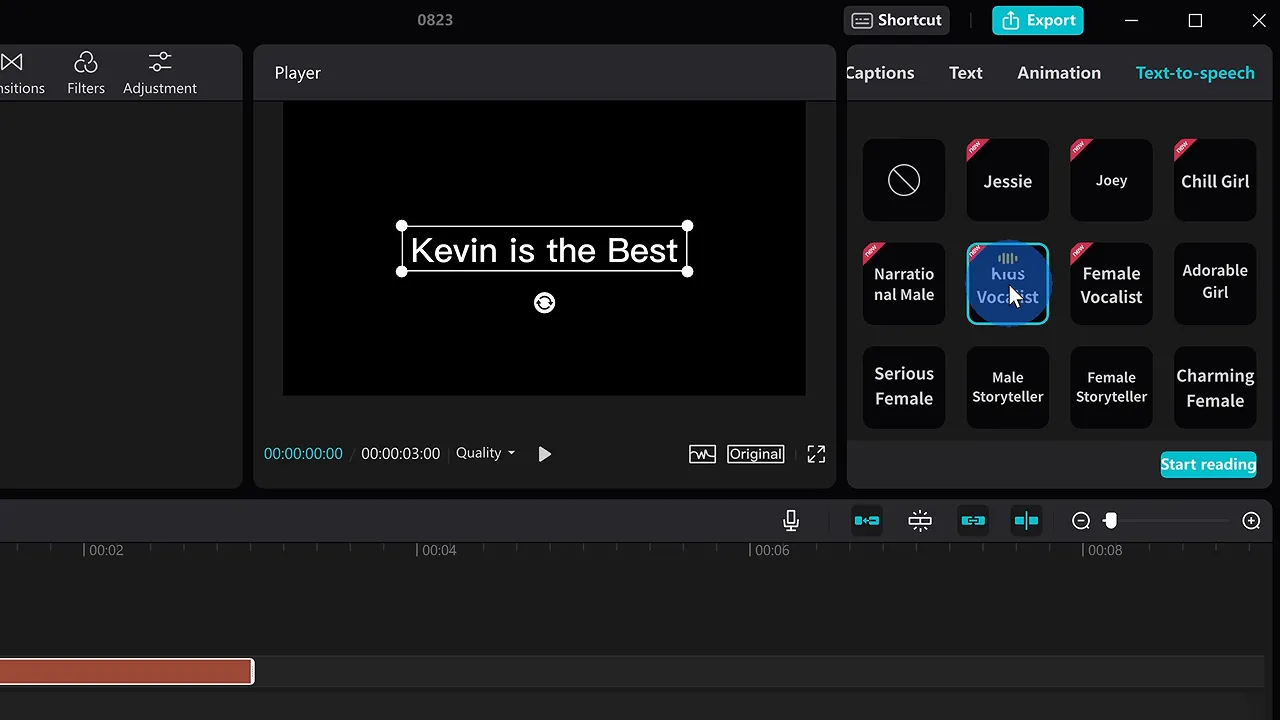
Once generated, the result appears as a separate audio clip on the timeline. That makes the distinction useful: the text object controls what appears on screen, while the generated audio occupies its own track.
4. Edit to the Beat with Match Cut
Cutting between clips on the beat can make a sequence feel much more connected to its music. Instead of finding every beat yourself, you can have CapCut identify them.
This example uses Match cut on mobile.
- Add your video clips and a song to the timeline.
- Tap the song to open its audio tools.
- Select Match cut.
- Choose Auto detect.
- Return to the main timeline and adjust your video clip boundaries to the beat markers.
CapCut marks the detected beats with little yellow dots. As you adjust your clips, their edges can snap to those dots, making it much easier to line up each change with the music.
You can also add beats manually in Match cut. I prefer letting automatic detection do the heavy lifting first.
5. Overlay One Video on Another
An overlay, also called picture-in-picture, lets two videos appear at the same time. The basic idea is simple: place one clip on a track above another, then resize the upper clip so the lower one is visible.
Create picture-in-picture on desktop
- Drag your background video onto the timeline.
- Drag a second video onto a track above it.
- Select the upper clip.
- Use the handles in the preview to change its size.
- Move it to the position you want.
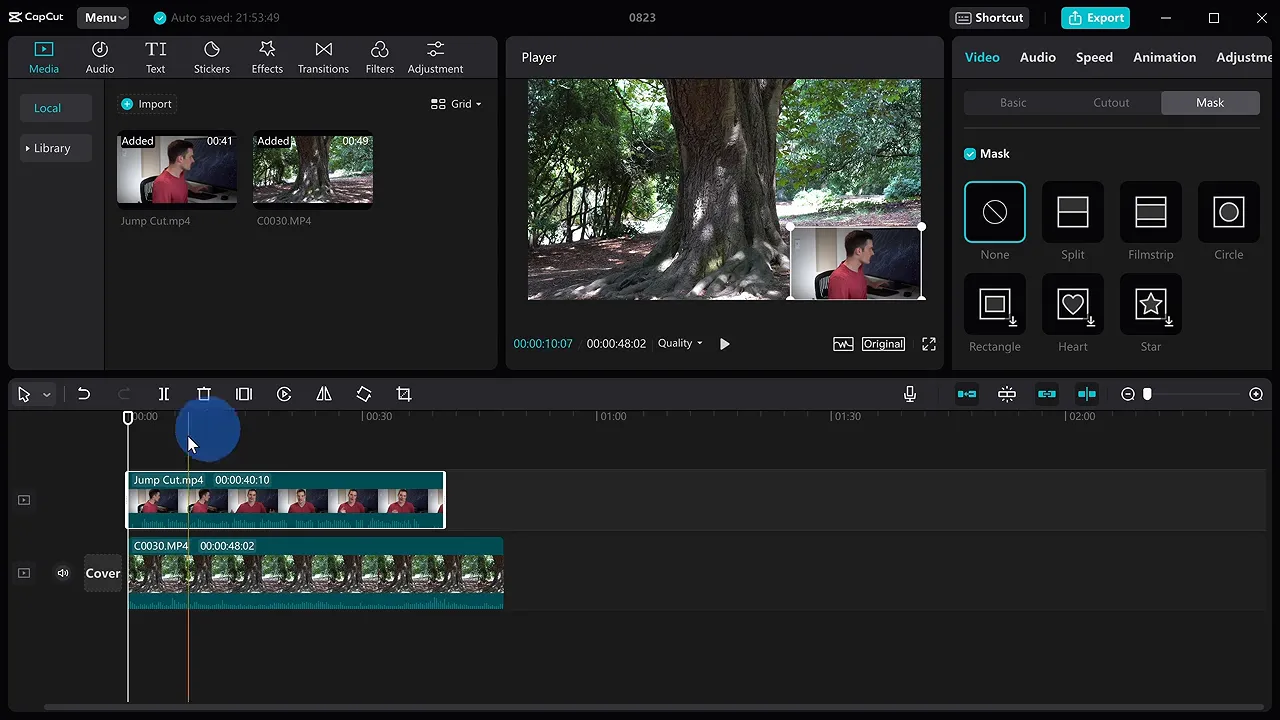
The upper clip appears in front of the lower clip. If the clips need to stay synchronized, align them carefully on the timeline. When both contain matching audio, use their waveforms to help line them up.
Remove the overlay’s background automatically
You don’t have to keep the upper video inside a rectangular box. On desktop, select that clip, open Video > Cutout, and enable Auto cutout. CapCut removes the background around the person, allowing the lower video to show through.
On mobile, select a clip and choose Overlay to move it onto another track. For automatic background removal, select the clip, open Remove background, then choose Remove background again.
It’s a pretty cool way to place yourself over another scene without first recording against a green screen.
6. Use a Green Screen with Chroma Key
Automatic cutout is convenient, but I personally prefer a green screen when I want a cleaner result. It requires a physical screen and some preparation, but CapCut supports the technique on both desktop and mobile.
The process is called chroma key compositing: you select a background color to remove so another video can appear underneath.
Here’s the desktop workflow:
- Place your replacement background on the lower video track.
- Place the green screen recording on the track above it.
- Select the upper clip and open Video > Cutout.
- Enable Chroma key rather than Auto cutout.
- Use the color picker to select the green background in the preview.
- Adjust the available strength and shadow controls to refine the result.
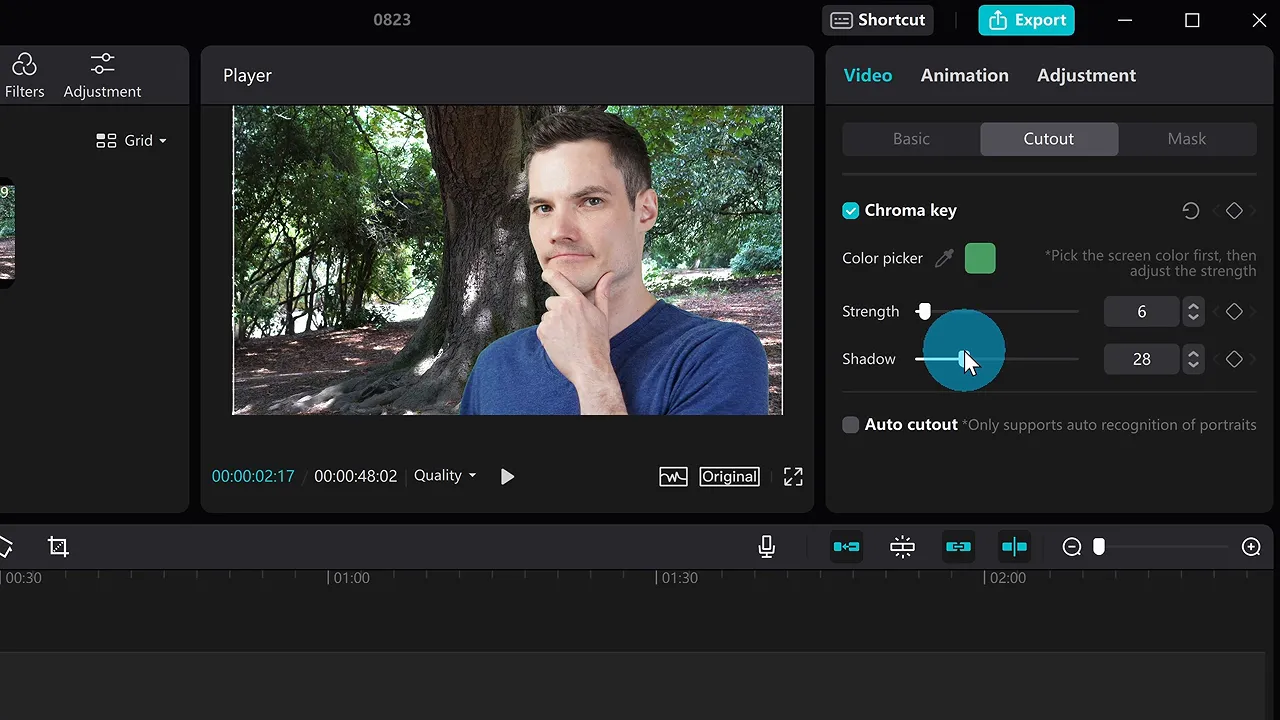
Even lighting makes a big difference. Try to light the green screen consistently across its surface. An evenly lit background gives you a better starting point when selecting and removing the green.
Both methods reveal the track underneath. The difference is that Auto cutout identifies the subject automatically, while chroma key removes the color you select.
7. Animate Zooms and Pans with Keyframes
Keyframes let you change a setting over time. You define its value at one point, define another value later, and CapCut creates the movement between them.
A gradual zoom is a good first example.
- Select your video clip and move the playhead to its beginning.
- Open Video > Basic.
- Next to Scale, click the diamond icon to add a keyframe.
- Leave the starting scale at 100%.
- Move the playhead to the end of the clip.
- Add another scale keyframe and increase the value to about 150%.
- Play the clip from the beginning.
The video now gradually enlarges from 100% to 150%. You aren’t manually changing the scale frame by frame. CapCut calculates those intermediate values for you.
The same principle applies to other properties:
- Position: Move the image across the frame to create a pan.
- Rotation: Change the clip’s angle over time.
- Blend: Animate supported blend settings.
- Audio volume: Change the sound level between different points.
Once you understand that a keyframe records a property’s value at a particular moment, the tool becomes much less mysterious.
8. Generate and Style Auto Captions
You don’t need to type every spoken line by hand. CapCut’s Auto captions tool analyzes your audio and creates text timed to the speech.
- Add a clip containing speech to your timeline.
- Open Text.
- Select Auto captions and start caption generation.
- Wait for CapCut to process the audio.
The generated captions appear over the video, with caption segments added to the timeline.
If the default appearance isn’t what you want, select a caption and change its text styling. Once it looks right, use the option to apply the style to all captions. That saves you from formatting each segment individually.
The useful combination here is automatic timing plus shared styling: CapCut handles the initial caption creation, and you control the visual treatment.
9. Add a Punch-In Jump Cut
A quick jump to a closer crop can emphasize a point, then return to the wider framing once that point is finished. Unlike a keyframed zoom, this change happens immediately rather than gradually.
You can create the effect by splitting a clip and enlarging only the middle section.
- Find the moment where you want the closer crop to begin.
- Press B to activate the blade tool, then split the clip at that point.
- Move to where you want the closer crop to end and split again.
- Press A to return to the selection tool.
- Select the section between the two cuts.
- Increase its Scale in the video settings.
On playback, the framing starts wide, jumps closer for the selected section, and returns to the original size afterward.
The two keyboard shortcuts make this especially quick: B for the blade tool, A for the selection tool.
10. Make Text Follow a Moving Object
Tracking is how you make text look as though it’s floating above your hand. Instead of manually repositioning it every time your hand moves, you tell CapCut what to follow.
This walkthrough uses text tracking on mobile.
- Add your video clip and a text object.
- Position the text where you want it relative to your hand.
- Select the text and open Tracking.
- Move the tracking target over your hand.
- Start tracking and let CapCut analyze the movement.
- Play the result to check how the text follows.
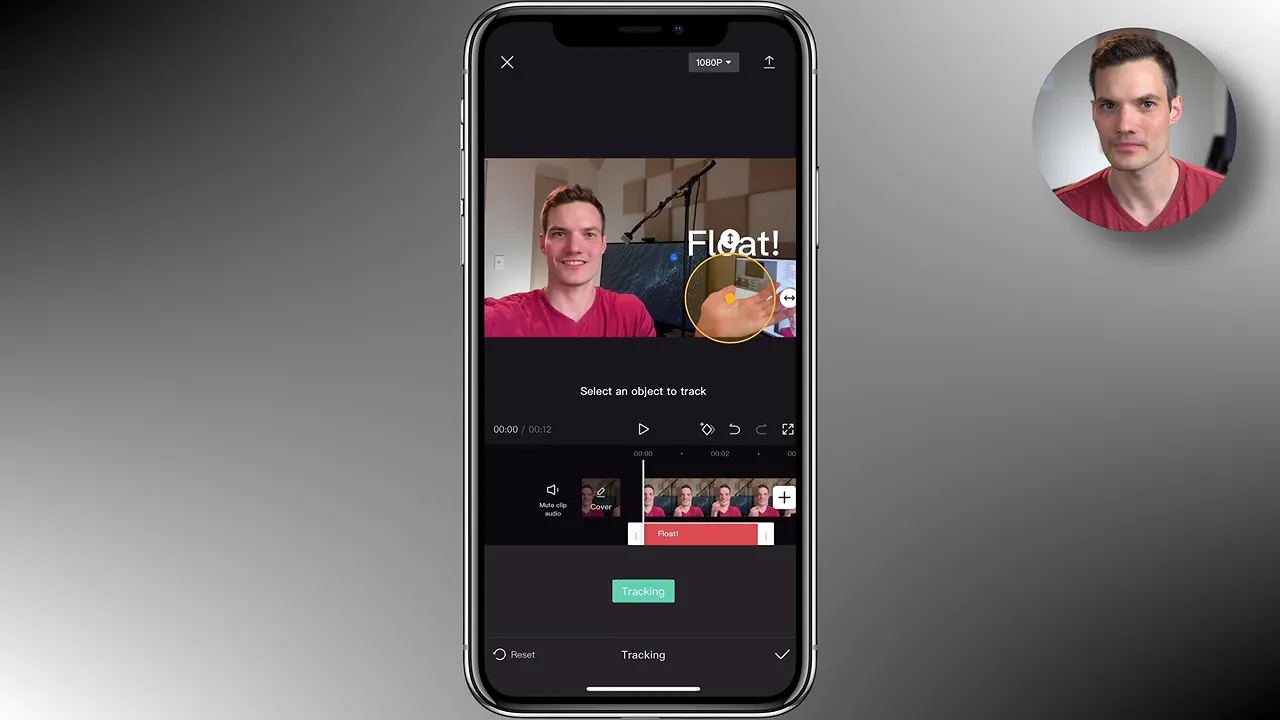
Once tracking is complete, the text moves with your hand, creating that floating-label effect. Your hand is only one possible target. The same idea applies to other objects you want the text to follow.
11. Combine Clips with Masks for a Transformation Effect
Masks are one of my favorite CapCut tools because they can create an effect that looks far more complicated than the edit behind it.
For this example, I ride a bike toward a large tree, disappear behind it, and jump out the other side on foot. The trick is to combine the biking portion and the running portion of a recording, using the tree to hide the join.
A mask controls which part of a clip is visible. The hidden portion becomes transparent, revealing the video on a lower track. Masks are available on both mobile and desktop; these steps use desktop.
Prepare the biking and running sections
The source recording contains both actions: first biking past the tree, then running past it. Add that recording to the timeline, then add a second copy so you can work with each action independently.
- In the biking section, find the exact moment when the cyclist begins emerging from behind the tree.
- Press B and split the clip at that moment.
- In the second copy, find the moment when the runner begins emerging from behind the same tree.
- Split that copy at the matching action point.
- Press A to return to selection mode and delete the unwanted sections.
- Move the retained sections so their emergence points line up in time.
You’re synchronizing the action, not the original recording timestamps. The cyclist and runner should reach the tree’s reveal point at the same moment in the edit.
Extend and align the two layers
Place the running section on the upper track and the biking section underneath it.
Extend the biking section backward so it starts with the bike entering the frame. Extend the beginning of the running section to match that start time. Then trim the end of the running section to the point where the runner leaves the frame, and match the biking section’s ending to it.
You should now have two overlapping clips with the same start and end times. They are aligned around the moment the subject emerges from behind the tree.
Apply a split mask along the tree
- Select the upper, running clip.
- Open Video > Mask.
- Choose Split.
- Rotate and position the split boundary so it follows the tree trunk.
- Place the boundary in a shadowed portion of the trunk to help hide the join.
- Add a little feathering to soften the mask edge.
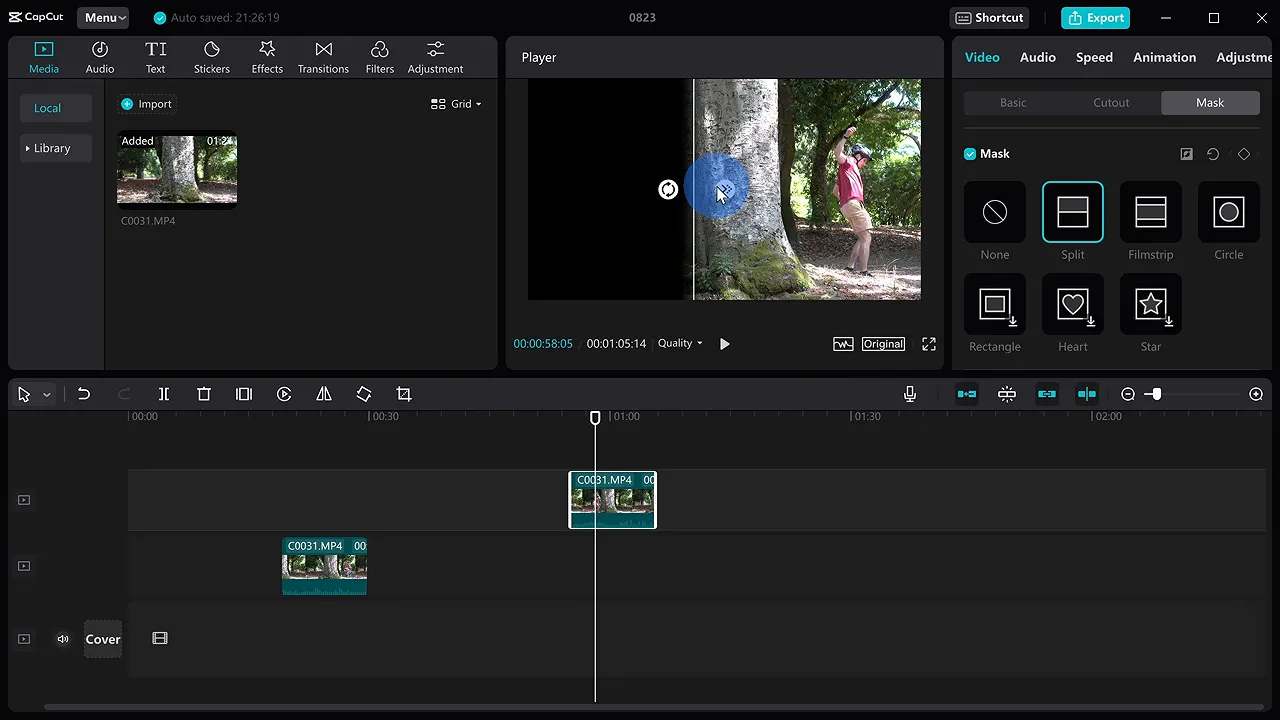
When the masked running clip is displayed by itself, the hidden area looks black. That area is actually transparent. Once the clip sits over the biking footage, the lower track shows through.
The finished composite uses:
- The lower biking clip on the left: The cyclist approaches and disappears behind the tree.
- The upper running clip on the right: The runner emerges from behind the tree and continues out of the scene.
The tree provides a natural place to conceal the switch. Positioning the mask in its shadow and adding a little feathering makes the boundary less noticeable.
Play the combined result, and the two separate actions become one neat illusion: bike in, jump out. That’s the magic of masks.
Build on the Basics
Some of these CapCut tricks save time, like disabling the default ending or styling all captions at once. Others give you more creative control, like keyframes, tracking, and masks.
The most useful distinction is knowing what each tool changes: overlays stack clips, cutouts remove backgrounds, keyframes animate settings, tracking follows movement, and masks reveal selected parts of a layer. Once those ideas click, you can start combining them into much more interesting edits.


