A free screen recorder should let you create a useful recording, not leave you with a watermark across the screen or force you to pay before you can export it. My priorities are straightforward: free recording, no watermarks, no restrictive recording limits, and high-quality output.
These five options take very different approaches. One comes preinstalled on Windows 10. Another is a video conferencing app you might already use. And my personal favorite, OBS Studio, gives you much more control over how your recording looks and sounds.
The important part is choosing the right tool for what you need to capture. Recording a single application is different from demonstrating your entire desktop, highlighting mouse clicks, or combining your screen with a webcam.
A note on versions: The features below describe the versions I tested. Free-plan terms, recording limits, and available controls can change, so check the current offering before relying on a tool for a long recording.
Table of Contents
- 1. Xbox Game Bar: Convenient Recording Without Another Download
- 2. Zoom: Screen Recording With Annotation Tools
- 3. FlashBack Express: An Easy Interface With Useful Recording Extras
- 4. Apowersoft Free Online Screen Recorder: Simple Controls, Plenty of Features
- 5. OBS Studio: My Favorite for Recording Quality and Control
- Which Free Screen Recorder Should You Choose?
1. Xbox Game Bar: Convenient Recording Without Another Download
If you use Windows 10, you probably already have a screen recorder installed. Search for Game Bar from the taskbar, or press Windows + G to open Xbox Game Bar.
The name makes it sound like it only records games. It can also capture supported applications, such as a browser window or a Word document. That makes it a handy option when you need a quick recording and do not want to install anything else.
How to record with Xbox Game Bar
- Open the application you want to record.
- Press Windows + G.
- Find the Capture widget, then select its recording button.
- Toggle the microphone on or off, depending on whether you want narration.
- Use the recording status control to stop when you are finished.
- Select the confirmation notification to open the saved recording in File Explorer.
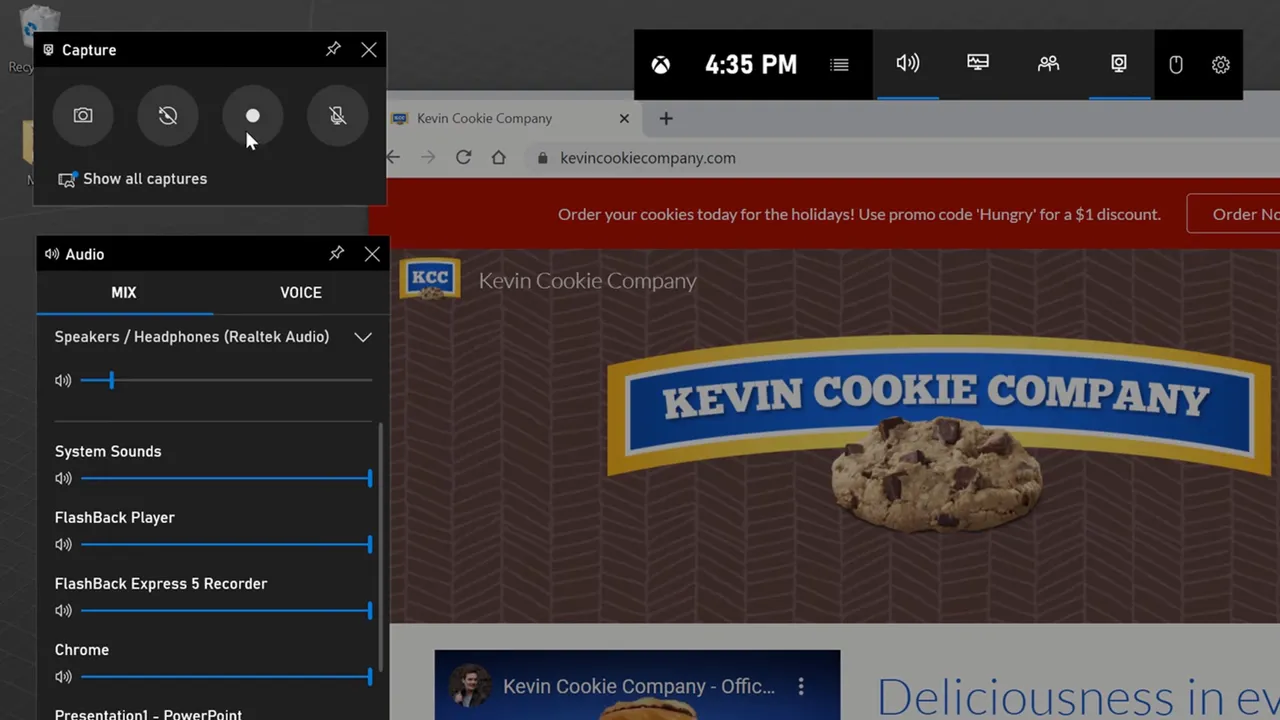
Game Bar includes audio controls so you can adjust sound levels. Its settings gear also lets you review and customize keyboard shortcuts.
For more recording options, search Windows for Game Bar settings. In the Windows 10 settings interface, the Captures section includes controls for recording length, audio quality, video frame rate, video quality, and whether to capture the mouse cursor.
Where Game Bar falls short
There is a reason to consider a dedicated screen recorder: Game Bar does not capture everything.
- No desktop or File Explorer recording: It is not suitable for a walkthrough that moves across those areas.
- Application menus can be a problem: In my testing, menus in applications such as Word, Excel, and PowerPoint did not record properly.
- No built-in video editor: Editing happens elsewhere.
- No cursor highlighting: It will not add a colored circle around your pointer to make it easier to follow.
My take: Game Bar is a great option in a pinch. Its biggest advantage is convenience, not flexibility. If the application you need is supported, you can get started without another download.
2. Zoom: Screen Recording With Annotation Tools
Yes, Zoom is a video conferencing app. But you can also use it to record your screen, and you do not need anyone else in the meeting.
What I particularly like here is the combination of screen sharing, optional camera video, and annotation tools. You can draw attention to something as you explain it, rather than leaving all the emphasis work for later.
How to use Zoom as a screen recorder
- Download, install, and open the Zoom desktop application.
- Select New Meeting to start a meeting by yourself.
- Select Record.
- Select Share Screen, then choose your entire screen or a specific application window.
- Select Share to begin capturing that content as part of the recording.
- Pause the recording when needed, or stop it when you are finished.
While sharing, move to the toolbar at the top of the screen to access additional controls. That floating sharing toolbar is not included in the recording. You can turn on your camera to include your video alongside the shared content.
The annotation tools let you draw on the screen and add stamps. For an explanation where you want to point out a button, mark an area, or emphasize a step, those tools are a nice addition.
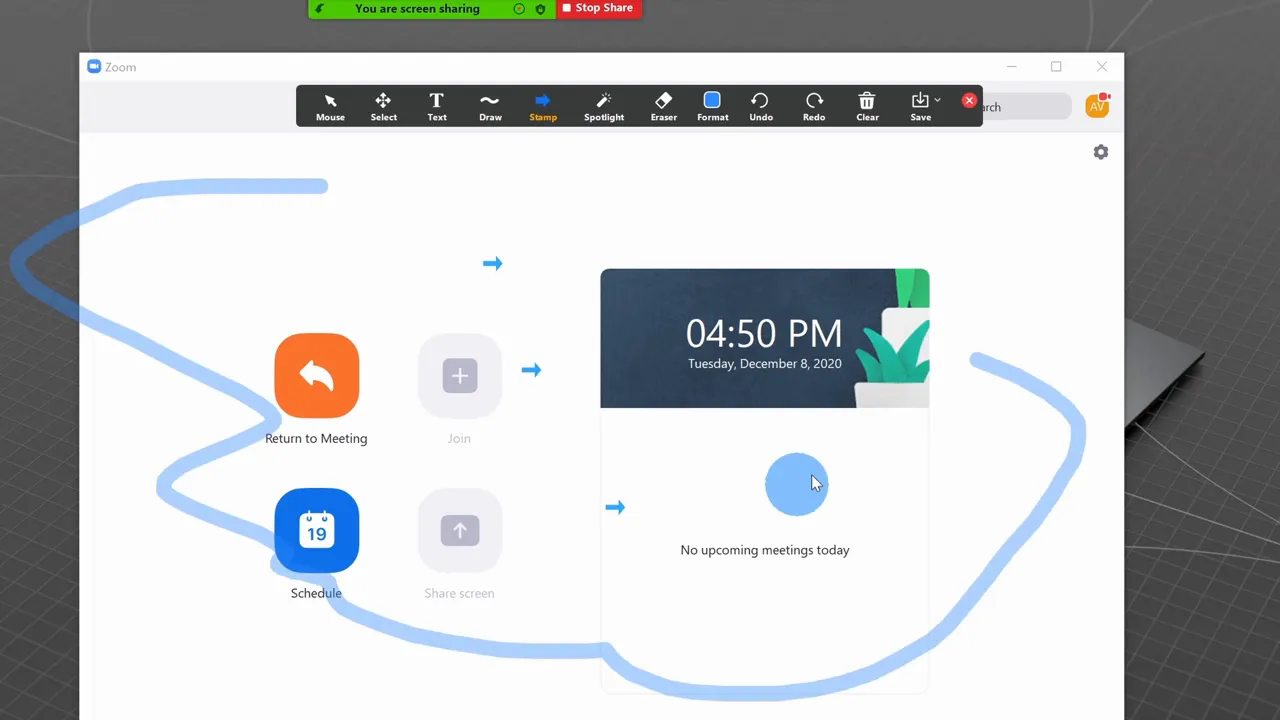
When you are finished, use More on the sharing toolbar to access the stop-recording command.
The trade-offs
In the workflow I tested, Zoom did not offer the same recording-quality controls as a dedicated capture application. It also let me choose the entire desktop or a window, but not draw an arbitrary rectangle around a small recording area.
There is no built-in cursor-highlighting option in this setup, either. Annotations help emphasize content, but they are not the same as a highlight that follows the pointer.
My take: Zoom is worth considering if you already have it installed and want a straightforward recording with annotations. If precise capture dimensions or detailed quality settings matter, another option will be a better fit.
3. FlashBack Express: An Easy Interface With Useful Recording Extras
FlashBack Express has a free version and a paid Pro version. The Express version I tested covers the core recording tasks well, especially if you already have a separate video editor.
One of its biggest strengths is its intuitive interface. The main window puts the important decisions together: what to record, which audio sources to include, and whether to add a webcam.
Choose your capture area, audio, and webcam
You can record:
- Your entire screen.
- A selected region of the screen.
- A specific application window.
Below the capture-area control, you can enable microphone audio and system sound, choose devices, and set levels. You can also include your webcam and decide whether its preview remains visible during recording. If you are recording a reaction, for example, seeing that preview can be useful.
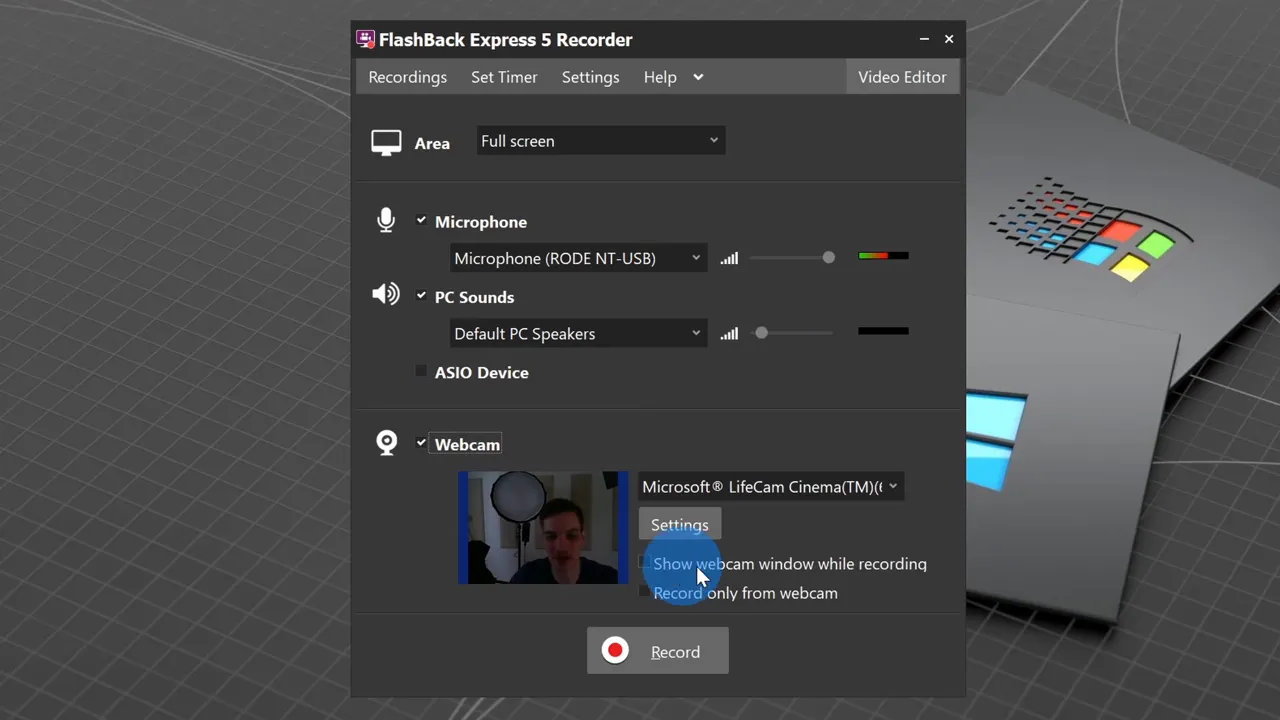
FlashBack Express also includes timing controls for when a recording starts and finishes.
Clean up the desktop before recording
Some of my favorite settings are less about capturing video and more about making the result look tidy.
Under the desktop settings, you can use a plain desktop background, hide desktop icons, and hide the taskbar. If your desktop has dozens of icons, hiding them removes a lot of visual clutter without requiring you to reorganize everything first.
You can customize hotkeys for starting and stopping a recording, too. After selecting Record, a countdown gives you time to get ready. During capture, you can use the small control window or minimize it and rely on those shortcuts.
Preview, trim, and export
After stopping, open the recording in the included player. In my test, the result included a yellow mouse highlight and click indicators, which help make software demonstrations easier to follow.
The free player also lets you select a portion of the recording to keep, trimming material from the beginning and end before export. The available export formats in the tested version were:
- MP4
- AVI
- Windows Media
That basic trimming is useful, but it is not the same as having a full video editor. More advanced editing belongs to the paid offering or a separate application.
The trade-offs
FlashBack Express felt a little laggier than some of the other tools in my testing. It is also a freemium product, so you will encounter prompts to upgrade to Pro. The player, in particular, puts paid features in front of you even though the free workflow mainly covers previewing, basic trimming, and exporting.
My take: This is a solid choice if you want an approachable recorder with capture-region controls, webcam support, desktop cleanup, and mouse highlighting.
4. Apowersoft Free Online Screen Recorder: Simple Controls, Plenty of Features
Apowersoft Free Online Screen Recorder combines a clean interface with a surprisingly useful set of controls. Start from its website and select Start Recording to launch the recording interface.
The large record button is easy to find, but it is worth configuring a few things before you press it.
Set the recording area and sources
You can capture the full screen or select a region by drawing a rectangle. You can also choose preset dimensions, such as 1920 × 1080, instead of sizing the region by eye.
The audio control lets you choose the source you want, including system sound and microphone audio. You can add a webcam overlay and move it to another part of the screen so it does not cover the content you are explaining.
Make the pointer easier to follow
Within settings, the mouse-style controls let you animate mouse buttons and clicks, and display a hotspot around the pointer. These are particularly helpful for a software demonstration because they make small movements and clicks much more obvious.
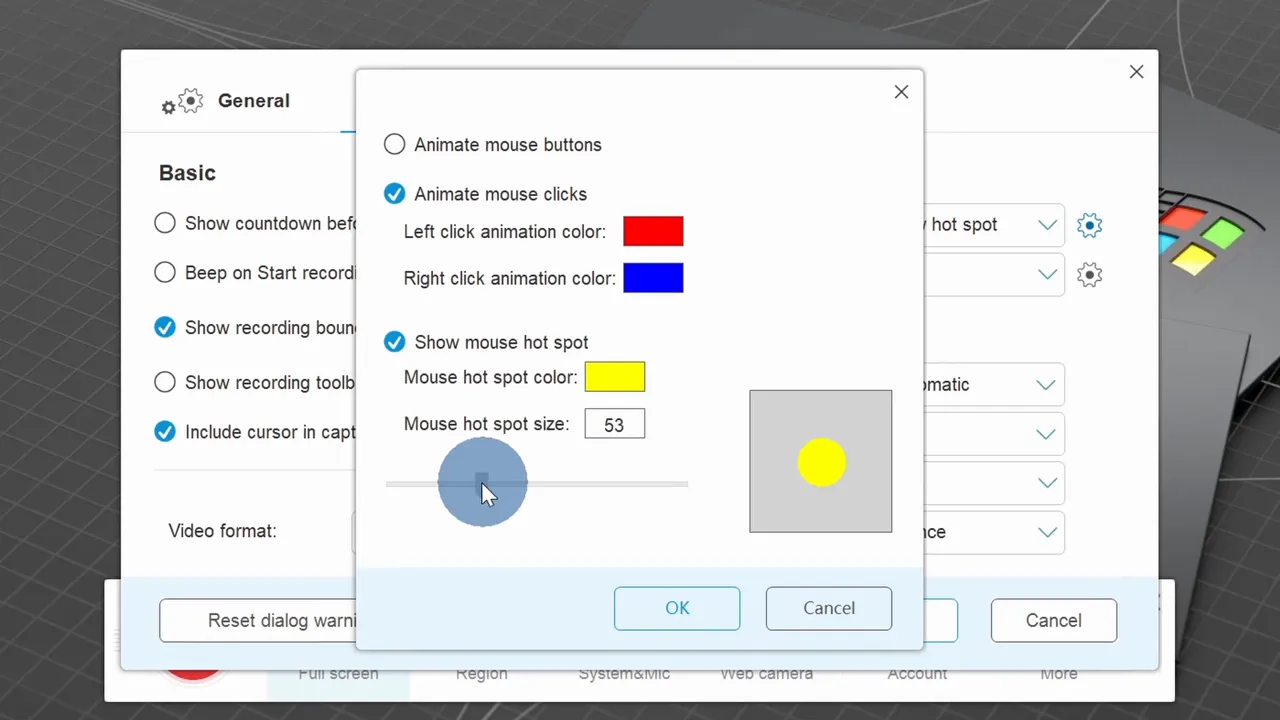
The application also provides audio- and video-quality settings. For such a simple-looking recorder, there is quite a bit you can configure.
Annotate while recording
Once recording starts, a compact toolbar shows elapsed time and gives you access to annotation tools. You can draw shapes and marks directly on the screen to emphasize what matters while you explain it.
When you stop, you can preview the recording and save it to your computer as a video file. The tested version also offered a cloud-upload option.
My take: Apowersoft is a strong option for desktop and application demonstrations, particularly when you want both mouse effects and annotations. It would not be my go-to choice for gaming capture.
5. OBS Studio: My Favorite for Recording Quality and Control
OBS Studio, short for Open Broadcaster Software, is my favorite of the bunch. It is also the tool I use to capture my tutorials.
OBS is free and open source, and it runs on Windows, macOS, and Linux. Its biggest advantage is control: you can configure the recording quality, compose the layout, combine sources, and adjust audio levels in one place.
Build the recording you want
OBS uses scenes and sources to assemble the picture you record. Rather than treating the screen as the only thing to capture, it lets you combine elements into a layout.
- Screen capture: Record your desktop content.
- Webcam: Add your camera and position it where you want.
- Cropping: Limit the visible screen content to a particular area.
- Audio mixer: Adjust microphone and system-sound levels.
- Additional sources: Add other elements to your scene as needed.
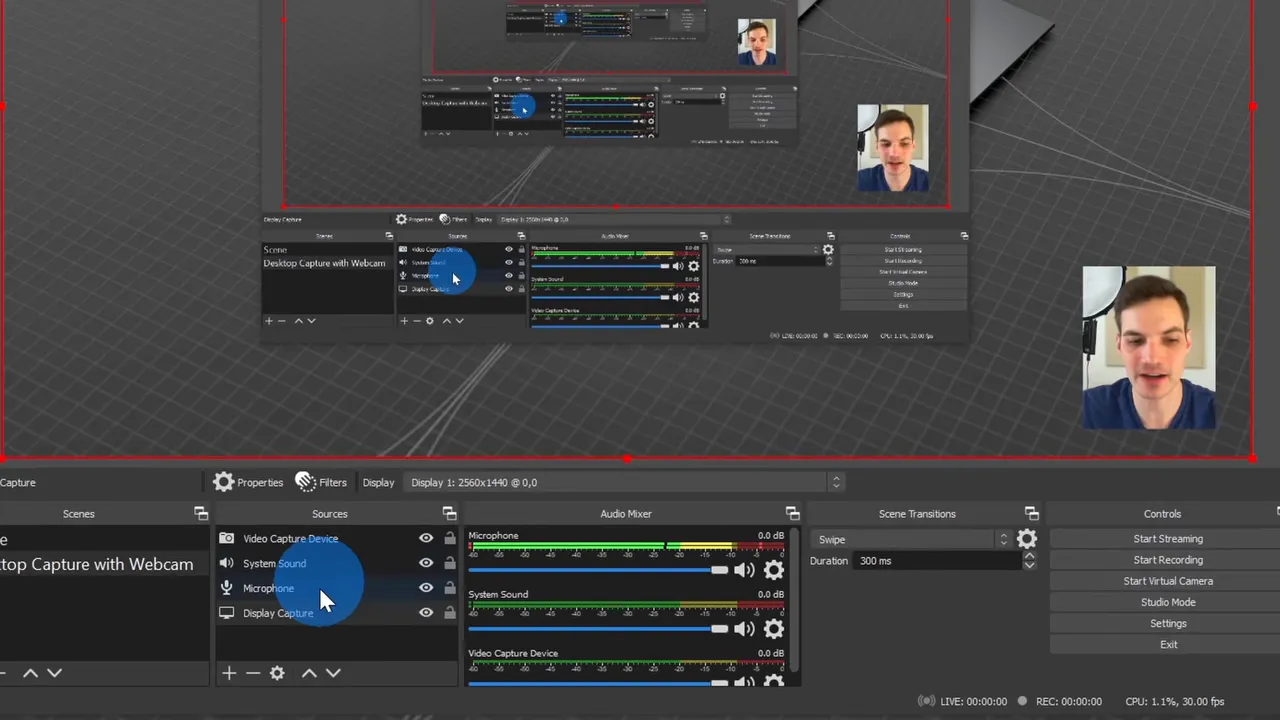
Open File > Settings to configure the recording details and quality levels. This is a major reason I prefer OBS: I can tailor the capture instead of accepting a tool's automatic choices.
Control recording with buttons or hotkeys
You can start recording, pause when needed, resume, and stop when you are done. In settings, you can assign keyboard shortcuts to those actions and many others.
Hotkeys make it easier to control a recording without repeatedly bringing the recorder's interface into the foreground.
Performance has also been excellent in my experience. OBS feels responsive during capture, and the resulting recordings look crisp.
What OBS does not include
All of that flexibility means OBS takes more time to learn. Compared with a small interface built around one record button, its scenes, sources, mixer, and settings can feel intimidating at first.
If you want help with the fundamentals, my OBS beginner tutorial walks through getting started.
There are also a few features you will need to handle elsewhere:
- Mouse highlighting: Use a separate third-party tool for cursor effects.
- Annotations: Use another application to draw or mark up the screen during capture.
- Video editing: OBS records the material, but it is not a video editor.
That separation works well for me. OBS is my capture tool, and I use another editor afterward.
My take: If you are willing to spend a little time learning it, OBS is my top recommendation for a flexible screen-recording workflow with detailed quality controls.
Which Free Screen Recorder Should You Choose?
The best screen recorder is the one that captures what you need without making the process harder than it has to be.
- Choose Xbox Game Bar for a quick recording of a supported application on Windows 10 without installing another tool.
- Choose Zoom if you already use it and want screen sharing with drawing and stamp annotations.
- Choose FlashBack Express for an intuitive interface, desktop-cleanup options, and mouse highlighting.
- Choose Apowersoft for desktop demonstrations with region selection, webcam placement, mouse effects, and annotations.
- Choose OBS Studio for detailed recording controls and a flexible layout, especially if you edit in another application.
My personal pick is OBS Studio, but you do not need its full set of controls for every task. For a quick capture, convenience may matter most. For a detailed tutorial, the ability to control quality, audio, and exactly what appears on screen becomes much more valuable.
Made with VideoToBlog using 💻 5 Best FREE Screen Recorders - no watermarks or time limits


