Microsoft Teams brings your chats, meetings, and files together in one place. You can ask a coworker a quick question, organize training materials for new employees, and meet with your group without switching between a whole bunch of different tools.
The easiest way to understand Teams is to put it to work. I’ll use employee onboarding at the Kevin Cookie Company as an example, from creating a team to sharing a training document and scheduling a meeting.
What You'll Learn
- Teams bring groups together, while channels organize their conversations and files by topic.
- Threaded replies keep discussions together, and @mentions notify the people who need to respond.
- Chat supports smaller conversations that can become voice calls, video calls, or screen-sharing sessions.
- The Teams calendar syncs with Outlook and adds a join link to meeting invitations.
Table of Contents
- 1. Sign In and Choose the Desktop or Web App
- 2. Create a Team and Understand Channels
- 3. Start Conversations, Reply, and Use @Mentions
- 4. Share Documents and Find Channel Files
- 5. Organize Teams and Check Your Activity
- 6. Use Chat for Smaller Conversations
- 7. Schedule and Join a Microsoft Teams Meeting
- 8. Find Calls and Files in One Place
1. Sign In and Choose the Desktop or Web App
To use Teams with your school or workplace, your organization needs to have Microsoft Teams available. If you’re setting it up for the first time, you can explore the options on the Microsoft Teams website.
If your organization already uses Teams, head straight to the Teams sign-in page and sign in with your school or workplace account.
After signing in, you may see a prompt to download the desktop app. You have two ways to get started:
- Desktop app: My recommendation if you’ll use Teams regularly, with a more complete desktop experience.
- Web app: A convenient way to access most core functionality directly in your browser.
The steps below follow the desktop experience. The web app offers many of the same core tools, although the location and appearance of controls can vary by version.
Once you’re signed in, look at the navigation bar on the left. This is your starting point for moving between teams, activity, chat, calendar, calls, and files.
2. Create a Team and Understand Channels
The app is called Teams, and there’s also an area called Teams. So what exactly is a team?
A team is a collection of people, content, and tools organized around a group or project. You might create one to manage a project, onboard new employees, or plan an upcoming event.
Join or create a team
- Open Teams from the navigation bar.
- Select Join or create a team at the bottom of the teams pane.
- Choose to join an existing team or create your own.
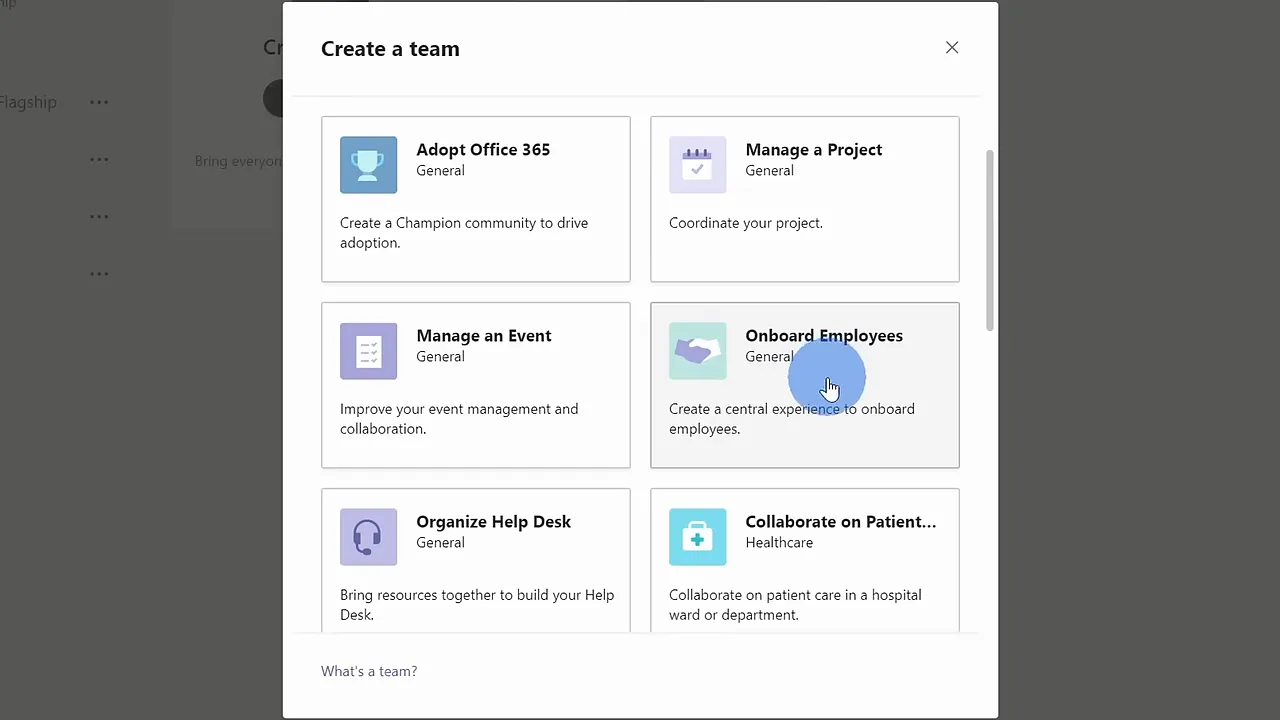
- When creating a team, choose whether to start from scratch, use an existing team, or start with a template.
Templates give you a head start by adding relevant channels and apps. For our new employees at the Kevin Cookie Company, I’ll use the Onboard Employees template.
Choose private or public access
Next, decide who should be able to join:
- Private: Participation is limited to people invited to the team.
- Public: Anyone in your organization can join.
Public here means public within your organization, not open to everyone on the internet. For this example, I’m going with public. I’m all about transparency.
Enter a name and description, then select Create. Our new team, Kevin Cookie Company University, now appears in the teams list.
Open the ellipsis menu, the three dots next to the team name, to find management options. From there, you can add members, get a link to share with others, or delete the team when you no longer need it.
Use channels to separate topics
Within a team, channels organize conversations and files by topic or project. Our onboarding template creates four channels: General, Announcements, Employee Chat, and Training.
Employee Chat gives new hires a place to talk and ask questions. Training gives us a separate place to organize learning materials. Both belong to the same onboarding team, but they serve different purposes.
That’s the key distinction: the team brings the group together, while channels keep its work organized.
3. Start Conversations, Reply, and Use @Mentions
Open a channel and select its Posts tab to see the conversations happening there.
You can start a new topic with New conversation. If you’re responding to an existing topic, choose Reply underneath that post instead. This creates a threaded conversation, keeping the original message and its responses together.
In Employee Chat, Nestor, one of our new employees, has already posted a message. I can reply directly underneath it rather than starting a separate conversation.
Get someone’s attention with an @mention
To notify a particular person, type @, begin entering their name, and select them from the suggestions. For example, selecting Nestor inserts a mention that notifies him about the message.
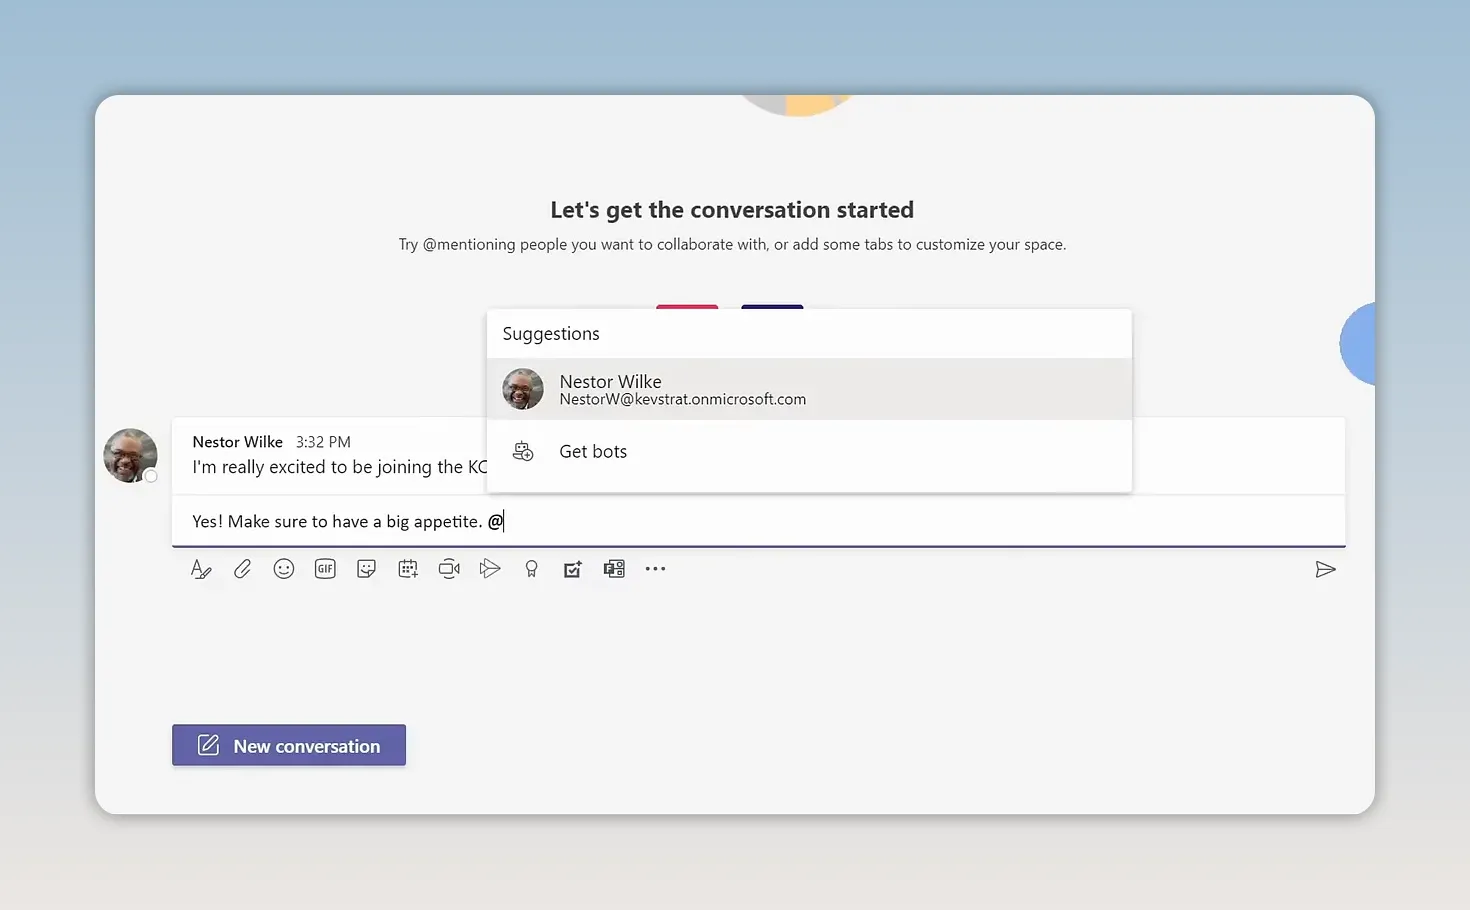
You can also mention a channel by typing @ and selecting the channel name. In our example, mentioning Employee Chat notifies people in that channel. A red @ indicator helps the recipient spot a conversation where they were mentioned.
Format your message
Select the Format icon beneath the message box to open the text-formatting tools. You can make important information stand out rather than sending everything as plain text.
For example, I can format a reminder asking Nestor to review our training document, then attach that document right in the same conversation.
4. Share Documents and Find Channel Files
You’re not limited to typing messages. To share a file, drag and drop it into the conversation composer, then send the message with the attachment.
Once I share the training document, Nestor can open it directly from the conversation. He can also select the channel’s Files tab to find it later, without digging through the discussion.
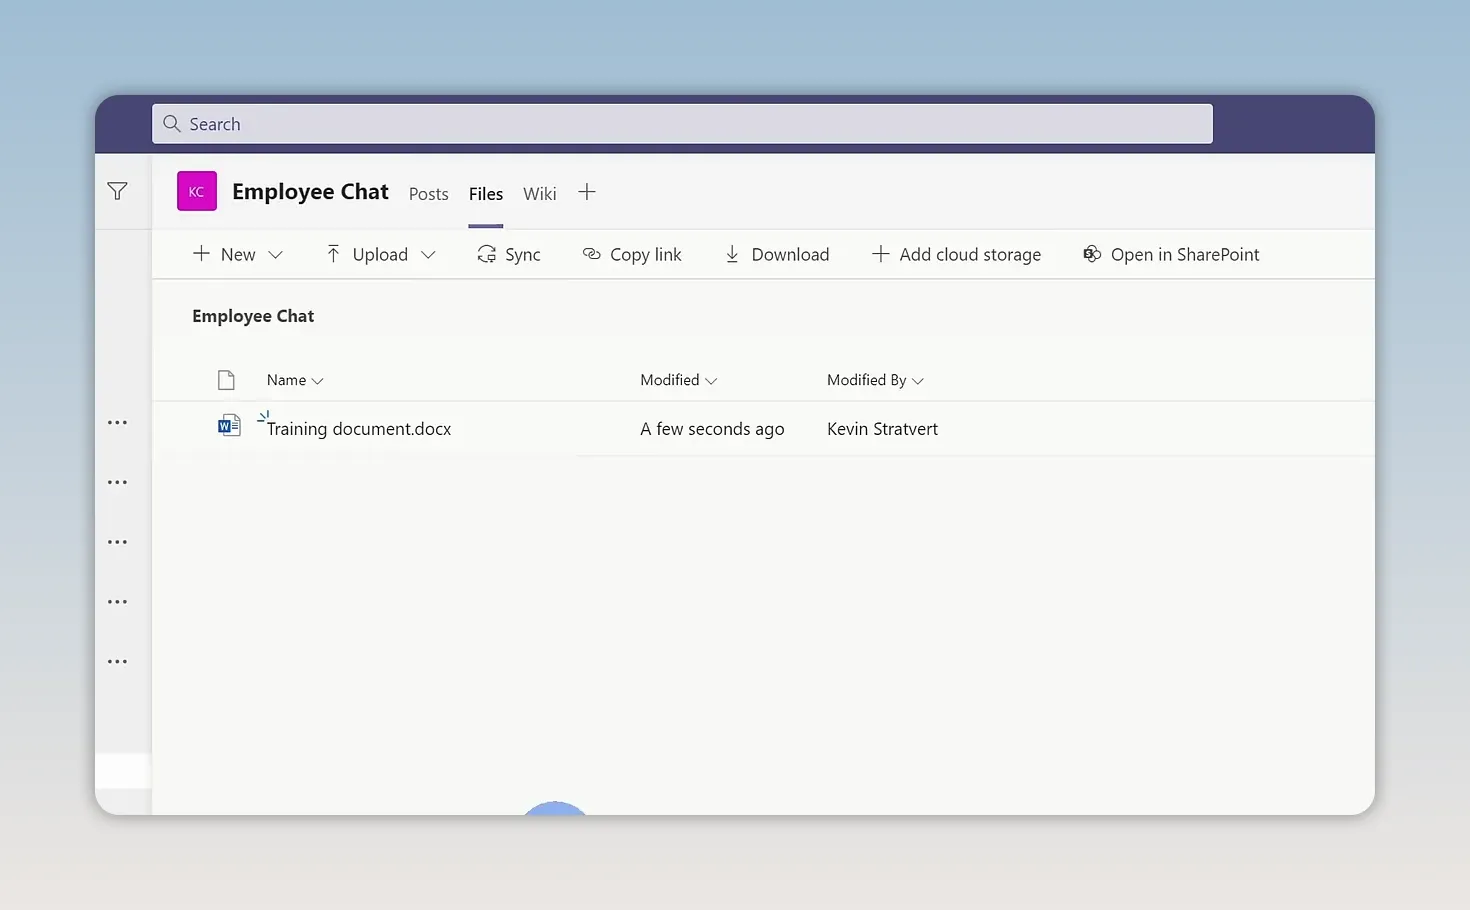
The Files tab collects files shared across conversations in that channel. You can also:
- Select New to create a document directly from the Files view.
- Select Upload to add an existing document.
- Open a listed file to access it.
Each channel has its own Posts and Files tabs. That’s why channels are so useful: they keep both the discussion and its supporting documents organized around the same subject.
5. Organize Teams and Check Your Activity
As you join more teams, a little organization makes it much easier to get back to the work that matters.
- Reorder teams: Drag and drop teams in the list to put important ones closer to the top.
- Hide a team: Open its ellipsis menu and choose Hide when it’s no longer relevant to your daily work.
- Pin a channel: Open the channel’s ellipsis menu and choose Pin for quick access at the top.
For our onboarding work, I’ll pin Employee Chat so I can quickly return to questions from new employees.
Next, select Activity in the navigation bar. This is where you can review notifications about recent activity across Teams, including mentions and updates involving meetings, files, and apps.
If Nestor mentions me, I can find that notification here and follow up. You can also use the activity filter controls to narrow the feed to a particular type of update, such as mentions or replies.
6. Use Chat for Smaller Conversations
Channels are useful for ongoing group work. Chat is ideal for communicating with an individual or a smaller group.
- Select Chat in the navigation bar.
- Select the New chat icon near the top.
- Enter the person’s name.
- Type and send your message.
I can start a chat with Patty and, if typing isn’t the best way to work through the topic, use the controls at the top to turn it into a video call or voice call. I can also share my screen or add more people to the conversation.
Another useful option is Pop out chat. This opens the conversation in a separate window, so I can keep chatting with Patty while moving into a team or channel in the main app.
7. Schedule and Join a Microsoft Teams Meeting
Schedule a meeting from Calendar
Select Calendar in the navigation bar to review your upcoming schedule. Your Teams calendar syncs with Outlook, so the scheduling process should feel familiar if you already use Outlook.
- Select New meeting near the upper-right corner.
- Enter a meeting title.
- Add the participants.
- Set the date and time, and add a description.
- Select Send.
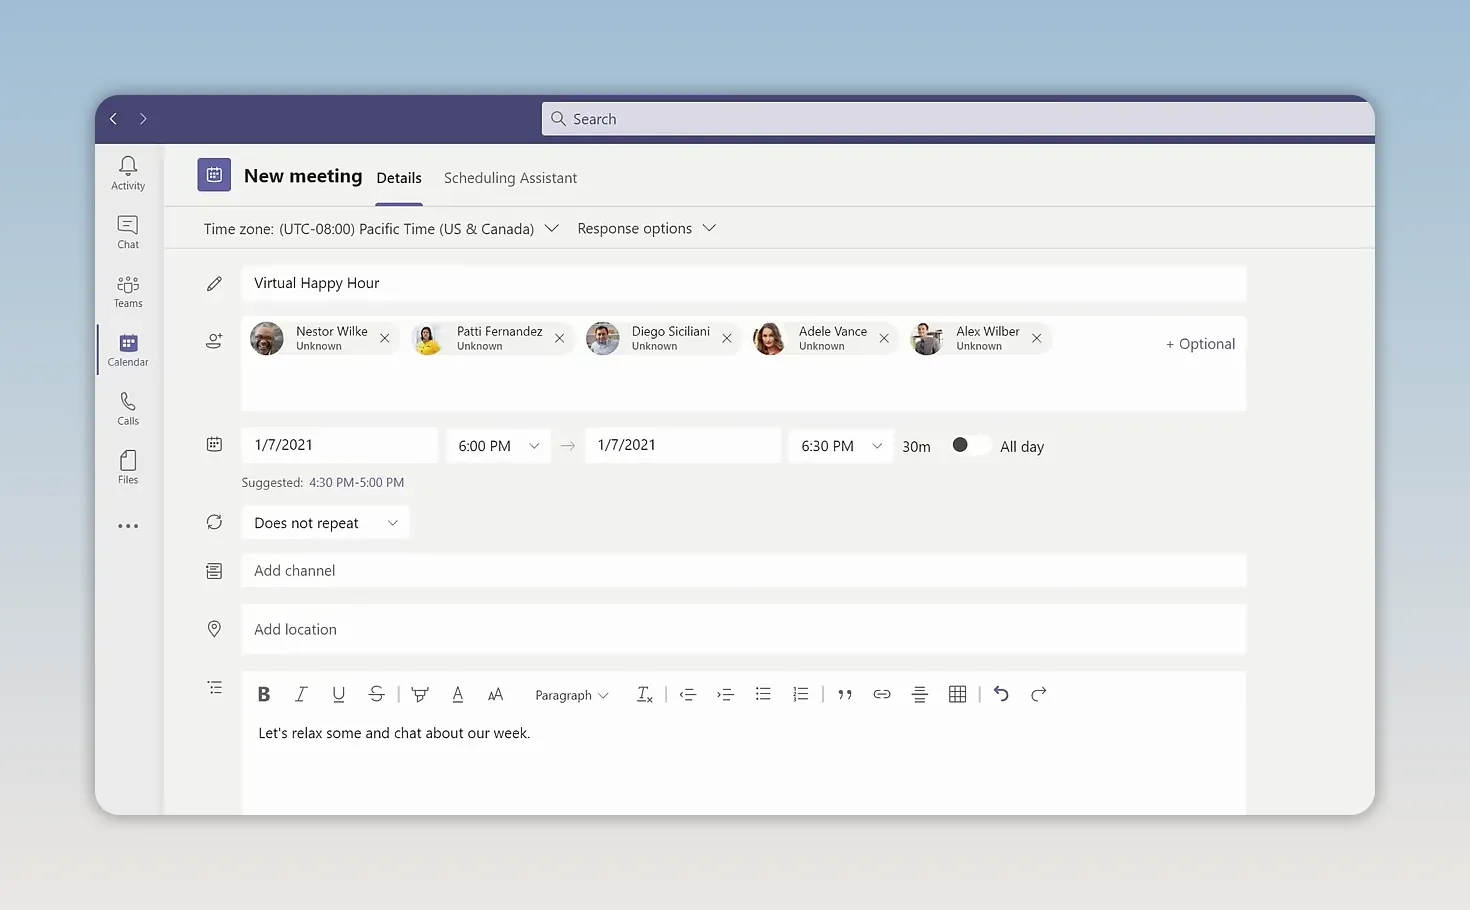
The invitation automatically includes a Microsoft Teams join link, giving everyone a way to meet virtually.
Check your camera and audio before joining
When it’s time to meet, open the event on your calendar and select Join. Before entering, Teams gives you a chance to configure your video and audio.
- Turn your webcam on or off.
- Check your audio settings.
- Choose a background effect, such as blur or a replacement background.
You could even choose a locker room background. Nothing like having a meeting from a locker room.
Once everything looks and sounds right, select Join now.
Use the meeting controls
Inside the meeting, the toolbar gives you access to the main collaboration tools:
- Participants: See who else is in the meeting.
- Chat: Exchange messages with participants.
- Raise hand: Signal that you’d like to speak.
- More options: Access additional actions, including meeting recording when available.
- Share content: Present your entire desktop, a specific window, or a whiteboard.
When you’re finished, select the red Leave button to exit the meeting. For additional help with meeting features, Microsoft maintains a Teams help and learning center.
8. Find Calls and Files in One Place
There are two more areas worth knowing about in the navigation bar.
Calls is where you can call other people in your organization. It also gives you access to your call history, contacts, and voicemail.
Files provides a broader view of your documents, including files in OneDrive and files you have access to through Microsoft Teams. Think of the channel’s Files tab as the place for one channel’s documents, and the navigation-level Files view as a way to find documents across your work.
That’s the foundation of Microsoft Teams: use teams and channels to organize shared work, chat for smaller conversations, Calendar for meetings, and Activity to keep track of updates. Once those pieces make sense, it becomes much easier to find the right place for your next message, document, or meeting.
Made with VideoToBlog using 🏫 Microsoft Teams Tutorial in 10 min


