Need to send hundreds of personalized emails without writing each one individually? Mail merge connects an Excel spreadsheet to a message in Word, then sends a separate, personalized email to each recipient through Outlook.
Excel holds the names, email addresses, and other details. Word provides the message and inserts each person’s information. Outlook handles the sending. Once those three pieces are connected, you can personalize much more than a greeting, including company names, webinar dates, and outstanding balances.
Before you begin: this workflow requires the classic desktop version of Outlook, along with desktop Word and Excel. It does not work with new Outlook or the web apps.
What You'll Learn
- Connect a clean Excel recipient list to Word and send personalized emails through classic Outlook.
- Insert merge fields to personalize names, companies, dates, and amounts within one shared message.
- Preview records and test a limited recipient selection before sending the full batch.
- Use Outlook’s Work Offline mode to review generated emails before delivery.
Table of Contents
- 1. Set Up Your Excel Spreadsheet
- 2. Connect Excel to a Mail Merge in Word
- 3. Write Your Email and Insert Merge Fields
- 4. Preview Each Personalized Message
- 5. Edit the Recipient List or Send a Test
- 6. Send the Emails Through Classic Outlook
- 7. Check the Sending Account and Review Before Delivery
- Final Mail Merge Checklist
1. Set Up Your Excel Spreadsheet
A successful mail merge starts with a clean, simple spreadsheet. Each row should represent one recipient, and each column should contain a specific piece of information about that recipient.
For this example, I’m using a contact list with fields such as First Name, Last Name, Email Address, Company, Webinar Date, and Amount Due.
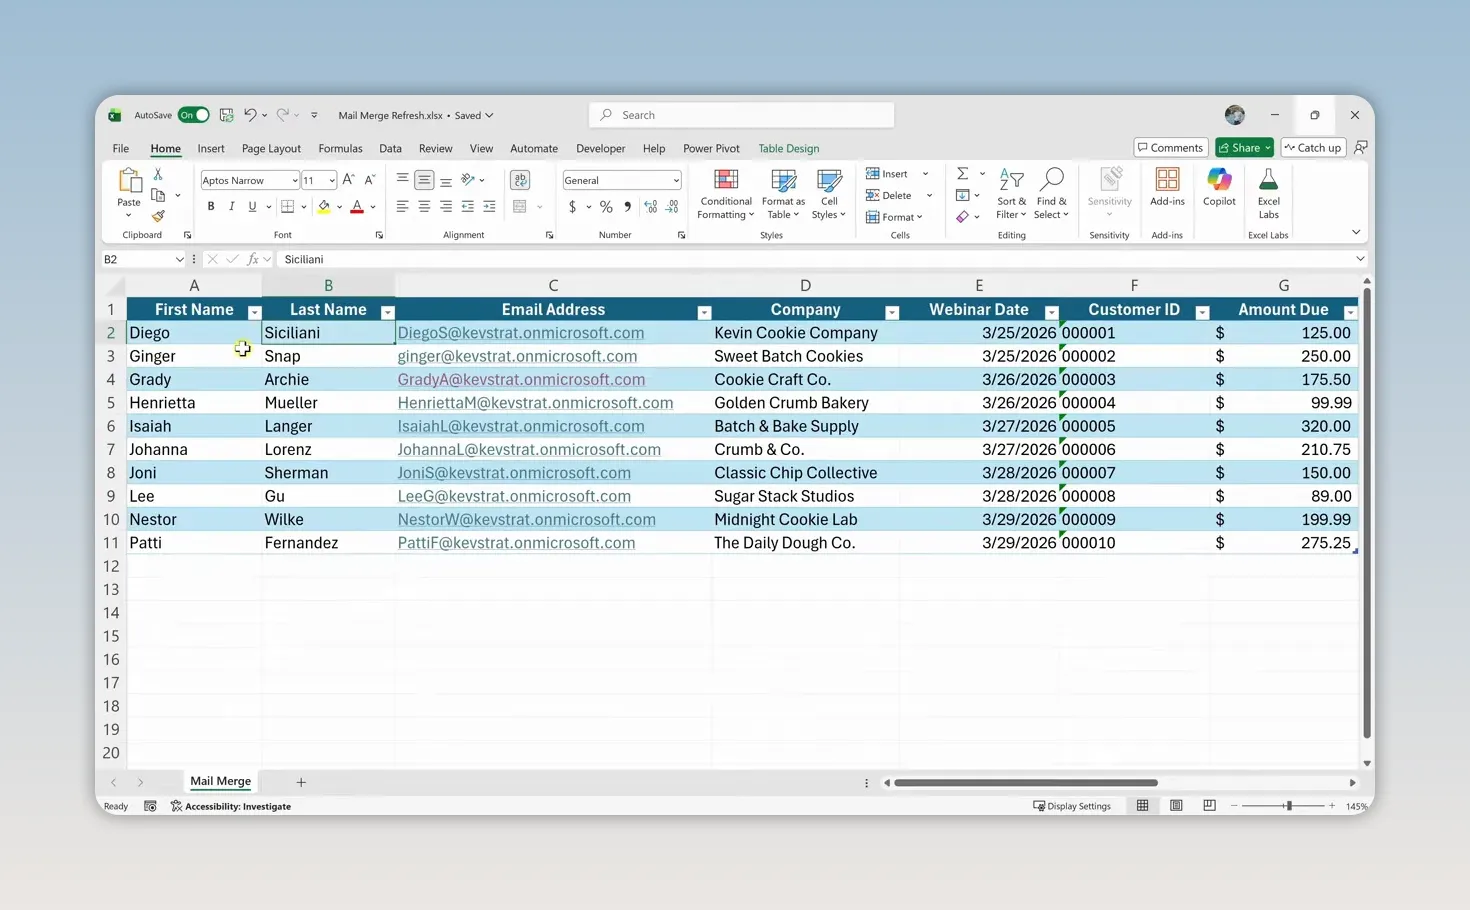
Before connecting the spreadsheet to Word, check the following:
- Use a single header row at the top. Don’t leave blank rows above your column headings.
- Give each column a clear name. These headings become the merge fields you select in Word.
- Include an email address column. Every recipient needs a valid email address because Word uses this field to direct the messages.
- Remove completely blank rows within the list. Gaps can interfere with how Word reads the records.
- Keep the data in one continuous list. Avoid merged cells, multiple separate tables, and unnecessary formatting.
Check Dates, ZIP Codes, and Currency
Formatting is one of the most common places to run into trouble. A value can look fine in Excel but need attention when it appears in Word, so prepare the source data carefully and always check the merged result.
- Dates: select the date column, right-click, and choose Format Cells. Select the date format you want.
- ZIP codes and IDs with leading zeros: use Format Cells > Text so Excel treats these values as text rather than ordinary numbers. Otherwise, leading zeros can disappear.
- Currency and other numbers: format them appropriately in Excel first, then verify how they appear in Word. Don’t assume every display detail, such as a currency symbol, will carry over.
Once the data looks correct, save the workbook. Now it’s ready to connect to Word.
2. Connect Excel to a Mail Merge in Word
Open Microsoft Word and start with a blank document. You’ll use the Mailings tab for most of this process.
- Open Mailings > Start Mail Merge.
- Select Email Messages.
- Choose Select Recipients > Use an Existing List.
- Find your saved Excel workbook, select it, and click Open.
- In the Select Table dialog, choose the worksheet or table containing your recipient data.
- Make sure First row of data contains column headers is checked, then click OK.
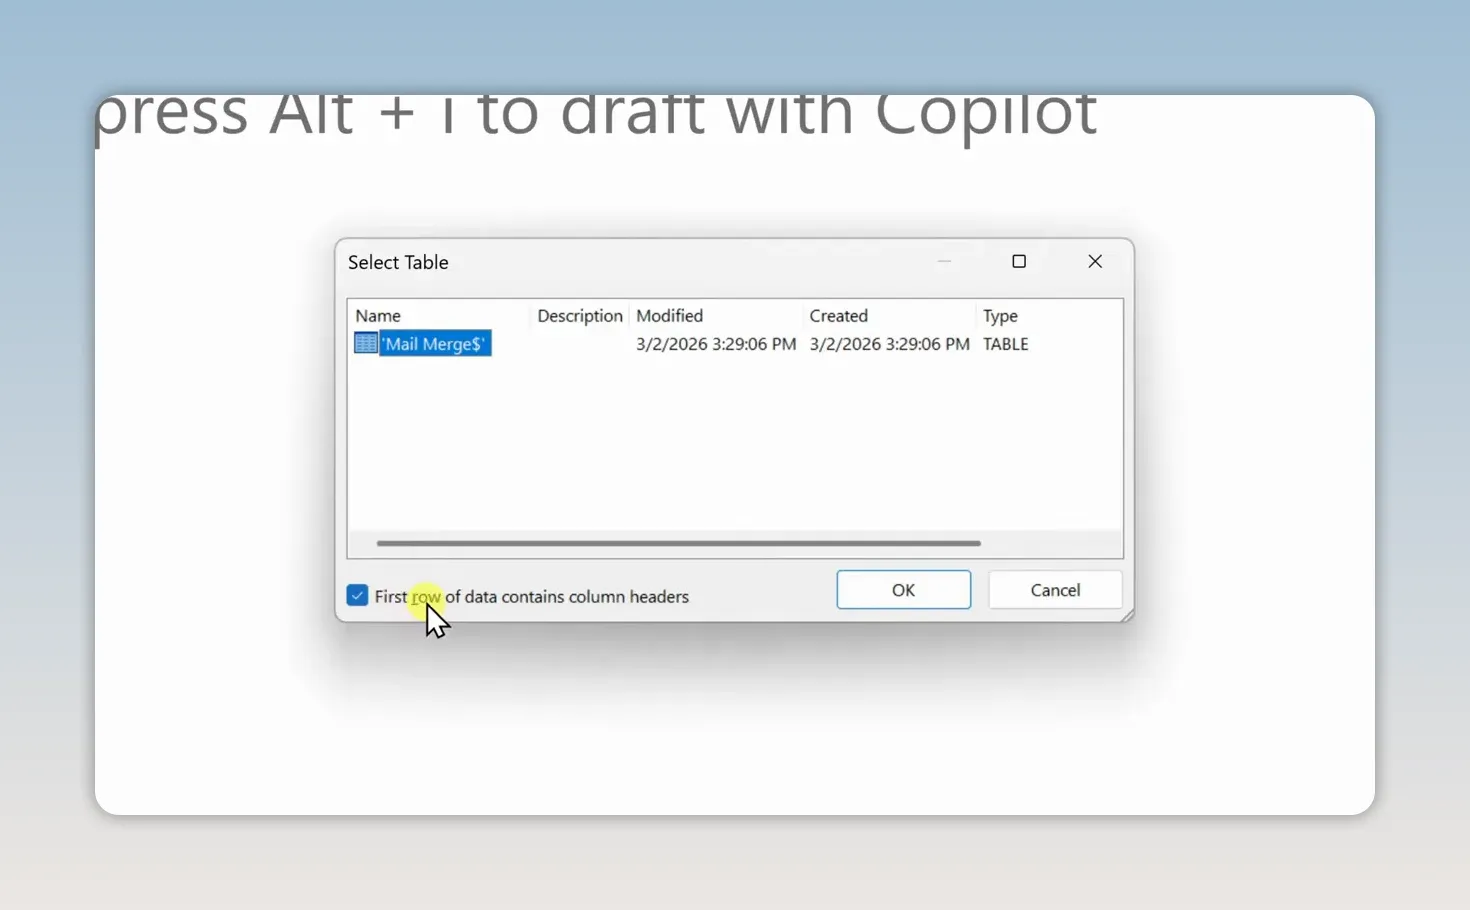
That last checkbox matters. It tells Word to treat labels such as First Name and Company as field names, rather than as another recipient’s information.
3. Write Your Email and Insert Merge Fields
Type the email message into Word. Start with the text everyone should receive, then insert fields wherever the content should change from person to person.
In my example, the message thanks contacts for being part of the cookie industry community, reminds them about an upcoming webinar, and includes their outstanding balance. The overall message stays the same, but the first name, company, webinar date, and amount due change for each recipient.
Personalize the Greeting
- Type your greeting, such as Hi, followed by a space.
- Place the cursor where the recipient’s name should appear. If you typed placeholder text such as FIRST NAME, delete or select it first.
- Go to Mailings > Insert Merge Field.
- Select the field corresponding to your first name column.
Word inserts a placeholder such as «First_Name». This is a merge field, not ordinary text. When you complete the merge, Word replaces it with the first name from each recipient’s row.
Add the Other Personalized Details
Repeat the process throughout the message. Select each temporary label and replace it with the corresponding field:
- Replace the company placeholder with the Company merge field.
- Replace the webinar date placeholder with the Webinar Date merge field.
- Replace the balance placeholder with the Amount Due merge field.
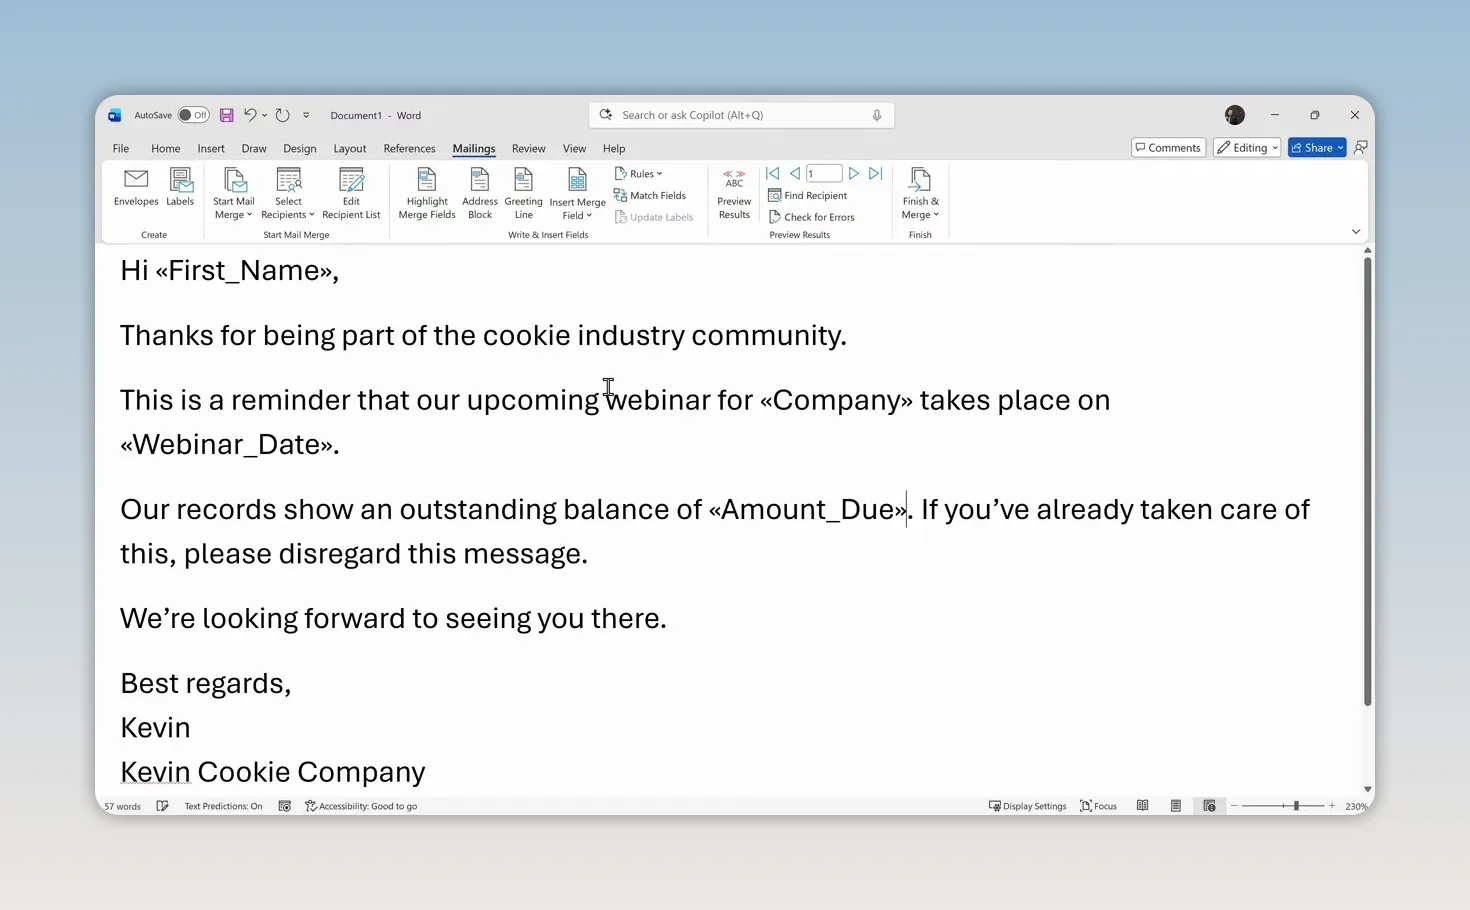
You can format merge fields just like other text. Select a field, open the Home tab, and apply bold, italics, underline, or other formatting. Keep it simple unless the emphasis serves a purpose.
4. Preview Each Personalized Message
Before sending anything, go back to Mailings and select Preview Results. Word replaces the field placeholders with information from your spreadsheet.
Use the record navigation arrows to move through recipients. Don’t stop after checking the first name. Confirm that the company, date, and amount all match the same person’s row.
Pay particular attention to:
- Spaces and punctuation around personalized fields.
- Dates appearing in the intended format.
- Amounts displaying correctly, including currency symbols.
- Line breaks and overall message formatting.
For example, one of my previewed messages showed an outstanding balance of 320, but no dollar sign. I added a dollar sign immediately before the amount field in Word so the message displayed $320.
If something looks wrong, check the Excel source first. Then preview again in Word. The preview is your opportunity to catch problems before they appear in everyone’s inbox.
5. Edit the Recipient List or Send a Test
You don’t have to send the message to everyone in the workbook.
On the Mailings tab, select Edit Recipient List. Here, you can sort or filter the contacts and choose which records to include.
This is especially helpful for a test. Limit the merge to one record before sending the full batch. When you’re ready for the complete mailing, confirm that the intended recipients are included and click OK.
6. Send the Emails Through Classic Outlook
With your message checked and recipients selected, choose Mailings > Finish & Merge > Send Email Messages.
The Merge to E-mail dialog contains the final settings:
- To: choose the spreadsheet column containing email addresses. In my workbook, that field is Email Address.
- Subject line: enter the subject everyone should receive. This standard mail merge workflow uses the same subject line for every message.
- Mail format: choose HTML to preserve the formatting applied in Word.
- Send records: choose All, Current record, or a range of record numbers.
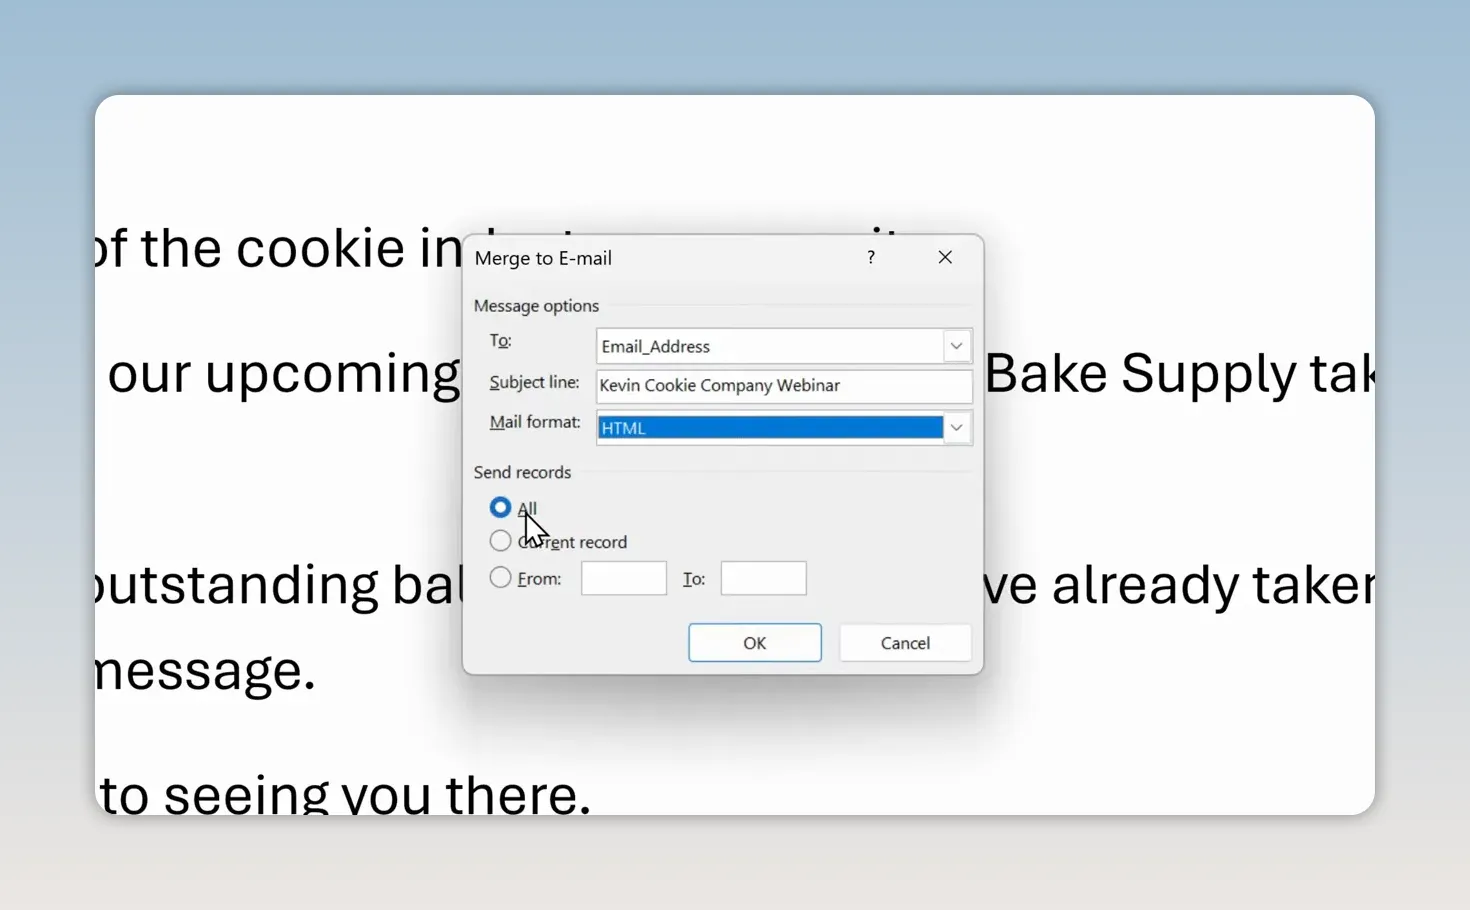
The record range refers to the recipient records from your data source. Use it when you want to send only a particular portion of the list.
Clicking OK starts the handoff to Outlook. Unless Outlook is offline, the emails begin sending automatically. You can find the individual personalized messages in Outlook’s Sent Items folder.
For an additional reference on the built-in workflow, see Microsoft’s guide to sending bulk email with mail merge.
7. Check the Sending Account and Review Before Delivery
Make Sure Outlook Uses the Correct Account
Mail merge sends from the primary account in your Outlook profile. If your messages are using the wrong From address, the cleanest fix is to create a new Outlook profile and add the intended sending account first.
Check this before starting a large merge, particularly if you use multiple email accounts in Outlook.
Use Work Offline to Review Messages in Outlook
If you’d like to review the generated messages in Outlook before they leave, use its offline mode:
- In classic Outlook, open the Send / Receive tab.
- Turn on Work Offline before you start the mail merge.
- Return to Word and complete the merge.
- Review the queued messages in Outlook.
- When everything looks correct, turn off Work Offline to go back online and allow the messages to send.
The timing is important: enable Work Offline before you click OK in Word’s final send dialog, not afterward.
Know the Attachment Limitation
Traditional mail merge does not support personalized attachments. If each person needs a unique file, you’ll need a different method. Personalizing the body of an email and attaching a different document for each recipient are separate requirements.
Final Mail Merge Checklist
Before sending the full batch, make one last pass through the essentials:
- The Excel workbook is saved and contains one clean recipient list.
- Every selected recipient has a valid email address.
- The merge fields pull the correct names, companies, dates, and amounts.
- You’ve previewed multiple records and checked the formatting.
- The subject line and HTML mail format are correct.
- Classic Outlook is using the intended sending account.
- If you want a final review in Outlook, Work Offline is already enabled.
Once those pieces are in place, you can turn one Word message and an Excel contact list into a batch of individually personalized emails. If something doesn’t look right, start with the two most important checks: your Excel data and formatting, and whether you’re using classic Outlook.


