Microsoft Access helps you track customers, orders, assets, and just about anything else that needs an organized home. It is a relational database program, which means you can store different types of information in separate tables and connect them when you need to work with them together.
That might sound complicated, but it becomes much easier once you build something. We’ll create an order tracking database for the Kevin Cookie Company, complete with customer information, an order entry form, a query for unfilled orders, and a printable report. Yes, I found another reason to bring cookies into a technology tutorial.
You can build the database from scratch or use the sample Access database to explore the example without typing all the sample records yourself.
What You'll Learn
- Separate customers and orders into related tables to avoid repeating customer information.
- Use appropriate data types and a calculated field to structure order records.
- Create a form that displays customer details alongside their related orders.
- Build a reusable unfilled orders query and turn its results into a printable report.
Table of Contents
- Why Use Access Instead of Excel?
- 1. Create a Blank Access Database
- 2. Build the Customers Table
- 3. Create the Orders Table
- 4. Connect Customers and Orders with a Relationship
- 5. Create a Form for Customer and Order Entry
- 6. Build a Query to Find Unfilled Orders
- 7. Create a Printable Report
- 8. Save the Database and Put It to Work
Why Use Access Instead of Excel?
You can certainly track orders in an Excel spreadsheet. Put customer details on the left, order details on the right, and add a new row whenever someone places an order.
But what happens when Bill comes back for more cookies? You copy his name, email address, phone number, and mailing address into another row, then enter his new order. Now you’re storing the same customer information twice. If he places ten orders, you repeat those details ten times.
This kind of flat-file arrangement mixes customer information and order information in one list. A relational database gives you a more efficient structure:
- Customers table: Store each customer’s contact information once.
- Orders table: Store individual orders, with a Customer ID identifying who placed each one.
- Relationship: Connect the tables through their matching Customer ID fields.
When you need an order and its shipping address together, Access can bring that information into a single result without requiring you to duplicate the customer’s details in every order.
Excel also limits a worksheet to just over one million rows. And although filters and PivotTables are useful, a database is designed around querying related information and turning the results into reports. The important distinction is not simply how much data you have, but how that data fits together and how you need to use it.
Where Access fits
Access is a useful tool for individuals and small businesses that need a straightforward database. Even within a large organization, it can be handy for a quick, simple tracking project.
For larger or more demanding systems, organizations may look at alternatives such as Oracle, MySQL, Microsoft SQL Server, or MongoDB. Access still provides an approachable way to learn database design fundamentals, including tables, keys, relationships, forms, queries, and reports.
1. Create a Blank Access Database
When you launch Access, the start page gives you several ways to begin. You can open a recent database, search for an existing file, choose a template, or create a blank database.
Templates can save time if one closely matches what you need. You can also pin frequently used databases from the recent files list so they’re easier to find later.
For this example, start with a blank database:
- Select Blank database.
- Enter Cookie Orders as the file name.
- Choose a location, or leave the default Documents location.
- Select Create.
Access opens the new database and creates an initial table called Table1. There isn’t much in it yet, but we now have somewhere to start.
Understand tables, fields, and records
The grid looks a little like an Excel worksheet, but the terminology is different:
- A table holds information about a particular subject, such as customers or orders.
- A field is a column, such as First Name or Order Date.
- A record is a row containing one item, such as one customer.
We’ll use the first table for customers and create a second table for orders. Keeping those subjects separate is the foundation of our database design.
2. Build the Customers Table
The first field in Table1 is named ID. Double-click its header and rename it Customer ID. A descriptive name makes its purpose much clearer, especially once we start connecting tables.
Press Tab to move to the next field. Access asks you to choose a data type, which determines the kind of information the field will hold.
Add customer fields and data types
Choose Short Text for the customer’s contact details. Short Text allows up to 255 characters, which is plenty for the fields in this example.
Add these fields:
- First Name: Short Text
- Last Name: Short Text
- Email Address: Short Text
- Phone: Short Text
- Address: Short Text
- City: Short Text
- State: Short Text
- Zip: Short Text
- Country: Short Text
- Notes: Long Text
The Notes field gives a salesperson room to record additional customer details. Maybe it’s a birthday or the names of a customer’s children. Remembering those little things certainly doesn’t hurt when you’re trying to sell cookies.
Review and edit the table design
You can rename fields by double-clicking their headers. Selecting a field also exposes the field-related ribbon controls, where you can review or change its data type.
Right-click a field header for more options, including hiding or unhiding fields, freezing fields, inserting a field, renaming it, or deleting it. You can also adjust column widths to make the information easier to read.
For a more structured view, select Design View using the view controls near the bottom-right corner. When Access asks you to save the table, name it Customers.
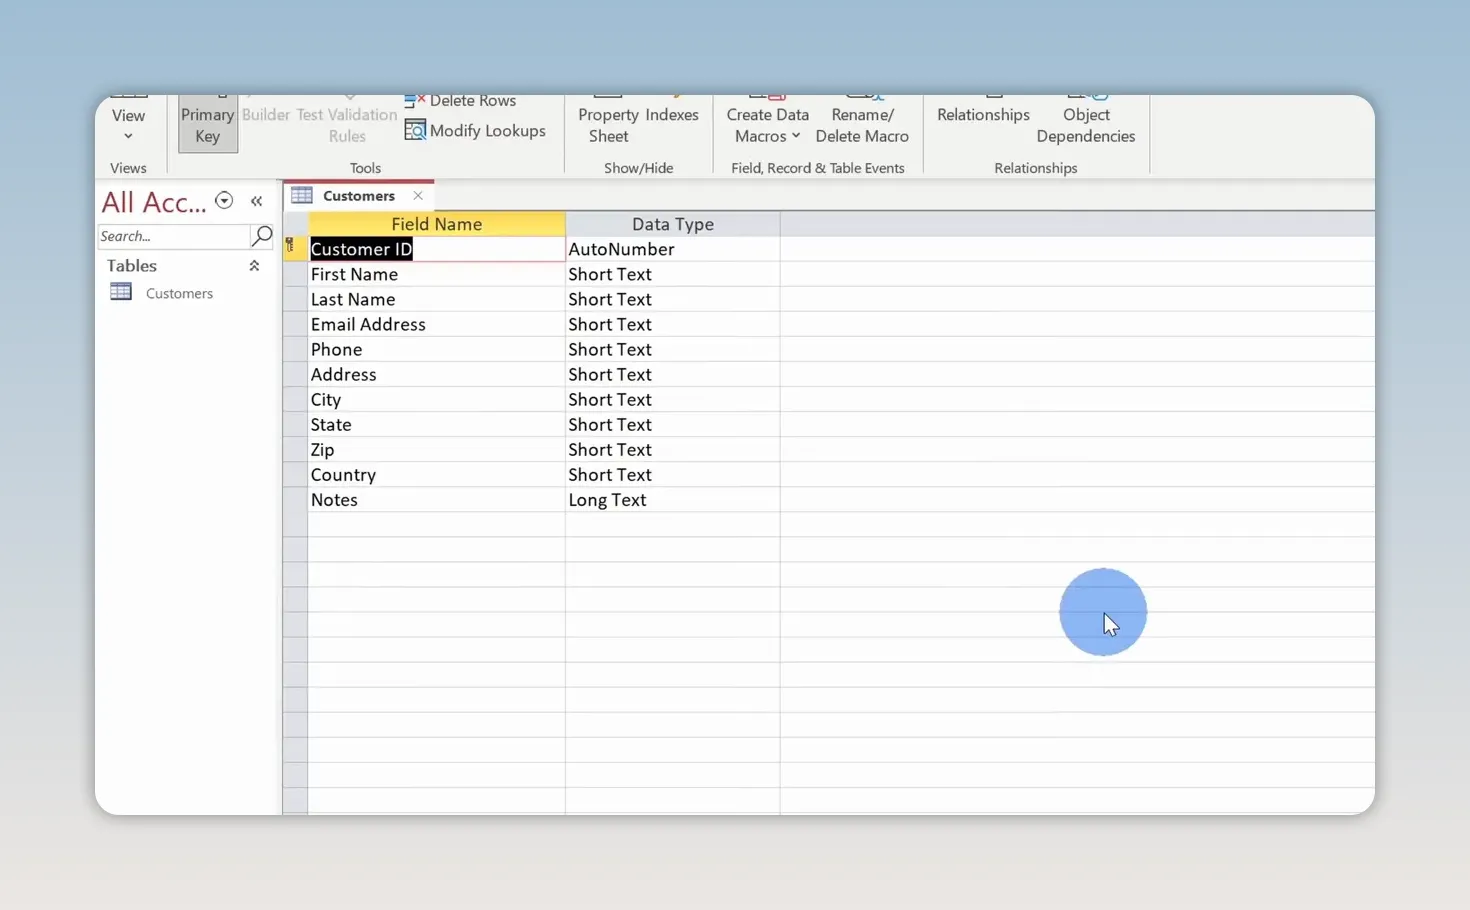
Design View shows your field names, data types, and an optional Description column. It’s a convenient place to review the whole structure, add fields, and explain fields whose names might not be obvious.
Switch back to Datasheet View when you’re ready to enter customer records.
Enter customers and understand the primary key
Start entering your first customer’s details. Access automatically assigns a value to Customer ID when you begin a new record.
This field is the table’s primary key: a unique identifier for each customer. No two customer records have the same Customer ID. Later, we’ll use that identifier to connect each order to the correct customer.
In my example, I’m customer number one. Considering how many cookies I eat, that seems entirely appropriate.
Add four or five sample customers so you have enough information to work with. Move to the next record after completing each customer.
3. Create the Orders Table
Select Create > Table on the ribbon. Access creates another blank table.
Rename its initial ID field to Order ID. Then add the fields that describe an order:
- Customer ID: Number. This identifies the customer who placed the order.
- Order Date: Date/Time. This records when the order was placed.
- Cookies Ordered: Number. This stores the quantity of cookies.
- Revenue: Currency. This stores the order’s revenue.
- Order Filled: Yes/No. This indicates whether the order has been fulfilled.
The Order Filled checkbox gives warehouse staff a simple way to record progress. Checked means the order has been filled; unchecked means it still needs attention.
Add a calculated field for revenue per cookie
We already have the order revenue and cookie quantity, so Access can calculate the revenue per cookie for us.
- Open the data type menu for a new field.
- Select Calculated Field > Number.
- In the Expression Builder, double-click Revenue.
- Enter the division symbol, /.
- Double-click Cookies Ordered.
- Select OK and name the field Revenue per Cookie.
The expression is [Revenue]/[Cookies Ordered]. Think of it like a formula that uses the values in the current order record.
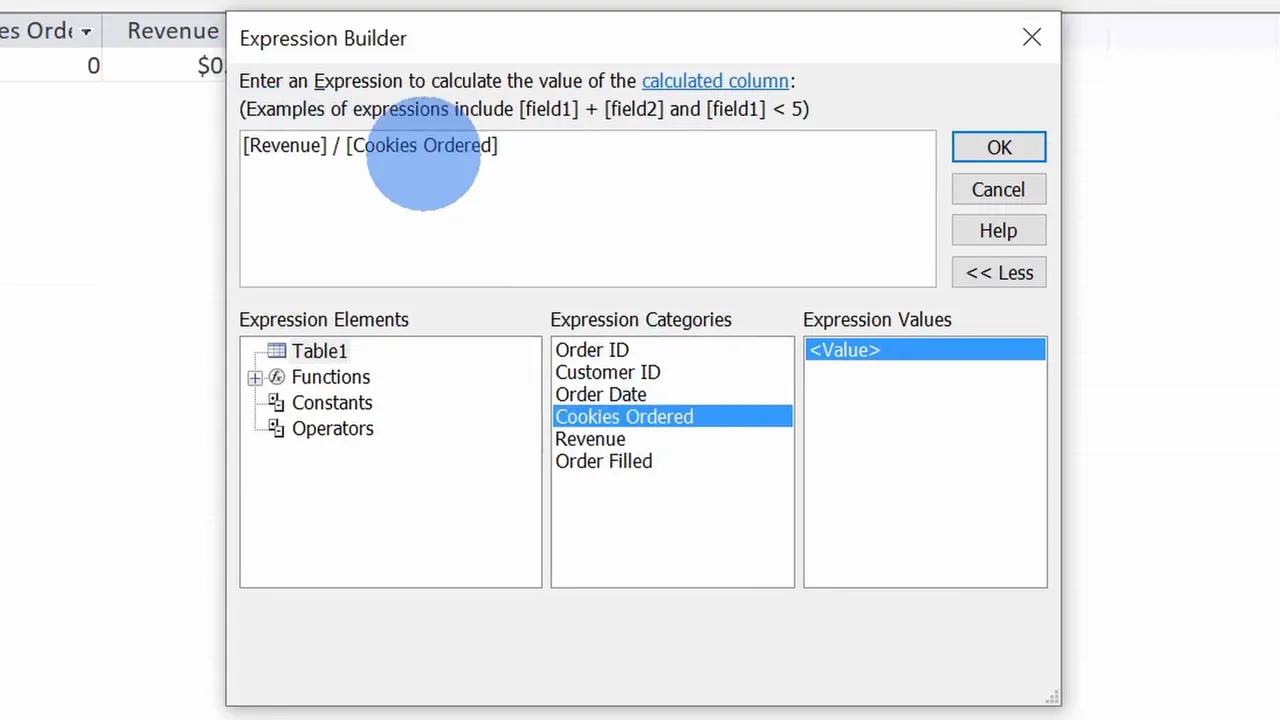
Add sample order records
For the first order, enter the Customer ID assigned to your first customer. In my example, Customer ID 1 belongs to Kevin.
Add an order date, enter 50 for Cookies Ordered, and enter $100 for Revenue. These are premium cookies, after all. Access calculates a revenue per cookie of 2.
Leave Order Filled unchecked so this order will appear in our unfilled orders query later.
Save the table as Orders. You can trigger the naming prompt by switching to Design View or by closing the table and agreeing to save it.
Add five or six sample orders, including multiple orders for the same customer and a mix of filled and unfilled orders. Notice that each order needs only a Customer ID, not another copy of the customer’s name and address.
Closing a table’s tab does not remove it from the database. You can reopen Customers or Orders from the Navigation Pane on the left.
4. Connect Customers and Orders with a Relationship
We have matching Customer ID fields, but we still need to tell Access how the tables relate.
- Select Database Tools > Relationships.
- Add Customers to the relationship workspace.
- Add Orders beside it.
- Drag Customer ID from Customers onto Customer ID in Orders.
- Review the matching fields in the Edit Relationships dialog.
- Select Create.
- Close the Relationships window and save the changes when prompted.
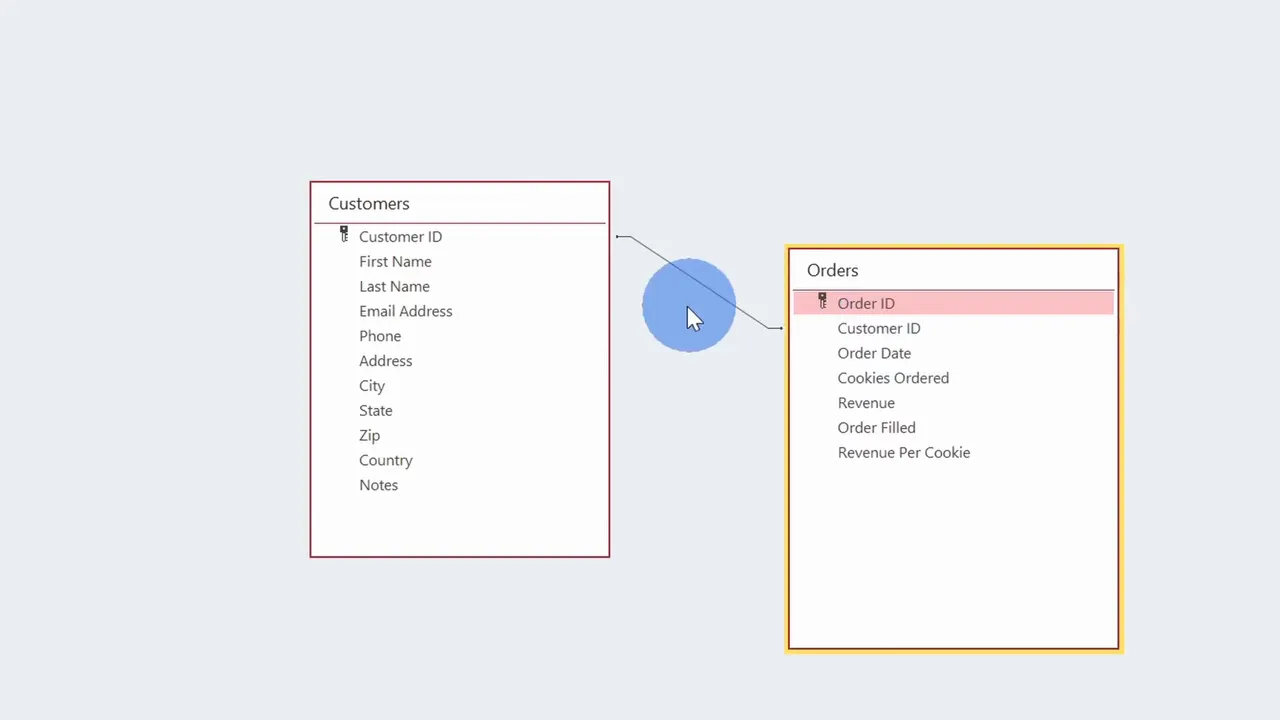
The key icons identify each table’s primary key. Customers has Customer ID as its primary key, while Orders has Order ID.
The Customer ID field in Orders refers back to a customer. That lets one customer have several orders while keeping their contact details in one place. This is the practical meaning of a relational database.
Bring in existing data
You don’t have to type every record manually. The External Data tab provides options for bringing information into Access from files, other databases, and online services.
For this exercise, our sample records are enough. For an existing tracking project, those import options are worth exploring before reentering information you already have elsewhere.
5. Create a Form for Customer and Order Entry
Entering information directly into tables works, but it isn’t always the friendliest experience for other people. A form provides a cleaner interface for adding and reviewing records.
- Select the Customers table in the Navigation Pane.
- Open the Create tab.
- In the Forms section, select Form.
Access generates a form based on Customers. Because we connected Customers and Orders, the form also includes the related order information beneath the customer details.
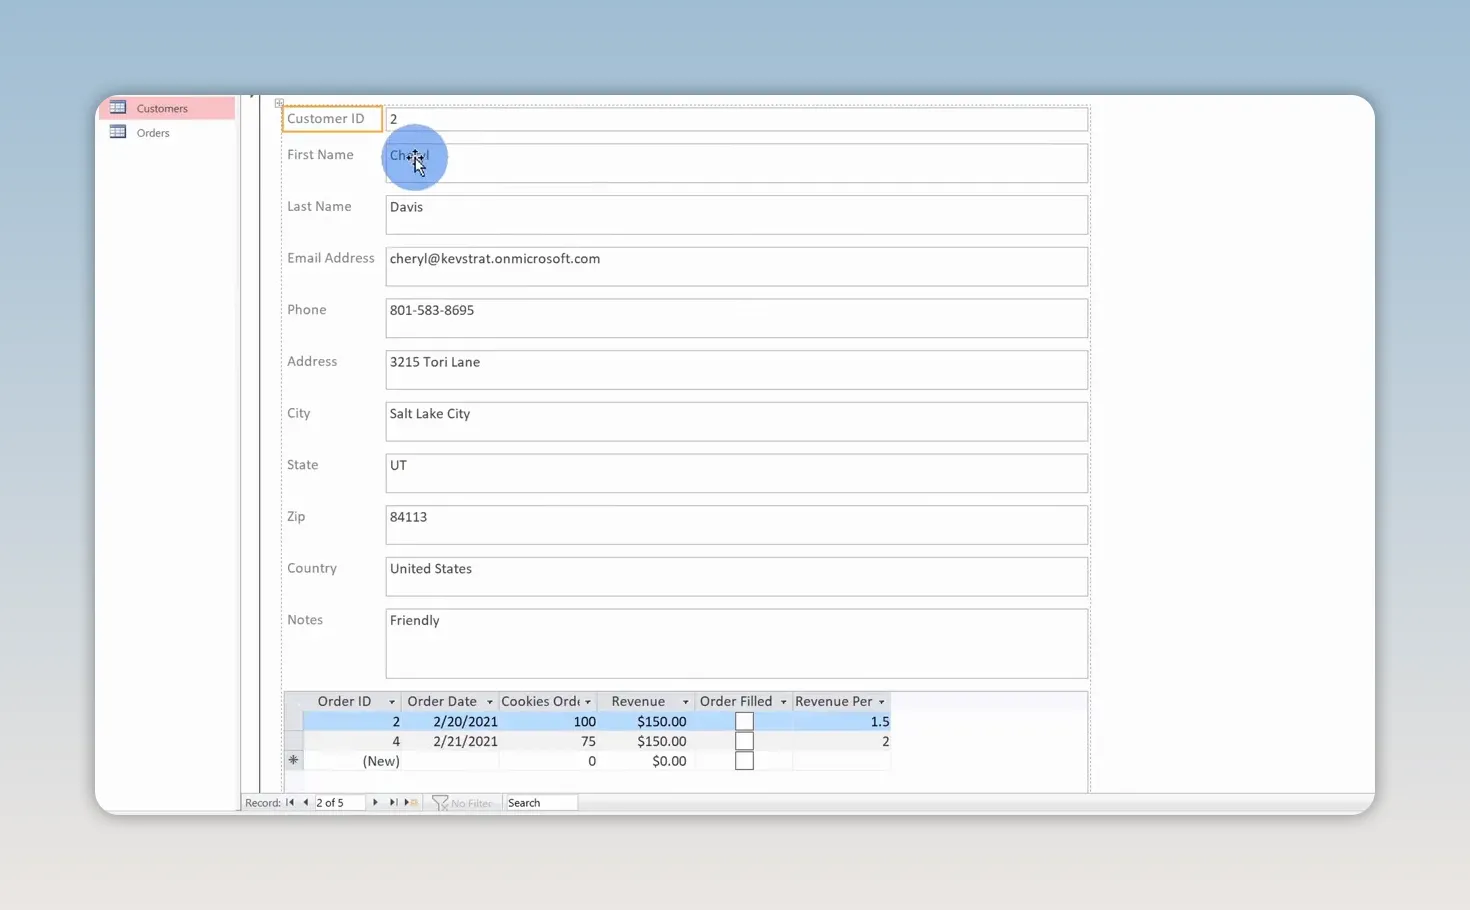
Use the record navigation controls to move between customers. As you move, the related orders change to match the selected customer. For example, selecting Sheryl in the sample data displays the two orders associated with her.
Customize the form
The form tools let you change themes, colors, and controls, or add a logo. If I wanted to give this a little more personality, I could add the Kevin Cookie Company logo.
Switch to Design View to adjust the layout. You’ll see sections such as the form header, detail section, and footer, and you can move elements around to arrange the form.
Switch to Form View for normal data entry. In this view, people can work with the records without rearranging the form’s design.
To add a customer, use the New blank record control at the bottom of the form. Fill in the customer information, then use the related orders area to add order details.
Close the form and save it as Order Form. A Forms category appears in the Navigation Pane, where you can reopen it whenever you need it.
Access also offers a Form Wizard, a blank form option, and a form designer. The automatic Form command is simply a quick way to get a useful starting point.
6. Build a Query to Find Unfilled Orders
Now we can turn our stored information into something useful for the warehouse crew: a list of orders that still need to be shipped.
A query lets you choose the information you want, combine related tables, and apply criteria to return only the records you need.
Choose the tables and fields
- Select Create > Query Design.
- Add the Customers and Orders tables.
- Expand the table boxes if needed so you can see their fields.
The designer shows the connection between the Customer ID fields that we created earlier.
Double-click the following customer fields to add them to the query grid:
- First Name
- Last Name
- Address
- City
- State
- Zip
- Country
From Orders, add Order Date, Cookies Ordered, and Order Filled.
We’re selecting the information the warehouse needs to prepare and send the cookies. For this particular output, we’ll leave out Customer ID, Order ID, and Revenue.
Filter out completed orders
The query grid includes rows for the field name, source table, sort order, whether to show the field, and criteria.
Under Order Filled, enter =No in the Criteria row. This tells Access to return only orders whose checkbox is not selected.
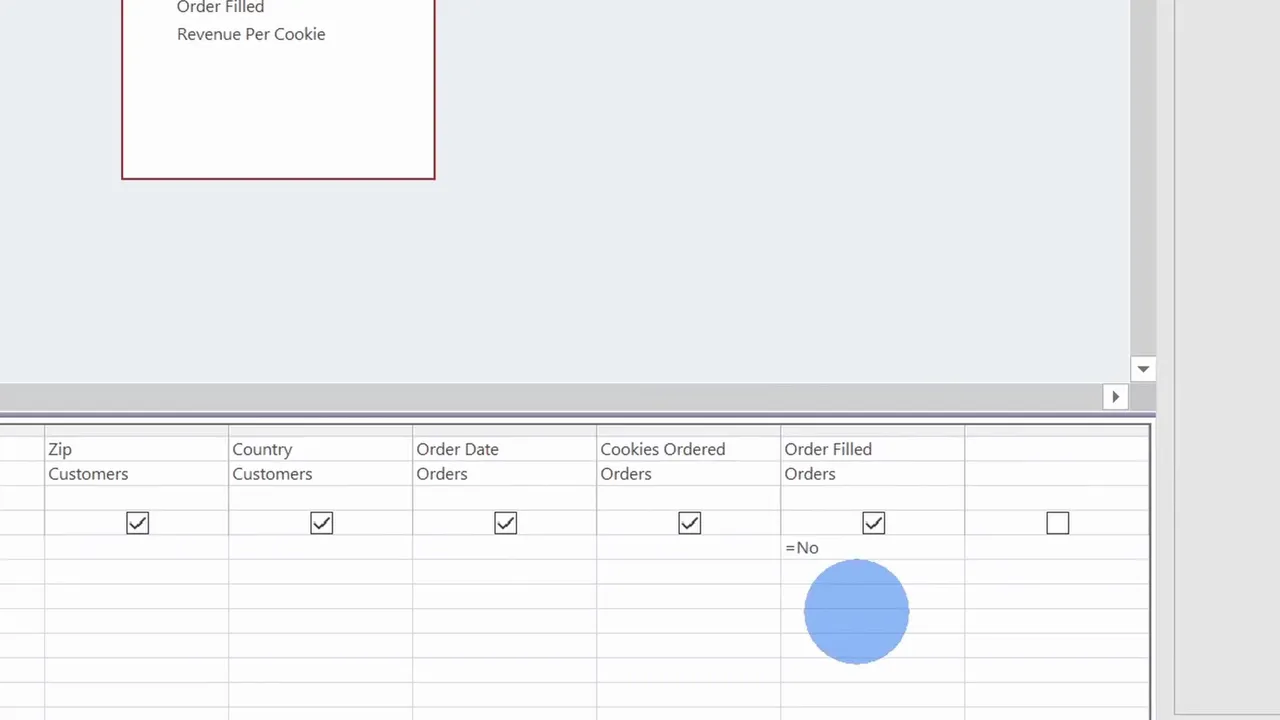
Switch to Datasheet View to see the results. Access combines the customer names and shipping addresses with their order details, then limits the output to unfilled orders.
That’s the benefit of the relationship in action. We stored the information separately, but we can bring it together whenever the task calls for it.
See the SQL behind the query
You don’t need to write SQL to create this query. The graphical designer handles it. But if you want to understand what Access is doing, switch to SQL View.
The generated statement has three main jobs:
- SELECT: Identifies the fields included in the results.
- FROM and JOIN: Identify the source tables and connect them using Customer ID.
- WHERE: Applies the condition that Order Filled equals No.
This is a useful way to learn SQL: build a query visually, then inspect the statement Access creates. For more detail on the language, Microsoft provides an Access SQL reference.
Save and reuse the query
Close the query and save it as Unfilled Orders. It appears under Queries in the Navigation Pane.
Double-click it whenever you need an updated list. As you add customers and orders, running the query again returns the current records that meet its criteria. You don’t have to rebuild the query each morning.
7. Create a Printable Report
A query gives us the right data. A report gives us a formatted way to present it.
For example, rather than asking warehouse staff to open Access and run the query, you might print a list of unfilled orders each morning.
- Select Unfilled Orders in the Navigation Pane.
- Open the Create tab.
- Select Report.
Access creates a report using the query’s fields and results. Selecting the source first matters: if you select Customers instead, the report will be based on that table rather than our filtered order list.
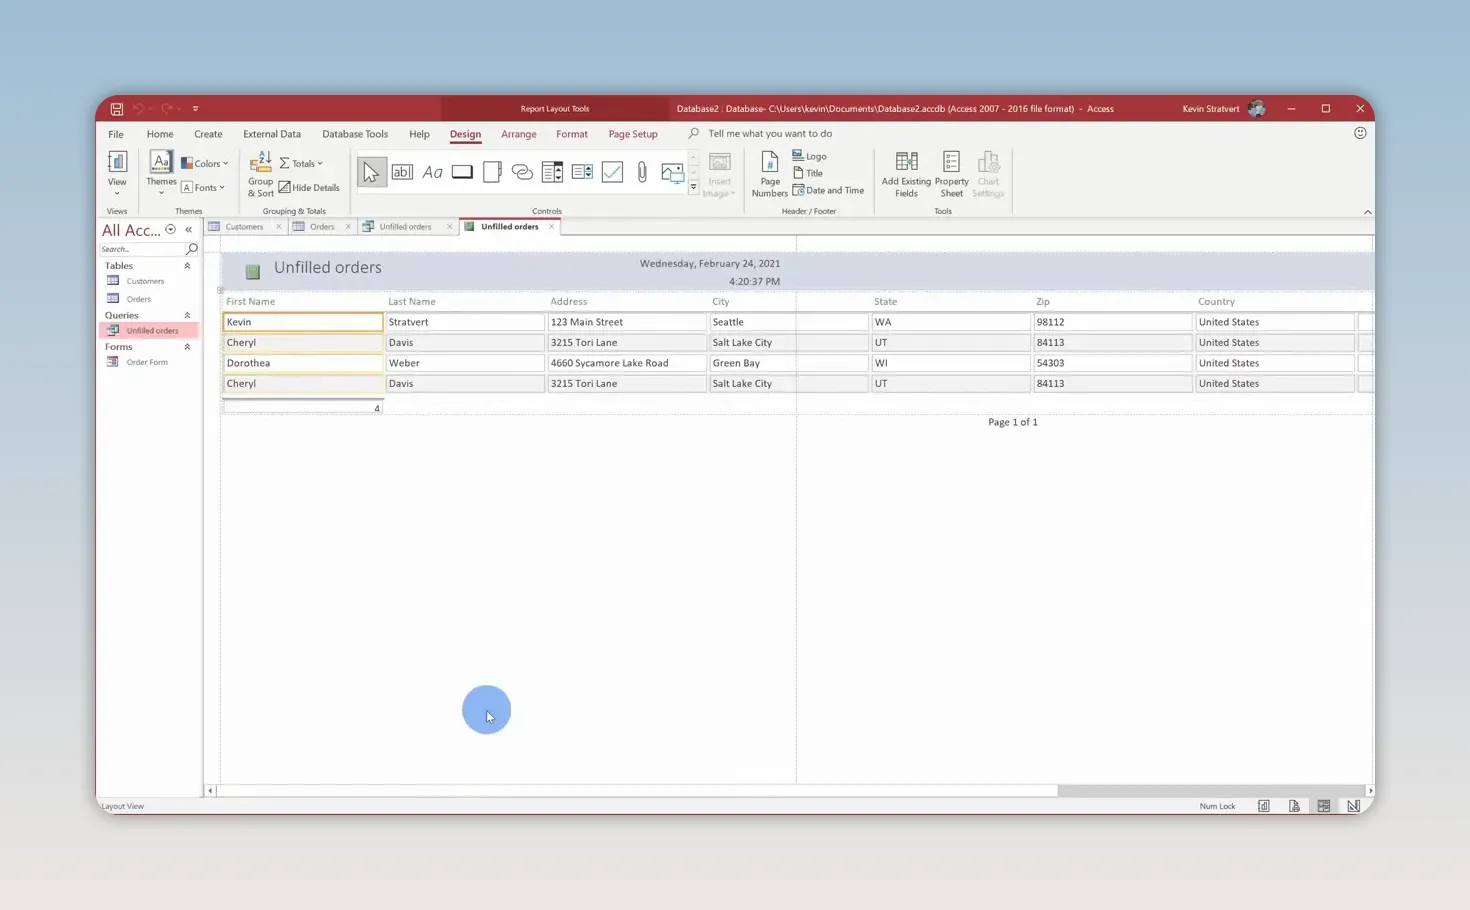
Use the report tools to adjust themes, colors, and fonts. You can review the output in Report View, check how it will print in Print Preview, or use Design View to make more detailed layout changes.
Access also provides a Report Wizard and a blank report option if you want a different starting point or more control.
When you finish, close and save the report. It appears under Reports in the Navigation Pane, alongside the tables, form, and query we’ve already created.
8. Save the Database and Put It to Work
To save the database under another name or location, open File > Save As and choose the Access database option.
You now have the core pieces of a working Access database:
- Tables store customer and order information.
- A relationship connects each order to the right customer.
- A form makes records easier to enter and review.
- A query finds orders that still need attention.
- A report presents those orders in a shareable, printable format.
There’s plenty more you can customize, but these fundamentals give you a practical foundation. Start by deciding what you need to track, separate the main subjects into tables, connect them through identifiers, and build the forms and outputs that make the information useful. For the Kevin Cookie Company, that means fewer repeated addresses and a clearer path from cookie order to shipment.
Made with VideoToBlog using How to use Microsoft Access - Beginner Tutorial


