Headers and footers seem simple until you need a blank title page, alternating page layouts, or a different heading for each part of a report. The good news is that Word has built-in tools for all of these tasks. Once you know which settings control what, formatting your document becomes much easier.
You can start with a company name and page numbers, then build up to branded letterhead with a logo, address, and divider line. Here’s how to put those features to work.
What You'll Learn
- Insert automatic page-number fields so numbering updates throughout your document.
- Use separate first-page and odd-and-even settings to control repeating page layouts.
- Create section breaks and unlink headers and footers independently for different document sections.
- Build letterhead with a resized logo, formatted address, divider line, and suitable margins.
Table of Contents
- What Are Headers and Footers?
- How to Open and Close the Header or Footer
- Add and Format Header and Footer Text
- Insert and Customize Automatic Page Numbers
- Keep the First Page’s Header and Footer Blank
- Create Different Odd and Even Page Headers
- Use Different Headers and Footers in Different Sections
- Add a Company Logo and Build Letterhead
- Adjust Header and Footer Margins
What Are Headers and Footers?
A header is the area at the top of a page, above the main document content. A footer is the area at the bottom, below the main content.
Both can repeat automatically throughout your document. That makes them useful for information you want to keep consistent, such as:
- A document or report title
- Your company name and logo
- A date
- Page numbers
The important distinction is that headers and footers are separate from the body of your document. Instead of manually adding the same information to every page, you set it up once and let Word repeat it.
How to Open and Close the Header or Footer
The quickest way to edit a header is to double-click near the very top of the page. To edit a footer, double-click near the bottom.
When the area opens, Word displays a dashed boundary and makes the main document text appear gray. That means you’re editing the header or footer rather than the body. You’ll also see a Header & Footer tab appear in the ribbon. This is the control center for page numbers, page-specific settings, and section links.
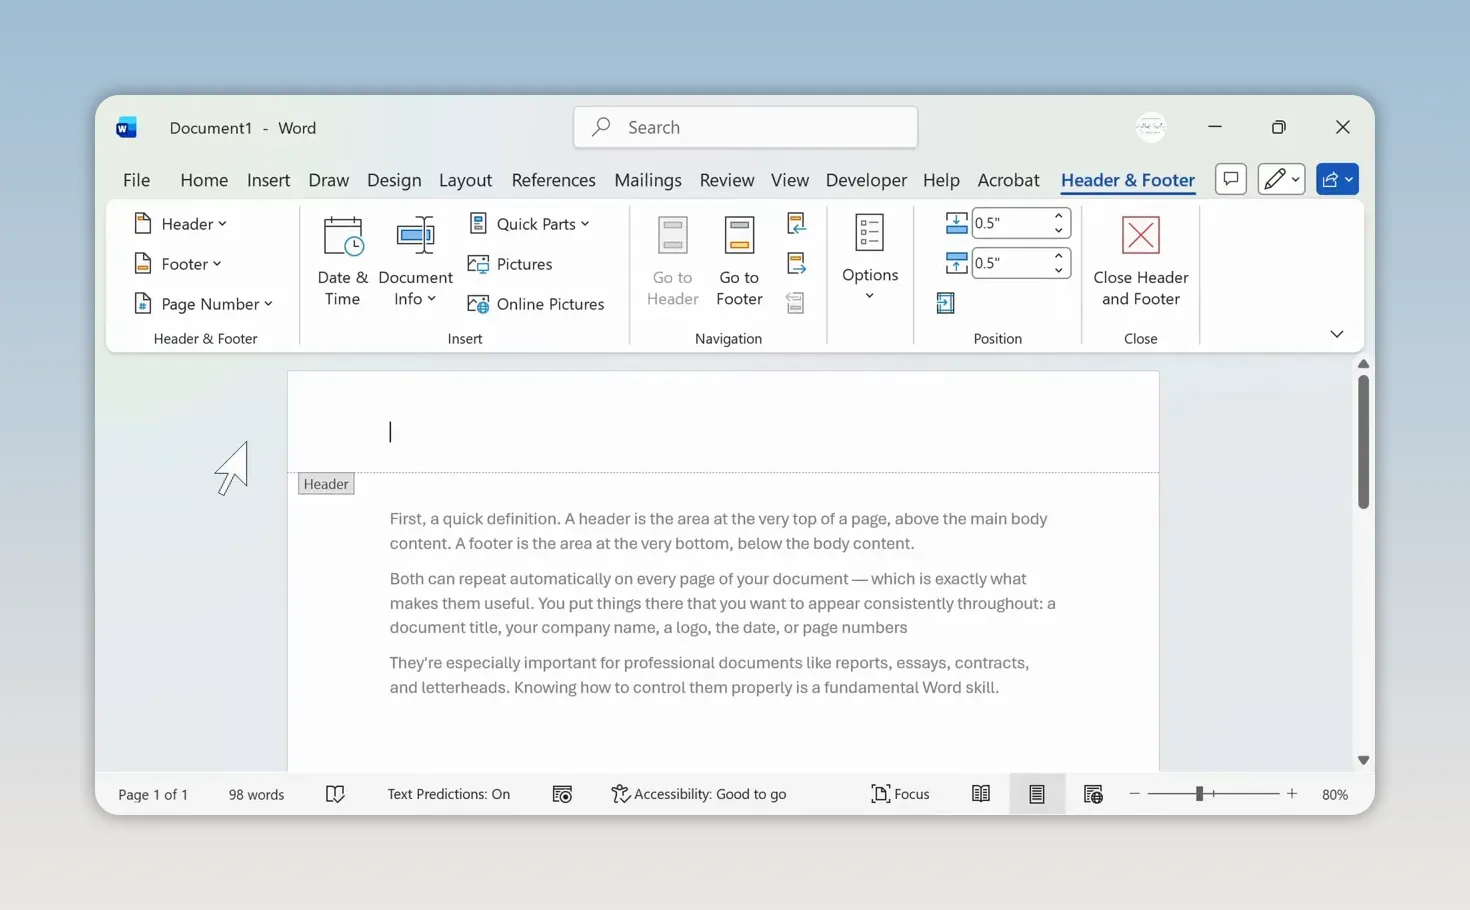
You can also open these tools from the ribbon:
- Select the Insert tab.
- Find the Header & Footer group or menu.
- Choose Header, Footer, or Page Number, depending on what you want to add.
When you’re finished, double-click in the main body of the document or select Close Header and Footer. You’ll return to normal document editing.
Add and Format Header and Footer Text
Once you’re inside a header or footer, text behaves much like it does elsewhere in Word. You can change the font, adjust its size, apply bold or italics, and choose a different text color.
You also have a handy alignment feature: built-in tab stops. In the header shown here, you can type at the left margin, press Tab to move to the center, then press Tab again to move to the right edge.
A professional report header could use that layout like this:
- Left: Company name
- Center: Document title
- Right: Date
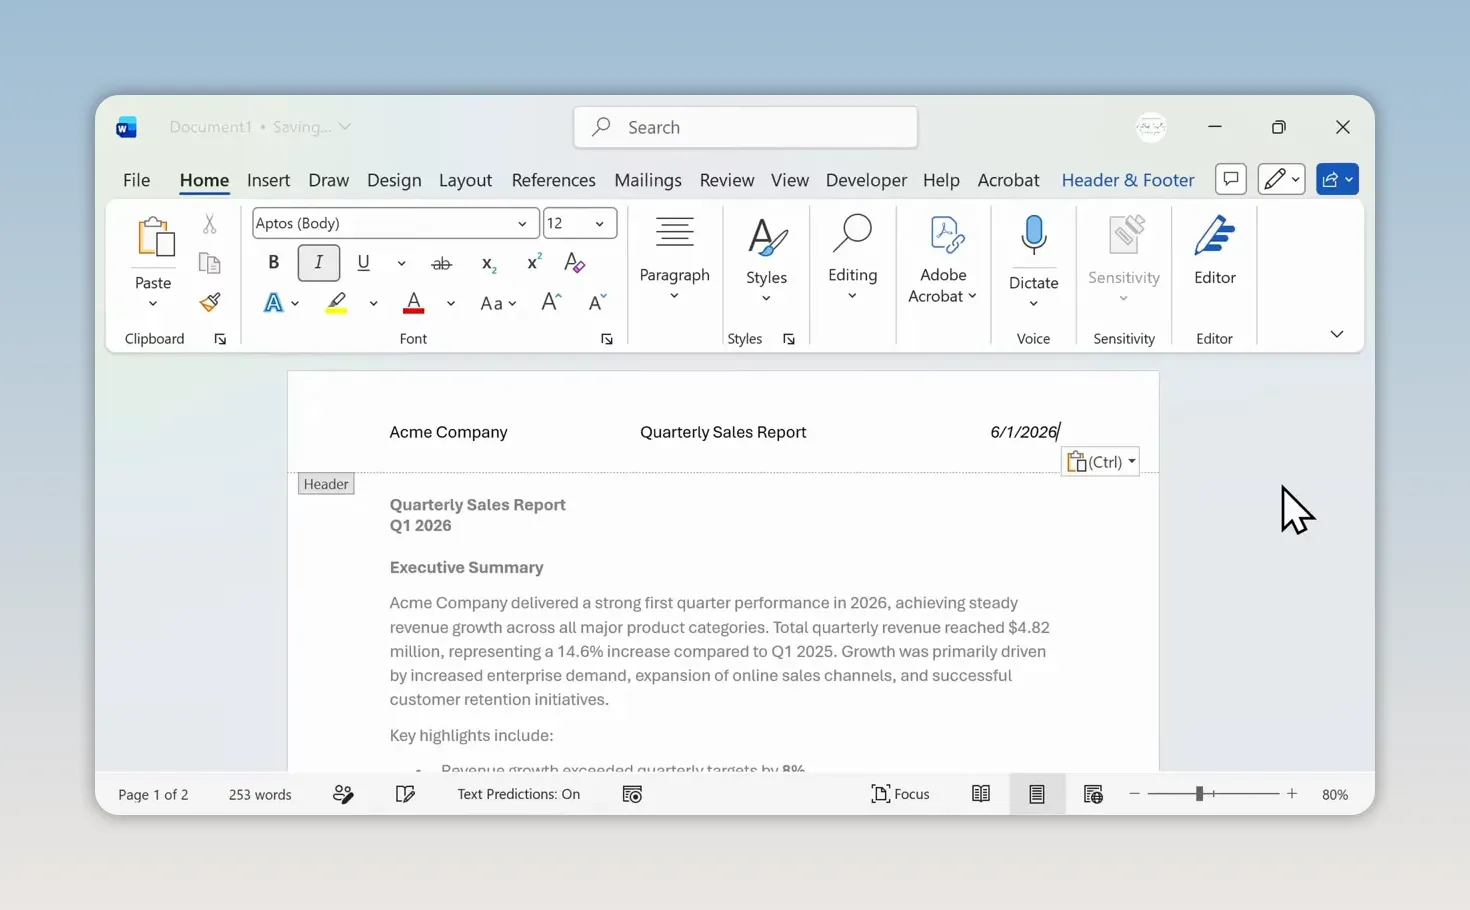
The same basic approach works in the footer. Double-click into the footer, use the available tab positions to place your content, and format it as needed. For example, you could position a copyright notice toward the right side.
Insert and Customize Automatic Page Numbers
Page numbers are probably the most common content people put in headers and footers. The key is to insert an automatic page-number field, not simply type a number.
- Open the header or footer.
- On the Header & Footer tab, select Page Number.
- Choose where the number should appear.
- Select a style from the gallery.
Word offers several locations:
- Top of Page: Adds numbering in the header.
- Bottom of Page: Adds numbering in the footer.
- Page Margins: Places numbering along a page margin.
- Current Position: Inserts numbering where your cursor is located.
Bottom of Page is a common choice. Its gallery includes simple numbers as well as more decorative layouts, with different alignment options.
Once inserted, the number updates automatically for each page. If you’re on the second page, Word displays the appropriate number rather than repeating a typed “1” throughout the document.
Change the Style or Number Format
To choose a different page-number style, return to Page Number and select another gallery option.
To change the numbering system, choose Page Number > Format Page Numbers. In the dialog box, use the Number format dropdown to select a format, such as Roman numerals, then select OK.
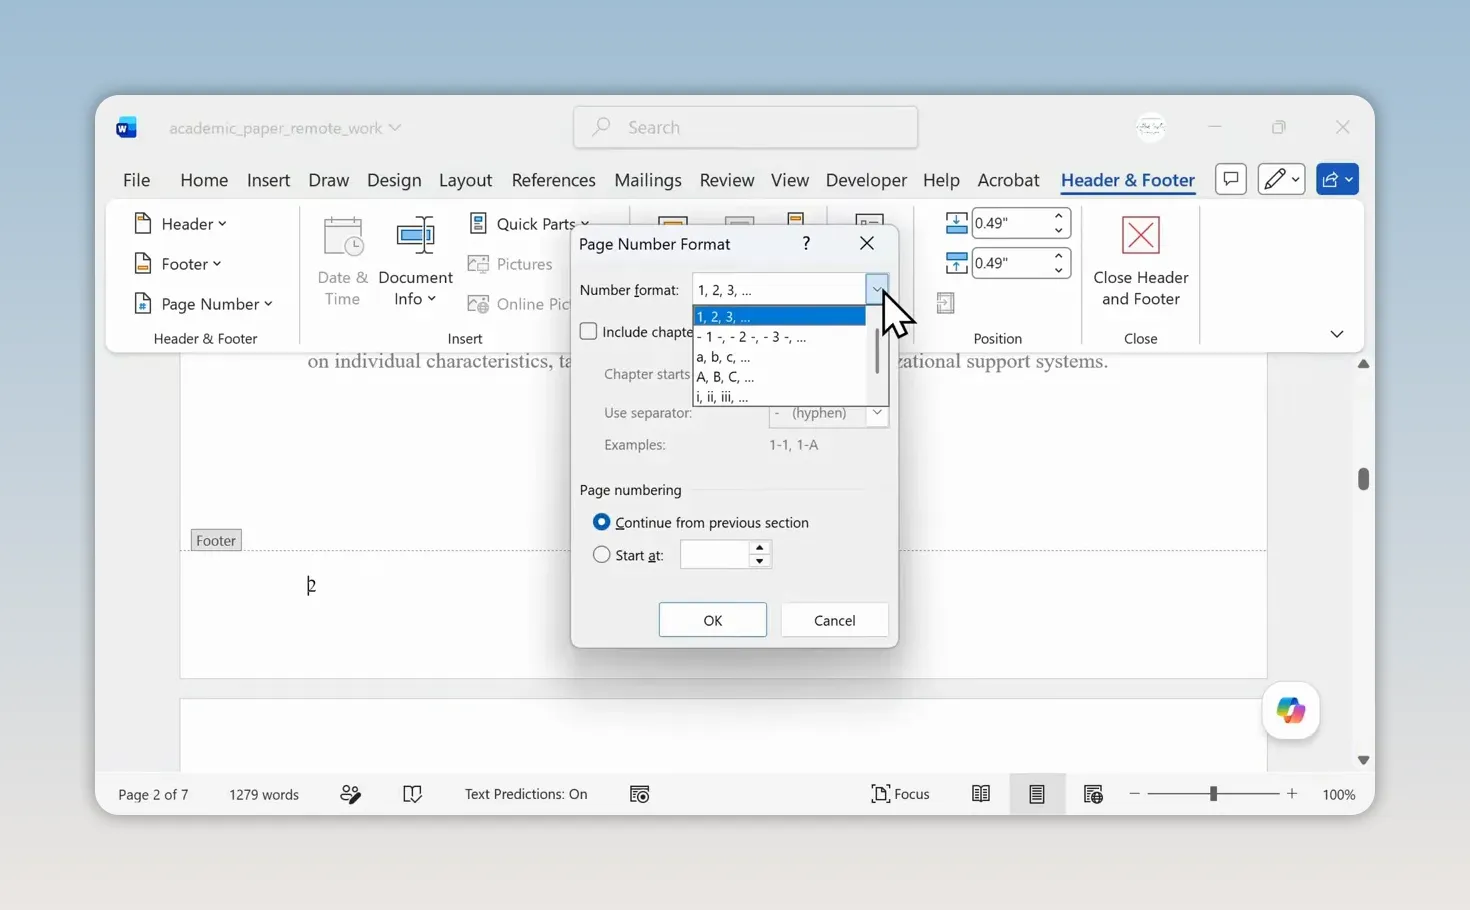
This gives you control over how the page numbers appear without having to replace them manually.
Keep the First Page’s Header and Footer Blank
A report often needs a clean title page, while the remaining pages need a header and page numbers. You don’t need to delete the repeated content page by page. Use Different First Page.
- Open the header or footer.
- On the Header & Footer tab, open the Options group or menu.
- Select Different First Page.
- Leave the first-page header and footer blank, or give them their own content.
Word now treats the first-page header and footer separately from those on the following pages. In this example, the existing page number disappears from the first page but remains on the later pages.
You can then go to a later page and add the header you want repeated, such as the report title. It will appear on the following pages without adding it to the title page.
Different First Page creates a separate header and footer; it doesn’t require them to be empty. Leaving them blank is simply the right choice when you want a clean cover page.
Create Different Odd and Even Page Headers
For a book-style layout, you may want facing pages to use different headers. A typical example is a book title on left-hand pages and a chapter title on right-hand pages.
Open the header or footer, go to Options, and select Different Odd & Even Pages.
Word creates separate areas for odd-numbered and even-numbered pages. It labels the active area so you can tell which one you’re editing, such as Odd Page Footer.
Design each one independently. Word then alternates the two layouts automatically throughout the document. You don’t have to manually format every other page.
Use Different Headers and Footers in Different Sections
What if your introduction needs one header, but the next part of your document needs something completely different? This is where sections come in.
The process has two parts: create a section break, then disconnect the new section’s header or footer from the previous section.
1. Insert a Next Page Section Break
- Place your cursor at the end of the content before the page where the new section should begin.
- Select Layout > Breaks.
- Under Section Breaks, select Next Page.
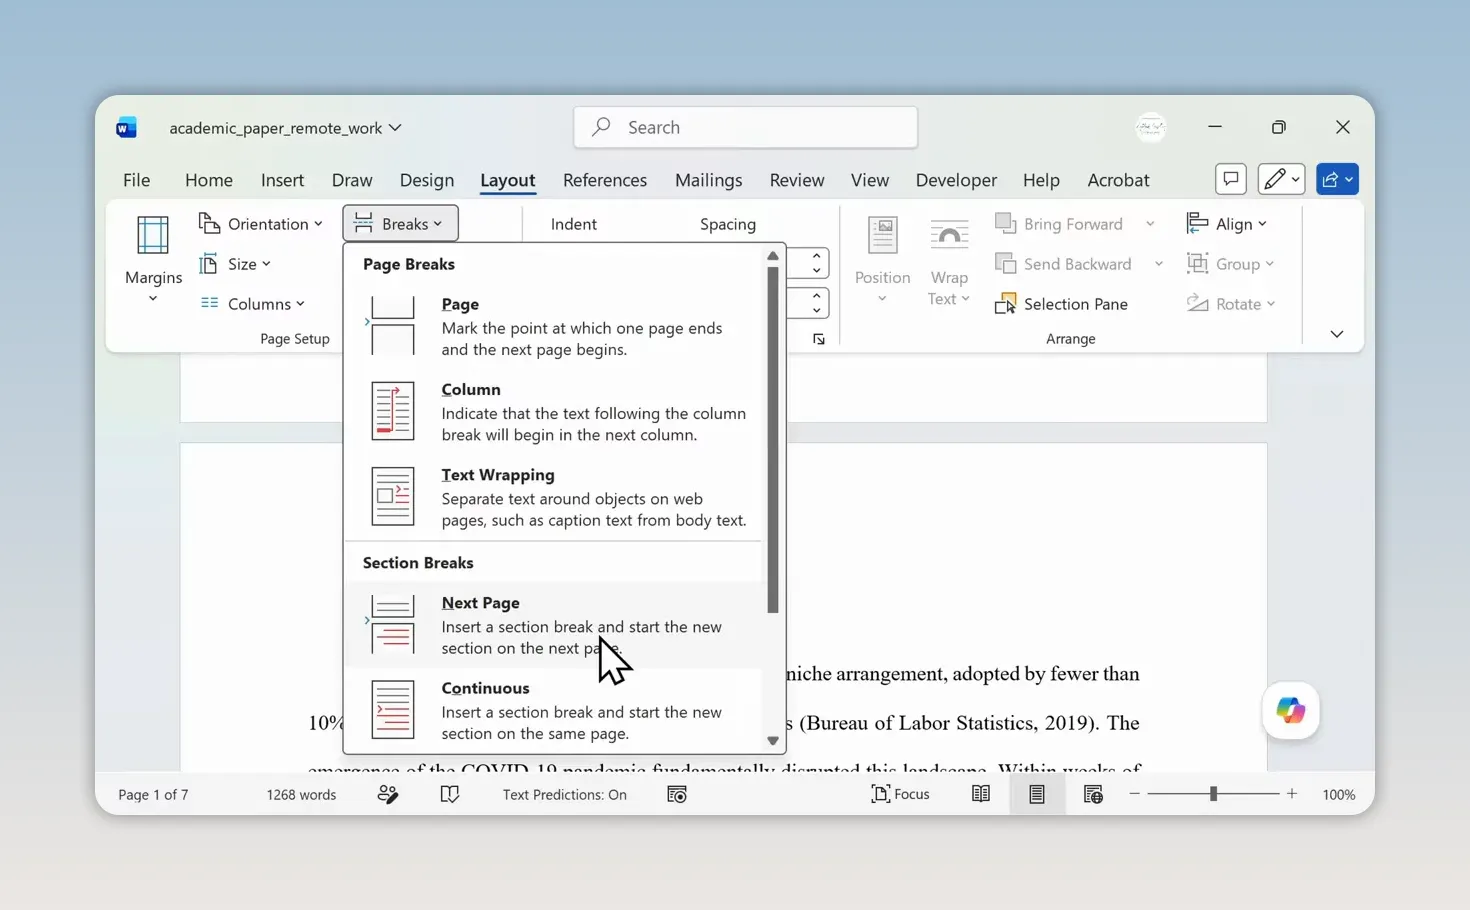
Now open the header on the new section’s first page. Word identifies it with a section number. If Different First Page is enabled, you may see a label such as First Page Header - Section 2.
2. Turn Off Link to Previous
By default, Word links a new section’s header to the corresponding header in the previous section. You’ll see a Same as Previous label when that connection is active.
To make the new header independent:
- Click inside the new section’s header.
- Find Link to Previous on the Header & Footer tab.
- Turn it off.
- Enter the header text for the new section.
You can now change that header without changing the previous section’s header. Repeat the process wherever another part of the document needs its own heading.
Headers and footers are linked independently. Turning off Link to Previous for the header does not disconnect the footer. If both need to be different, open each area and turn off its link separately.
Add a Company Logo and Build Letterhead
Headers aren’t limited to text. You can add a company logo, pair it with a business address, and finish the layout with a line.
Insert and Resize the Logo
- Place your cursor inside the header.
- Select Insert > Pictures and choose your image.
- Drag a corner sizing handle inward to make the logo smaller.
- While the image is positioned inline with the header text, use the tab stops to move it toward the center or right.
Keep the logo fairly small. Headers are narrow, and an oversized image can push your main document content farther down the page.
Adjust Text Wrapping to Add an Address
After inserting the logo, you may find that clicking elsewhere in the header doesn’t let you type where you want. Changing the image’s text wrapping can make the layout easier to work with.
- Select the logo.
- Open its Layout Options button.
- Under the text-wrapping choices, select Through.
- Click back into the header and add your business address.
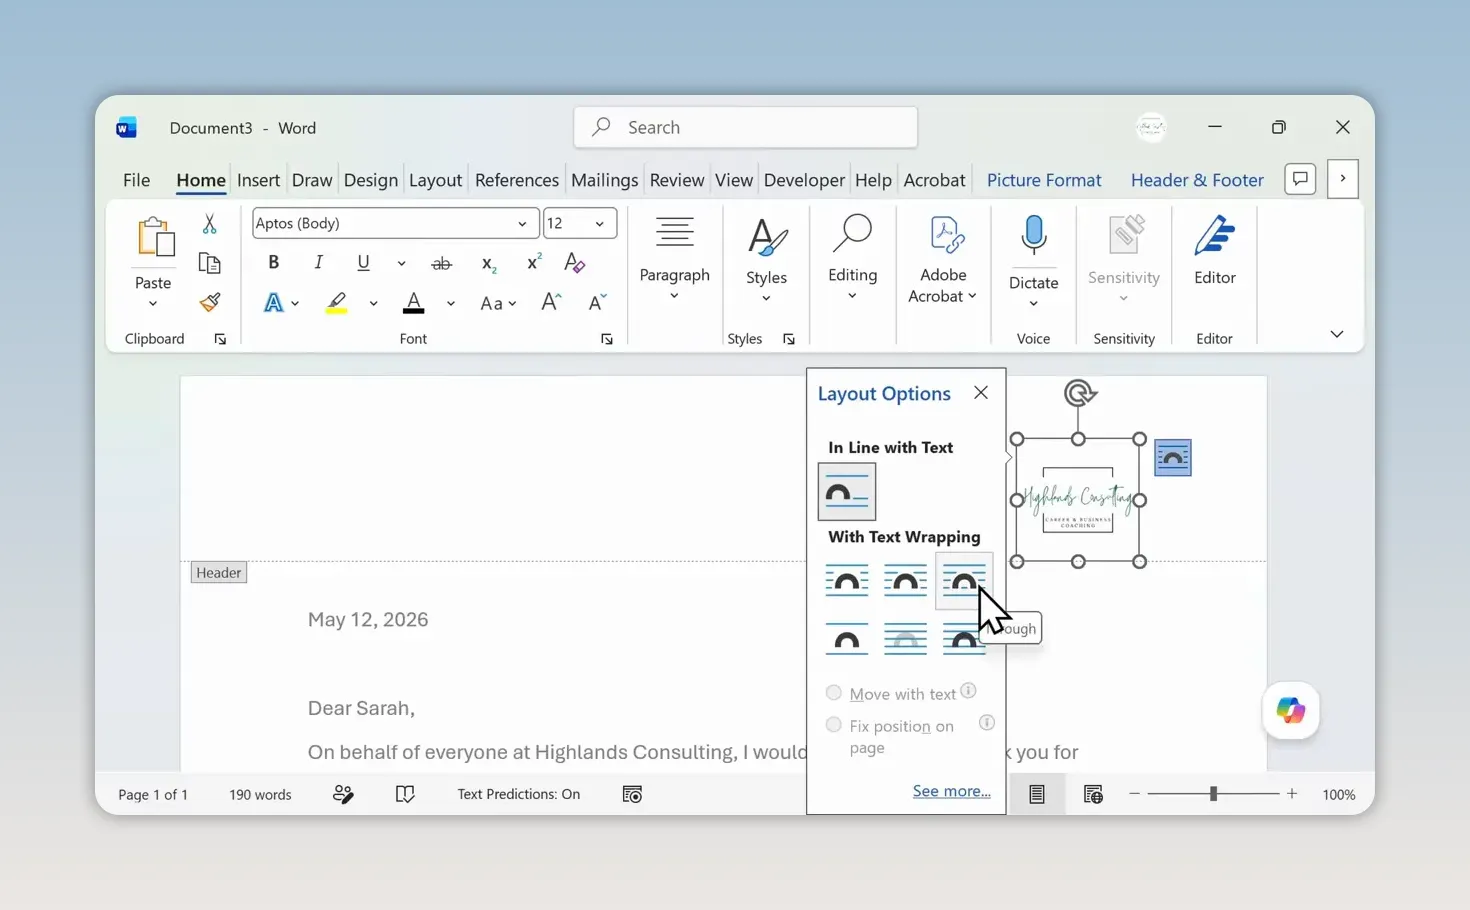
The image may shift when you change its wrapping. That’s okay. Format your address first, adjusting the font, size, and color as needed, then drag the logo back into the position you want.
Add a Divider Line
A divider line can visually separate your letterhead from the letter itself.
- With the header active, select Insert > Shapes.
- Choose a line.
- Click and drag across the header to draw it.
- Adjust the line’s color, width, and position to suit the layout.
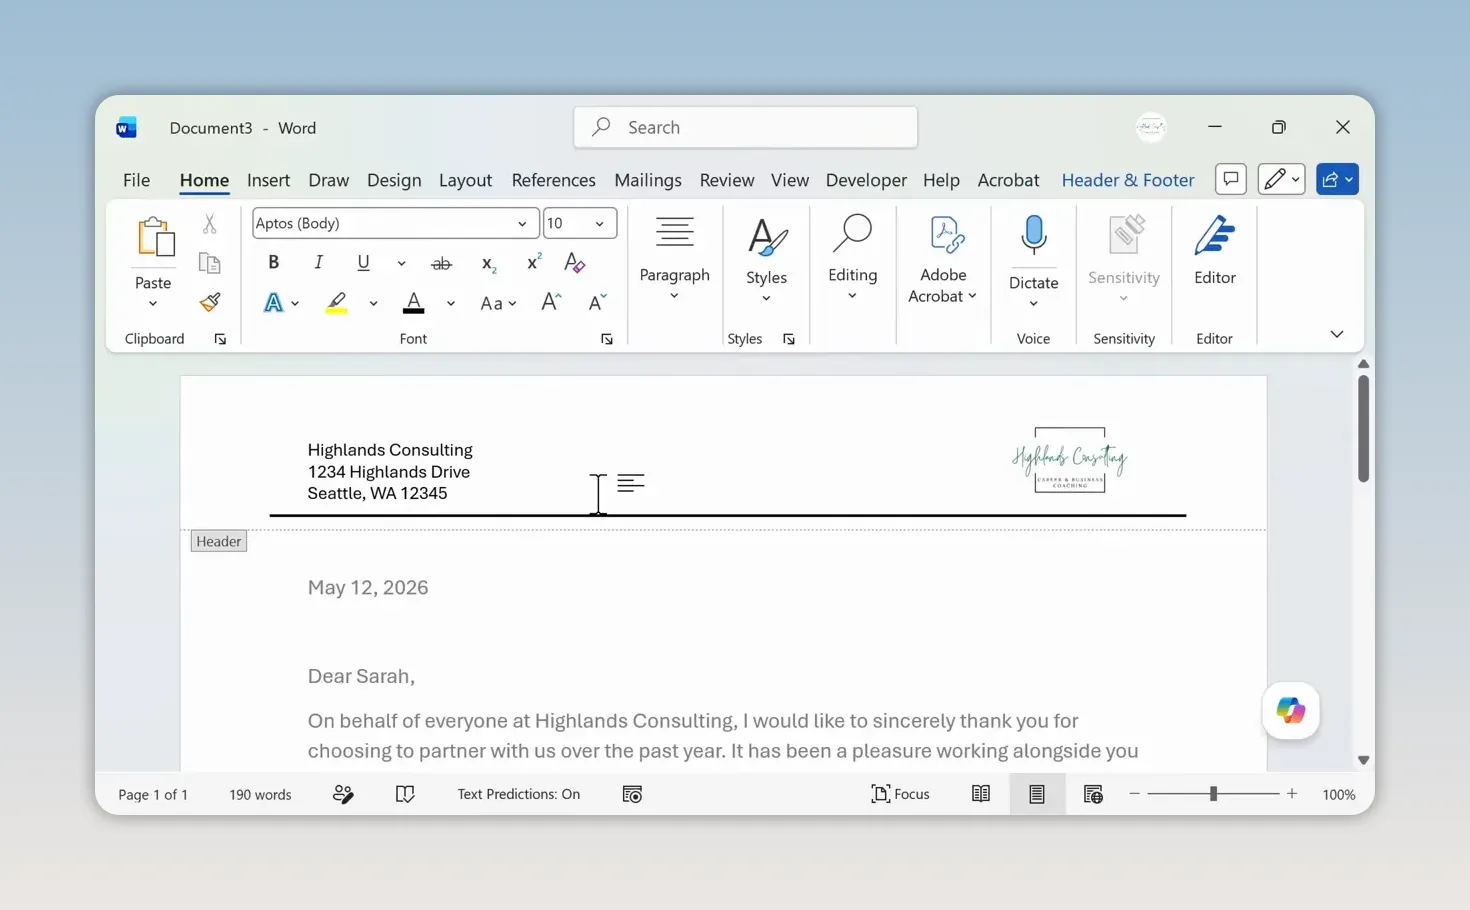
You now have the basic elements of branded letterhead: contact details, a logo, and a clear boundary above the body content.
Adjust Header and Footer Margins
If your header or footer content is getting cut off, check the page margin and positioning settings. Headers and footers occupy the page’s margin areas, so they need enough room for the content you’ve added.
- Select Layout > Margins.
- Choose Custom Margins.
- In the Page Setup dialog box, select the Layout tab.
- Adjust the Header and Footer distances under From edge.
These settings control how far the header and footer sit from the edges of the page. Check them alongside the size of your logo and the amount of text in the header or footer.
The most useful settings to remember are Different First Page for a cover page, Different Odd & Even Pages for alternating layouts, and section breaks plus Link to Previous for independent parts of a document. Combine those with automatic page numbers and a carefully sized logo, and you can create polished reports and letterhead without manually repeating content on every page.
For additional Word help, the Microsoft Word support hub provides more guidance on document formatting.


