Finishing a recording usually leaves me with the same pile of files: one main take, a handful of product close-ups, and a few moments that definitely need cutting. The challenge is turning those pieces into a video that feels organized, looks polished, and keeps moving.
Movavi Video Editor 2027 takes a useful approach to that problem: customizable templates made from individual, editable blocks. You get a starting structure without being locked into someone else’s sequence, footage, titles, or music.
For this walkthrough, I’m building a short review of the Focusrite Scarlett 8i6 audio interface using one continuous recording and some close-ups from my desk. The same workflow works for gadget reviews, cooking videos, travel projects, gaming highlights, and other everyday editing jobs.
Disclosure: This tutorial is sponsored by Movavi.
What You'll Learn
- Customize modular template blocks with your own footage, photos, text, and arrangement.
- Layer product shots above one continuous recording to preserve narration throughout the edit.
- Polish the result with precise cuts, transitions, overlay stickers, and balanced background music.
- Use AI tools to generate subtitles, reduce noise, and reframe footage.
Table of Contents
- What Movavi Includes, and Which Libraries Cost Extra
- 1. Import Your Footage and Choose a Template
- 2. Treat the Template as a Set of Blocks
- 3. Add a Ready-Made Montage with Quick Cuts
- 4. Keep One Continuous Take Beneath the B-Roll
- 5. Remove Pauses and Trim the Main Recording
- 6. Customize Transitions and Finish with a Fade
- 7. Add an Overlay Sticker
- 8. Balance the Music Beneath the Voice
- 9. Use AI Tools for Subtitles and Cleanup
- A Template Gives You a Starting Point, Not a Fixed Result
What Movavi Includes, and Which Libraries Cost Extra
Movavi Video Editor is a desktop video editor for Windows and macOS. I’m using a Mac, but the editing interface works the same way on Windows. It combines traditional timeline editing with drag-and-drop effects, customizable video templates, and automated tools for tasks such as removing silence and generating subtitles.
Before choosing a template, it helps to understand the three parts of the offering:
- Movavi Video Editor: The editor itself, including its built-in transitions, effects, stickers, and music. Several templates are included with the full version at no additional cost.
- Movavi Video Templates: A separate subscription that unlocks the full collection of modular templates. A crown icon identifies templates that require this subscription for full use.
- Movavi Effects: Another separate subscription with more than 10,000 additional creative effects and over 1,500 music tracks, along with transitions, filters, and other assets.
You can download and preview templates, and you can try the additional effects on your footage before subscribing. For subscription templates marked with a crown, you can still customize the project, but you need the Templates subscription to export videos longer than 60 seconds and without a watermark.
The important distinction: Templates provide the building blocks and arrangement; Effects provides additional looks and creative assets to apply on top.
1. Import Your Footage and Choose a Template
When Movavi opens, the File Import area is ready for your videos, photos, and audio. Browse for files or drag them straight in from a folder on your computer. You can add more media at any point, so there’s no need to gather every last file before starting.
For my review, I’m importing the continuous camera recording along with product videos and still images of the Scarlett interface.
You could drag those files onto an empty timeline and edit everything manually. Instead, open the Templates tab to browse categories such as beauty and fashion, food and cooking, storytelling, travel, and vlogs. There are also options for intros, YouTube outros, slideshows, birthday videos, and promos.
Download a template, then move your pointer across its thumbnail to preview it, or press the spacebar to play it. The preview includes placeholder footage, images, text, and music, which makes it much easier to judge the pacing and overall feel.
Templates can even help before you record. If you’re unsure which shots to capture, previewing a few layouts can suggest a useful shot list.
For this project, I’m choosing Review from the Vlog category and dragging it onto the timeline.
2. Treat the Template as a Set of Blocks
Once the template lands on the timeline, it separates into individual sections. Most display a block icon, which means they contain editable placeholders for your own clips, images, and text.
A section without that icon is simply a regular video clip. You can remove it or replace it entirely.
This is what makes the workflow flexible. The sequence is a suggestion, not a requirement. You can:
- Move blocks into a different order.
- Delete sections you don’t need.
- Add blocks from other templates.
- Replace the template’s regular footage with your own.
- Build a project from individual blocks without starting from a complete template.
The library lives inside the editor, so you can browse, download, and drag a template into place without a separate installation workflow.
Replace a video placeholder
The opening block in my chosen template contains a five-second product video and three text fields. Here’s how I make it my own:
- Double-click the block to open its clip settings above the timeline.
- Select the video placeholder and click the double-arrow Replace Clip icon.
- Choose an imported clip, or use Add to bring in another file.
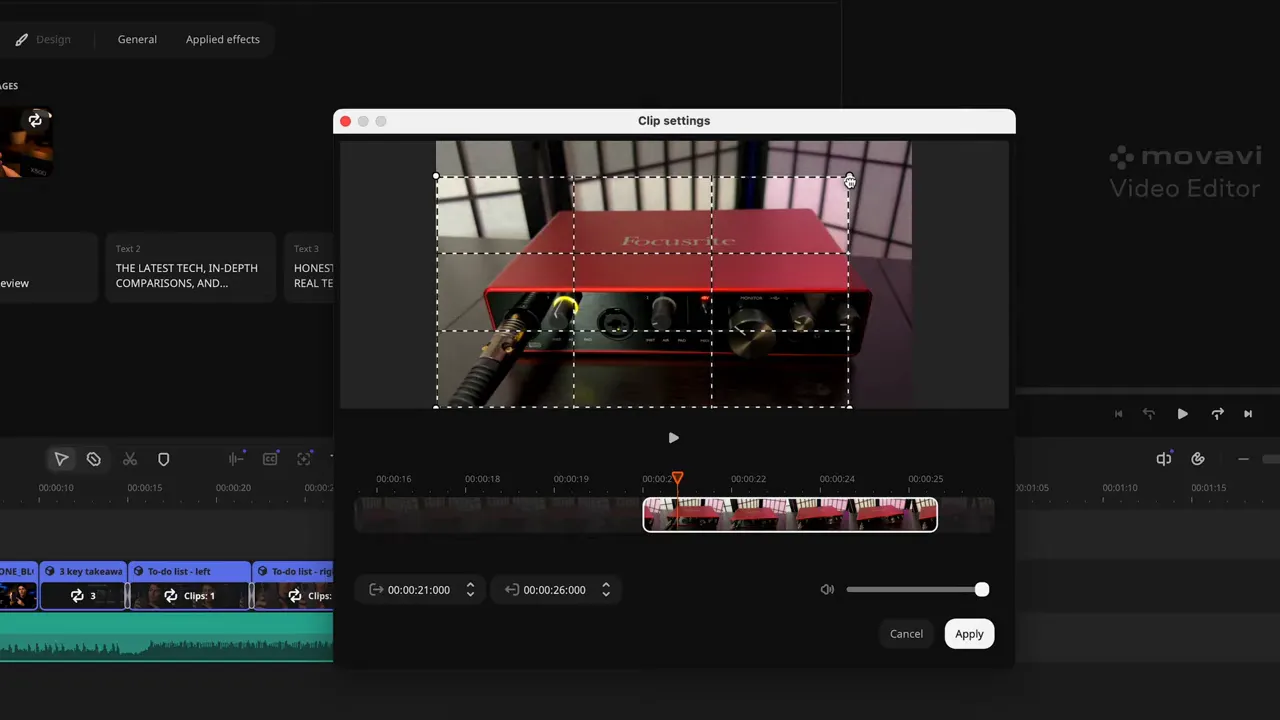
- Move the highlighted selection along the source clip to choose the portion you want.
- Adjust the framing if needed, then click Apply.
Because this placeholder is five seconds long, I’m choosing a five-second section from my product footage. I can move that selection to a better part of the recording rather than accepting the first five seconds.
To tighten the framing, click the preview and drag the selection corners. The crop keeps the placeholder’s aspect ratio, so I can zoom in slightly without changing its shape.
Customize the text
With the block selected, find the text fields in clip settings and type your own wording. I’m replacing the opening title with Garrick’s Tech Reviews.
The template preserves its original styling, but you can change the font, size, and other text properties. I’m making the title slightly smaller. If a text field isn’t useful, simply clear its contents.
Mix videos and still images
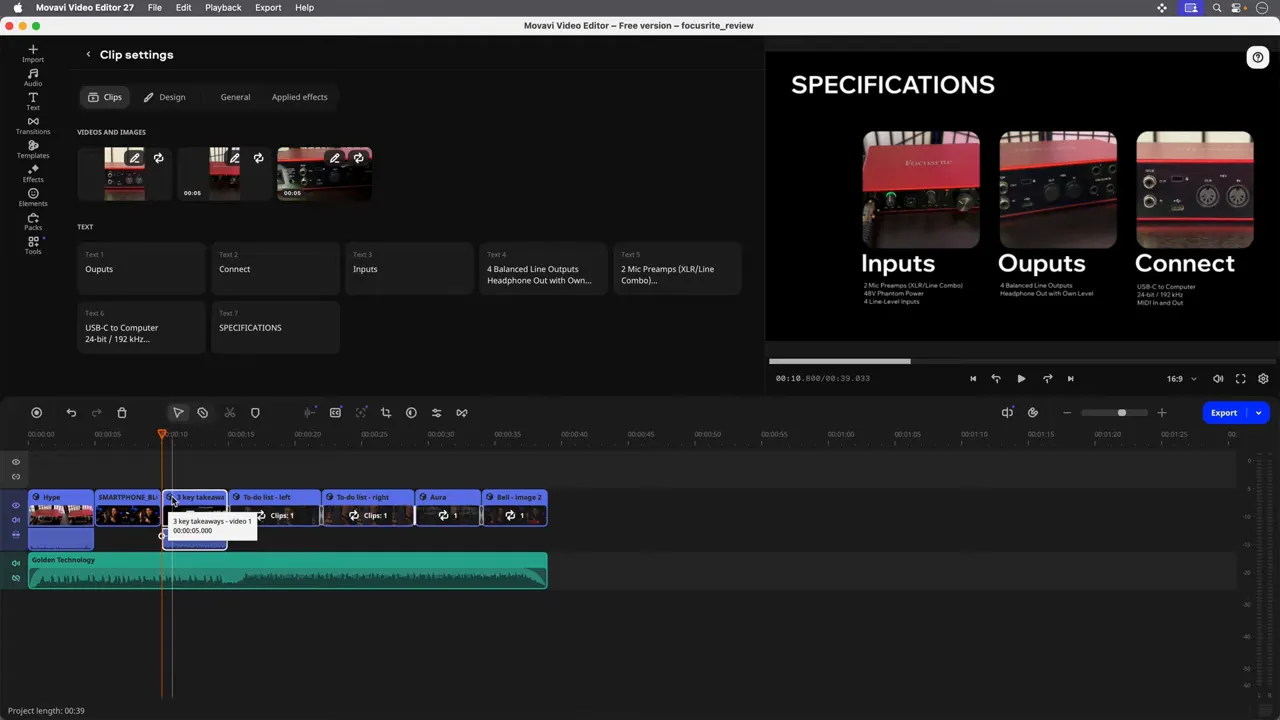
Another block contains three media placeholders and seven text fields. Each placeholder uses the same replacement process, whether I choose a horizontal video, a vertical video, or a still photo.
For a photo, select the Photo category in the replacement window and adjust the framing. There’s still a timeline because the image needs to remain on screen for the placeholder’s duration.
I’m also changing the labels to match the product. A placeholder originally labeled for a phone camera becomes Inputs, alongside close-ups of the interface’s connections.
One small detail matters here: imported videos may contain audio captured while recording the close-ups. If that sound isn’t part of the finished piece, lower its volume to mute. Otherwise, adjust it deliberately so it doesn’t introduce unwanted noise beneath the narration.
3. Add a Ready-Made Montage with Quick Cuts
You don’t have to keep only the blocks supplied with the template. Open Templates, then select Blocks to browse individual pieces organized by purpose.
Options include collages for split-screen layouts, countdowns, logo animations, outros, picture-in-picture arrangements, and Quick Cuts.
A Quick Cut is a prebuilt montage. Its cuts, timing, and transitions are already arranged; you just supply the media. The thumbnail indicates how many clips it holds, and the names distinguish faster and slower styles.
I’m using Flicker Fast 2, which holds four clips and runs for four seconds.
- Preview the block by moving the pointer across its thumbnail.
- Drag it between two sections on the timeline, using the insertion highlight as a guide.
- Double-click it to open its placeholders.
- Replace all four placeholders with product close-ups or photos.
If an existing block no longer fits, right-click it and choose Ripple Delete. That removes the block and closes the gap by bringing the following content over.
You can also reverse the whole approach: start with an empty timeline, add an intro, a few Quick Cuts, a collage, and an outro. A full template is really just a collection of blocks that has already been arranged for you.
4. Keep One Continuous Take Beneath the B-Roll
My main recording is about 39 seconds long. I spoke through the review in one take rather than recording separate lines for each template section.
I want that recording to provide continuous narration, with product shots appearing whenever they help explain what I’m saying. That calls for two video layers:
- Upper video track: Template blocks and product close-ups.
- Lower video track: The continuous camera recording with its spoken audio.
First, delete the template’s regular placeholder video. Then select the template blocks and drag them to the track above. Bring the main recording onto the lower track.
Content on the upper track appears over content below it. When there’s a gap between the upper blocks, the main camera recording becomes visible again. Its audio continues underneath the product shots.
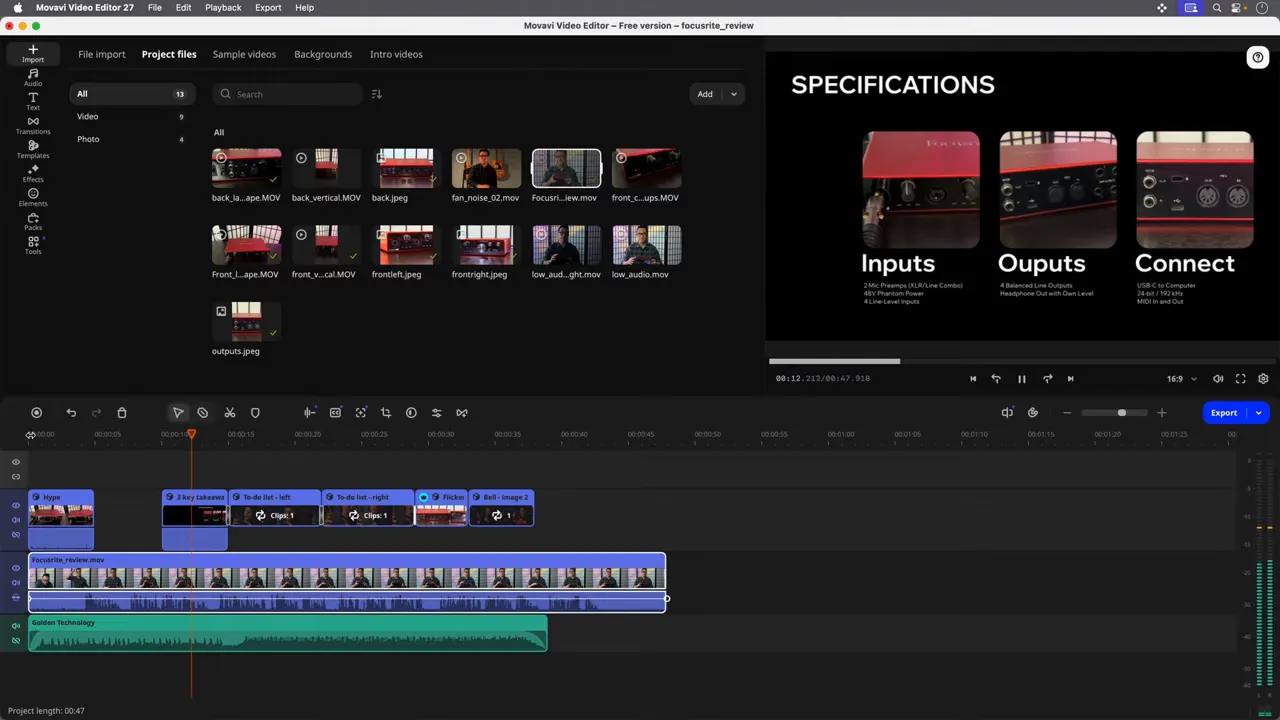
That gives the review a natural structure: a product close-up at the start, a brief appearance on camera, then supporting visuals as the narration continues.
For easier editing, temporarily mute the music and hide the template track. Now you can focus on the main recording without the overlays getting in the way.
5. Remove Pauses and Trim the Main Recording
Use automatic silence removal
If your recording contains long pauses or quiet gaps, Movavi can remove them automatically:
- Right-click the main video clip.
- Choose Audio Tools > Silence Removal.
- Set the tool to Auto.
- Click Remove Silence.
The tool cuts out quiet gaps between sentences, which can save a lot of repetitive editing.
Make precise cuts manually
You still have full control over individual edits. I’m undoing the automatic removal with Command+Z on Mac or Ctrl+Z on Windows to demonstrate the manual options.
To remove the moment before I begin speaking:
- Select the Blade tool beside the Selection tool.
- Move through the clip to find the first useful moment.
- Click to cut.
- Return to the Selection tool, select the unwanted opening piece, and press Delete.
Another option is to drag the clip’s left edge inward to change its starting point.
For the end, place the playhead where the recording should finish and click Split, or press Command+B on Mac or Ctrl+B on Windows. Delete the extra section.
These edits are non-destructive. Trimming doesn’t erase the original footage. Dragging an edge back out can reveal the material you trimmed away.
With both ends cleaned up, I’m positioning the recording so my voice begins about halfway through the opening product shot. That lets the narration start before I appear on screen.
Turn the template track back on and arrange its blocks around the spoken content. For this review, I’m moving the photo montage before the pros-and-cons section and removing the final template clip so the ending returns to me on camera sooner.
The customized blocks now reinforce the review: product details first, followed by strengths such as clean preamps and MIDI connections, then limitations such as price and the lack of onboard processing.
6. Customize Transitions and Finish with a Fade
The template already includes a couple of Push transitions, where one image slides in and pushes the previous one out. Zoom into the timeline to see their icons between the blocks.
Like the blocks themselves, those choices aren’t fixed. Select an unwanted transition and press Delete, or replace it from the Transitions tab.
Browse by category and preview transitions by moving your pointer over them. I’m replacing one with Offset by dragging it onto the cut between two clips.
Some transitions include sound effects. Double-click a transition to open its settings and adjust the effect’s volume. For this review, I’m turning those sounds off so they don’t compete with the narration.
You can also drag either edge of a transition to make it longer or shorter.
Time the fade to the final words
Rather than stopping abruptly, I want the video to fade to black:
- Search for Fade in the Transitions tab.
- Drag Fade to Black onto the end of the final clip.
- Adjust its duration and mute its sound effect if needed.
- Use the narration waveform to line up the fade with the ending.
My first attempt fades a little too early. Extending the final clip moves the transition along with it, letting me start the fade as I speak the last word rather than cutting the thought short.
7. Add an Overlay Sticker
For a small animated subscription reminder inside the finished video, there are two possible approaches.
The Social Media block category includes subscription graphics over black, white, or animated backgrounds. Those work when you want that kind of self-contained section.
For this project, though, I want the graphic to sit over the continuous recording rather than replace it. A sticker is a better fit:
- Open Elements and select Stickers.
- Search for Subscribe.
- Drag a suitable animation onto the timeline.
- Adjust its timing, size, and position in the preview.
Stickers appear on the top track so they overlay the other content. I’m moving this one toward the upper-right corner and starting it a little before the fade.
8. Balance the Music Beneath the Voice
Unmute the music and listen to the mix. In my project, the template’s original music is much too loud.
Double-click the audio clip to open its settings, then lower the volume slider. Around 11% works better for the first track in this example, but that isn’t a universal setting. The right level depends on the recording and the music.
If the template’s track doesn’t fit, delete it and open the Audio tab. Browse categories such as Featured, Abstract, Chillout, and Cinematic, preview a few choices, and drag a replacement onto the audio track.
I’m starting the replacement at roughly the same volume, then taking it lower after listening. The narration should remain easy to understand.
Finally:
- Trim the music: Drag its endpoint until it snaps to the end of the video.
- Fade it out: Open its settings and add a two-second fade-out.
- Check the ending: Listen through the last sentence to make sure the music finishes smoothly.
9. Use AI Tools for Subtitles and Cleanup
With the main edit assembled, Movavi’s AI tools can help with subtitles, noisy recordings, vertical crops, and grainy footage.
Generate automatic subtitles
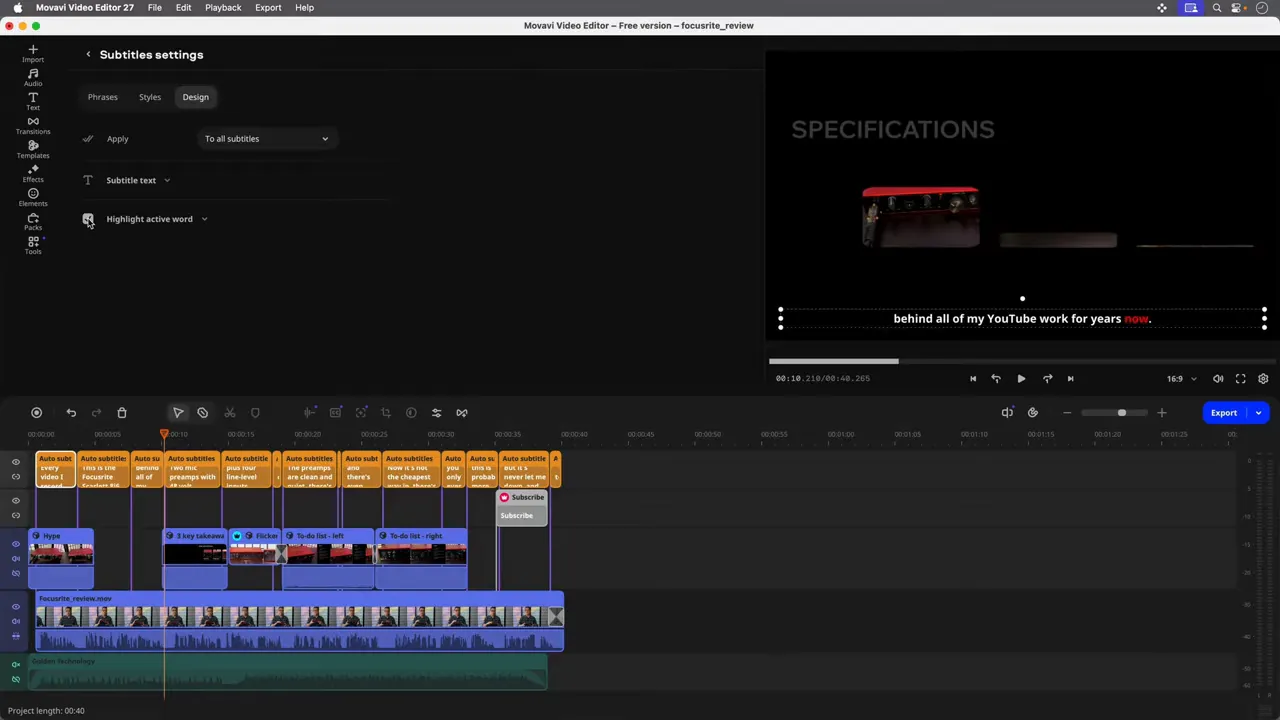
Right-click the main recording and choose Auto Subtitles. Movavi can detect the spoken language automatically, or you can select it. There’s also an option to translate the text into another language.
Click Generate to create a subtitle track synchronized with the audio. Then choose a subtitle style, or open Design and enable Highlight Active Word for word-by-word highlighting.
Subtitles also have an accessibility role. The W3C guidance on captions provides useful background on making spoken video content accessible.
Reduce background audio noise
For a separate test clip, I recorded with a fan running across the room. The background noise is very noticeable.
- Right-click the noisy clip.
- Choose Audio Tools > Noise Removal.
- Select AI Noise Removal.
- Click Apply.
In this example, the tool substantially reduces the fan noise while leaving the speech audible. It’s also useful for background hum and keyboard clicks.
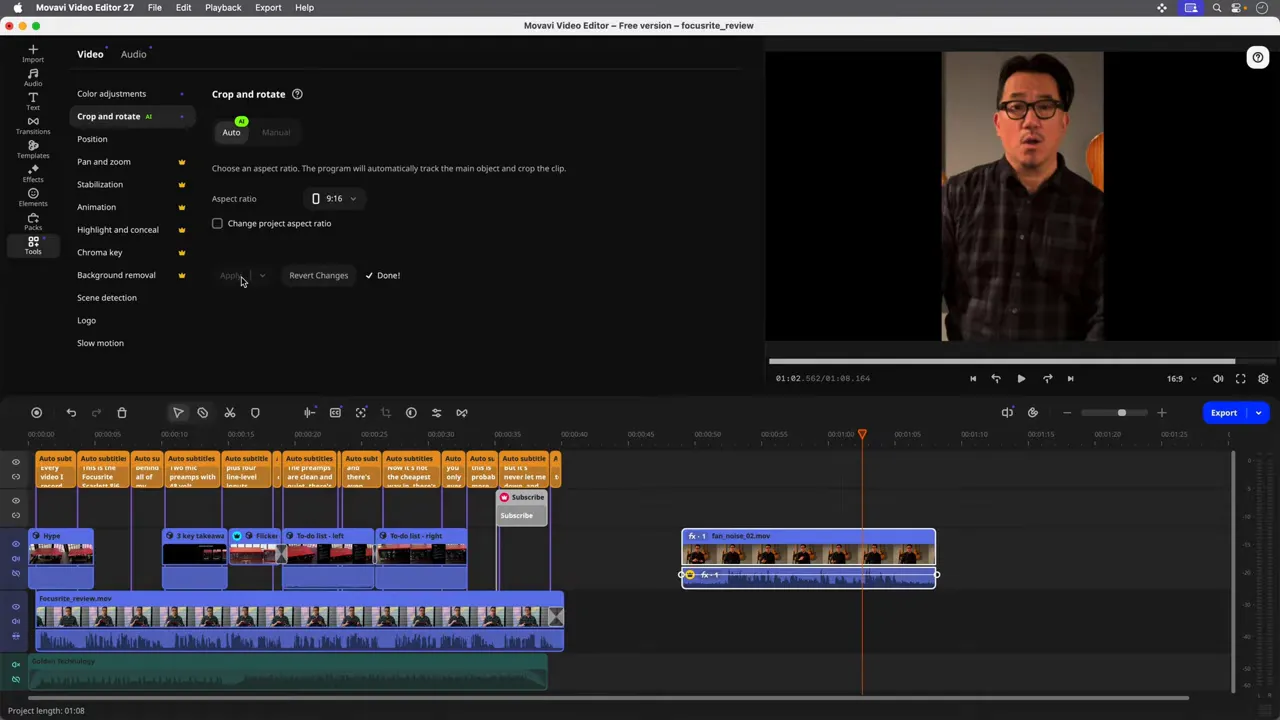
Convert horizontal footage to a vertical crop
To create a vertical version of a horizontal clip:
- Right-click it and choose Video Tools > Crop and Rotate.
- Select AI Auto.
- Choose a 9:16 aspect ratio.
- Uncheck Change Project Aspect Ratio if you want to affect only this clip.
- Click Apply.
The AI crop reframes the footage to keep the subject visible. Leaving the project-aspect-ratio option unchecked is important here because I’m testing a vertical crop without changing the entire horizontal review.
Clean up grain with AI Video Denoise
AI Video Denoise is a new tool in Movavi Video Editor 2027. It addresses visible video noise, rather than unwanted sound.
For a poorly lit clip, right-click and open Video Tools > Color Adjustments. Find the AI Video Denoise preset and move your pointer over it to preview the result. Drag it onto the clip to apply it.
In my test, it reduces grain while keeping facial features and fine details sharp. That makes it useful for footage recorded in a dim home studio or on a webcam.
A Template Gives You a Starting Point, Not a Fixed Result
This project began with one continuous take, a handful of desktop close-ups, and a template. The template supplied the initial titles, layouts, transitions, and montage structure, but I could still change the sequence, swap the music, layer in narration, and fine-tune the cuts.
That’s the real benefit of Movavi’s Blocks system: you don’t have to build every element from scratch, and you don’t have to keep an element just because it came with the template.
Movavi Video Editor is free to download for Windows and macOS. The free version provides essential cutting and joining tools, along with automated features such as auto subtitles, auto crop, and one-click silence removal, subject to its limitations. The AI tools demonstrated use fixed-price access rather than credits you need to keep purchasing.
For the full version, use promo code KEVIN for 25% off a one-year subscription. At checkout, select the options for seven free days of Templates and Effects if you want to try those separate libraries. The full editor removes its watermark and other free-version limitations; the additional libraries remain separate subscriptions.


