Microsoft PowerPoint helps you turn an idea into a professional-looking presentation, whether you’re sharing business results, teaching a class, or introducing a new project. You can start with a blank slide, build out your message, add visuals, and then present live or export a recording as a video.
I’ll use an All Hands presentation for the Kevin Cookie Company as our example. We have a new factory to announce and some cookie revenue to celebrate. Along the way, you’ll learn how to work with slides, themes, pictures, charts, animations, speaker notes, and collaboration tools.
What You'll Learn
- Build a slide outline before refining layouts, themes, and visual details.
- Use Slide Master to apply consistent branding across related slides.
- Turn text and data into visuals with SmartArt, pictures, and charts.
- Prepare speaker notes, collaborate with teammates, and present live or export a recording.
Table of Contents
- 1. Get PowerPoint and Start a New Presentation
- 2. Save Your Presentation Before You Start Building
- 3. Add Slides and Build an Outline
- 4. Apply a Theme and Try Designer
- 5. Use Slide Master for Consistent Branding
- 6. Turn a Bulleted List into SmartArt
- 7. Insert and Customize Text
- 8. Insert Pictures and Let Designer Arrange Them
- 9. Animate Content One Item at a Time
- 10. Insert a Chart and Highlight an Important Result
- 11. Use Morph to Draw Attention Between Slides
- 12. Add Speaker Notes and Get Feedback
- 13. Rehearse and Present Your Slides
- 14. Record Your Presentation and Export an MP4
- Keep the Focus on Your Message
1. Get PowerPoint and Start a New Presentation
You can use PowerPoint for the web for free in your browser. That shortcut takes you directly into a new presentation.
If you prefer the desktop app, you can explore the available Microsoft 365 options. The steps below follow the desktop interface shown in this tutorial.
When you launch PowerPoint, the Home screen gives you several starting points:
- Blank Presentation: Start from scratch.
- Themes and templates: Begin with a ready-made design.
- More themes or New: Browse the larger template collection.
- Search: Find an existing presentation.
- Recent presentations: Quickly return to something you’ve already worked on.
It’s worth browsing the templates before building everything yourself. If one already matches your needs, that can save you some work. For our example, select Blank Presentation.
2. Save Your Presentation Before You Start Building
Before adding content, give your file a name and choose where to save it.
- Click the Save icon in the upper-left corner, or press Ctrl + S.
- Enter a descriptive name. I’ll use Kevin Cookie Company All Hands.
- Choose a location.
- Click Save.
I recommend saving to OneDrive, Microsoft’s cloud storage. That gives you three useful benefits: automatic saving as you work, access to previous versions, and an easier way to share the presentation with other people.
With the file saved, you’re ready to build your deck.
3. Add Slides and Build an Outline
In Normal view, the left side displays slide thumbnails, and the main workspace shows the selected slide. Click a thumbnail to move to that slide.
On the first slide, click the title placeholder and enter All Hands. In the subtitle placeholder, enter Kevin Cookie Company.
Add a new slide
You have a few ways to insert slides:
- On the Home tab, select New Slide.
- Press Ctrl + M.
- Click between slide thumbnails so an insertion line appears, then press Enter.
That last method is especially handy when you realize you need another slide in the middle of your presentation. For example, I can insert a Revenue slide between the factory announcement and the closing slide.
Choose a slide layout
A layout controls the arrangement of placeholders on a slide. Your opening slide might have a title and subtitle, while another slide might have a title and a content area.
Open the arrow beside New Slide to choose a layout before inserting a slide. To change an existing slide, select it and use Home > Layout. A Section Header layout, for example, works well when you want a simple divider or closing message.
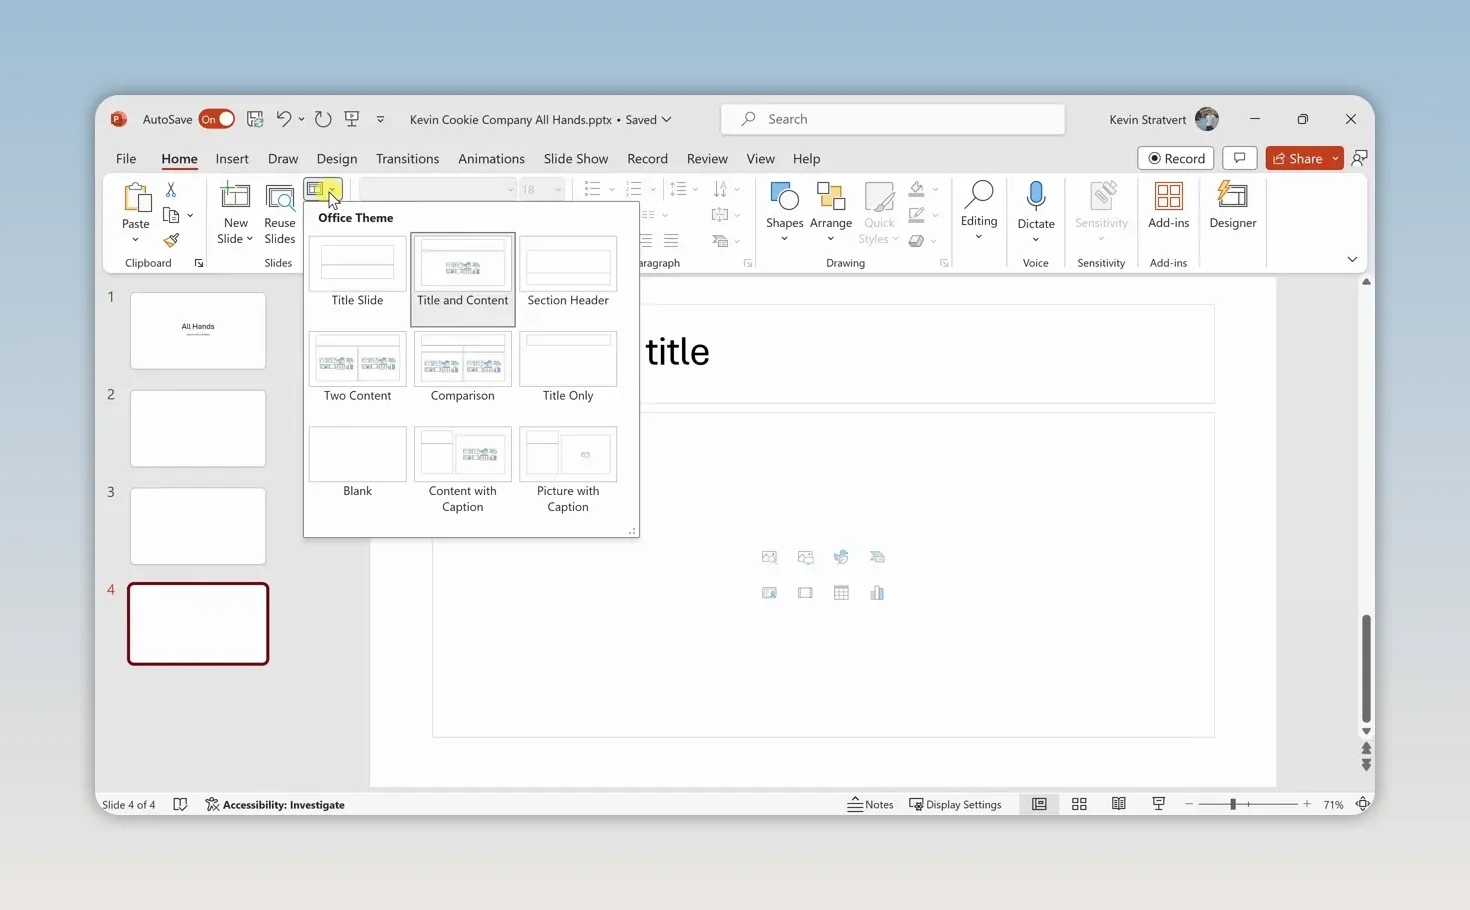
At this stage, focus on the outline rather than the design. My initial deck includes:
- All Hands
- Customer Feedback
- New Factory
- Revenue
- Thank You
You can click through the thumbnails or use the arrow keys while the thumbnail pane has focus to move through your slides.
Reorder or delete slides
To move a slide, drag its thumbnail to a new position. Hold Ctrl to select individual slides, or use Shift to select a range, then move them together.
For a broader view, click Slide Sorter near the bottom-right corner. This displays your slides in a grid so you can rearrange the presentation more easily. Click Normal to return to editing.
If a slide no longer belongs, right-click its thumbnail and select Delete Slide, or select the thumbnail and press Delete. For this practice deck, I’ll remove the Customer Feedback slide and keep working with the factory announcement and revenue results.
4. Apply a Theme and Try Designer
Once the outline is in place, the Design tab can make the presentation look a little less bare.
Hover over a theme to preview it on your slides, then click to apply it. Expand the theme gallery to see more options. I’ll try the Organic theme, which seems appropriate for a cookie company that uses organic ingredients.
The Variants area offers alternate treatments of the selected theme, including lighter and darker looks. You can switch themes again at any point, including returning to the basic Office theme.
Also on the Design tab, you can:
- Change the Slide Size.
- Open Format Background to customize the background.
- Use Designer to get layout recommendations based on your slide’s content.
Designer is one of my favorite shortcuts. Select the All Hands slide and open Designer. It analyzes the title and suggests designs that incorporate hands. That’s a pretty clever interpretation of an all-hands meeting.
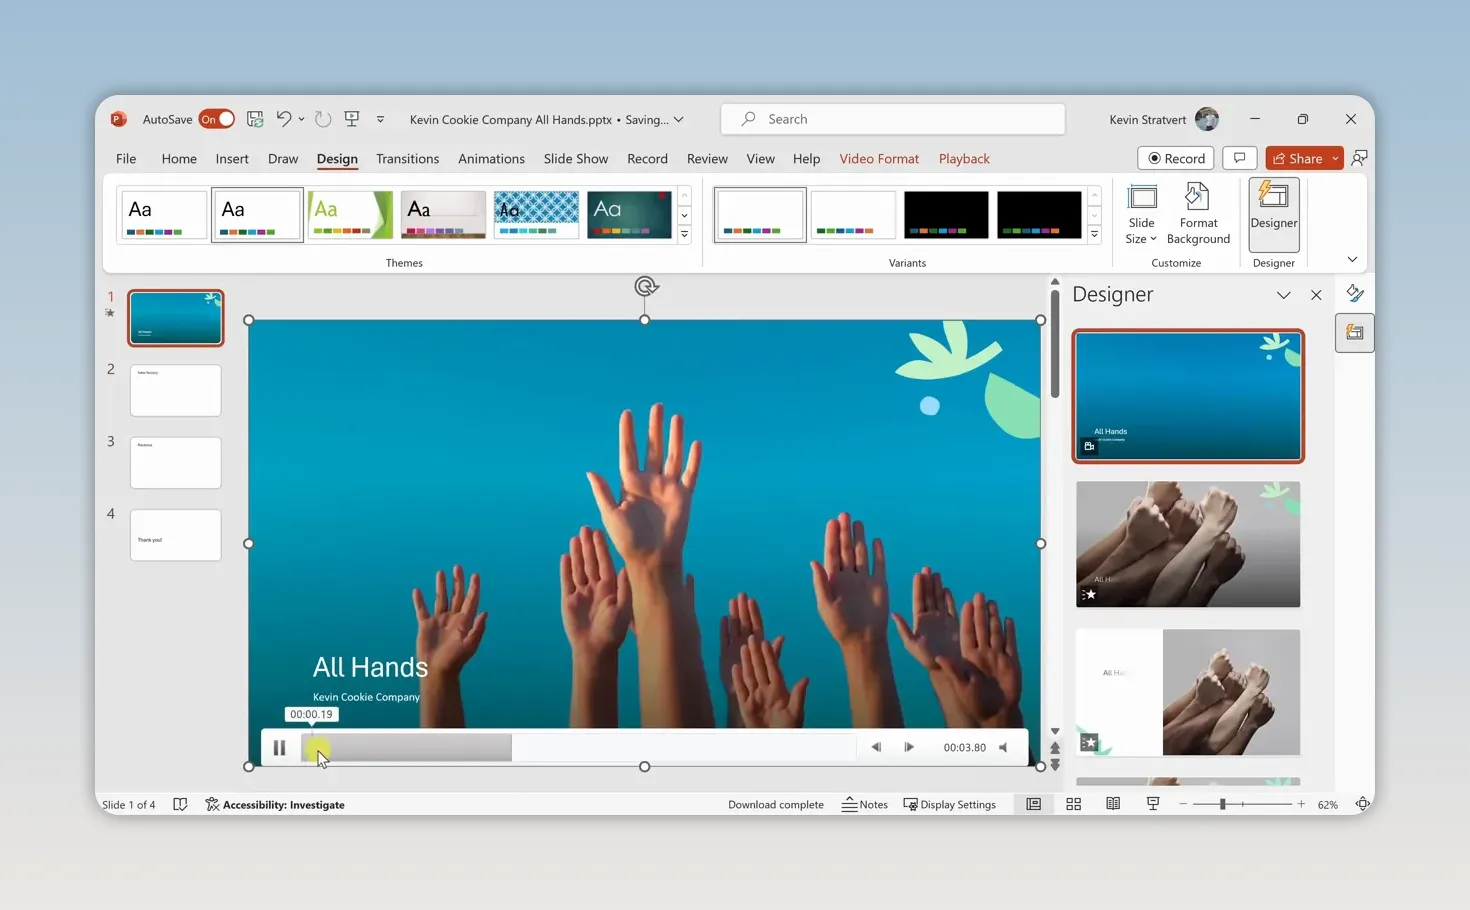
Click a suggestion to apply it, then close the Designer pane when you’re done.
5. Use Slide Master for Consistent Branding
What if you want your own background and company logo throughout the deck? You could edit each slide individually, but that’s a lot of repetitive work.
Slide Master lets you make shared design changes in one place.
- Open the View tab.
- Select Slide Master.
- In the left pane, select the large master thumbnail above its associated layouts.
- Adjust shared design settings such as colors, fonts, effects, and background styles.
- Add any common graphics, such as a company logo.
- On the Slide Master tab, select Close Master View.
For the cookie company deck, I’ll choose a gray gradient background, drag in the company logo, resize it with the corner handles, and place it near the title area.
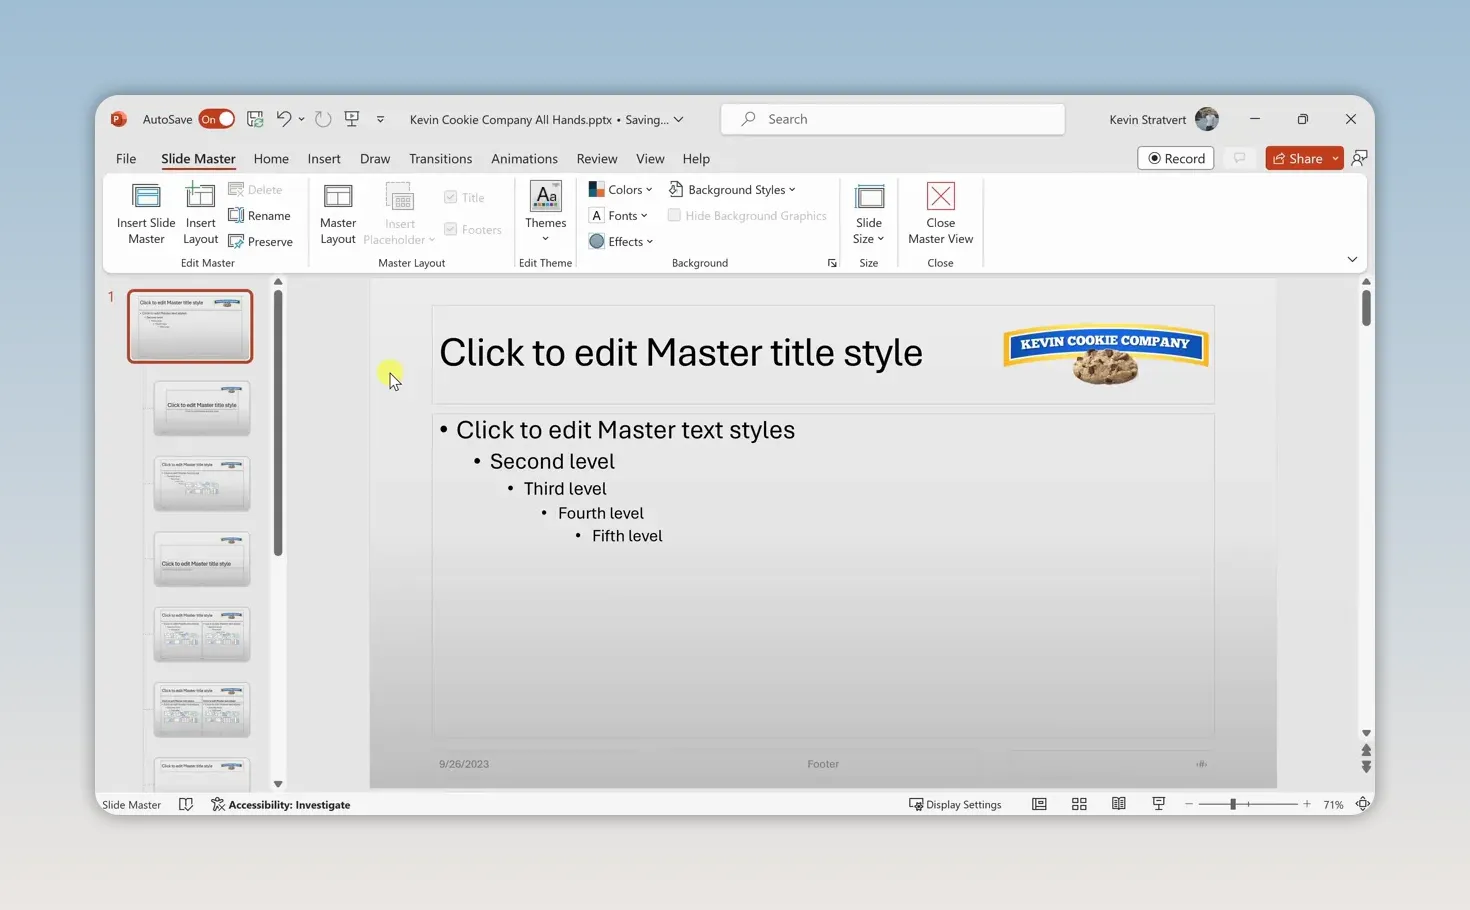
Slides using that master inherit its shared formatting and graphics. New slides based on those layouts also pick up the design automatically. You don’t have to keep adding the same logo over and over.
If you want more detail about how masters and layouts relate, Microsoft’s PowerPoint help and learning resources provide additional reference material.
6. Turn a Bulleted List into SmartArt
Our New Factory slide needs some details, but a dense bulleted list isn’t the most visual way to present them. SmartArt can turn that text into a diagram.
- Enter or paste the factory details into the content placeholder.
- Select the text.
- On the Home tab, open Convert to SmartArt.
- Hover over the available layouts to preview them.
- Select the arrangement you prefer.
Once the SmartArt is selected, PowerPoint displays contextual tabs for SmartArt Design and Format. These contain controls for changing its appearance.
Under SmartArt Design, use Change Colors to choose a different palette. You can also edit the text pane to add another item. Our factory needs a general manager, and who better than Cookie Monster?
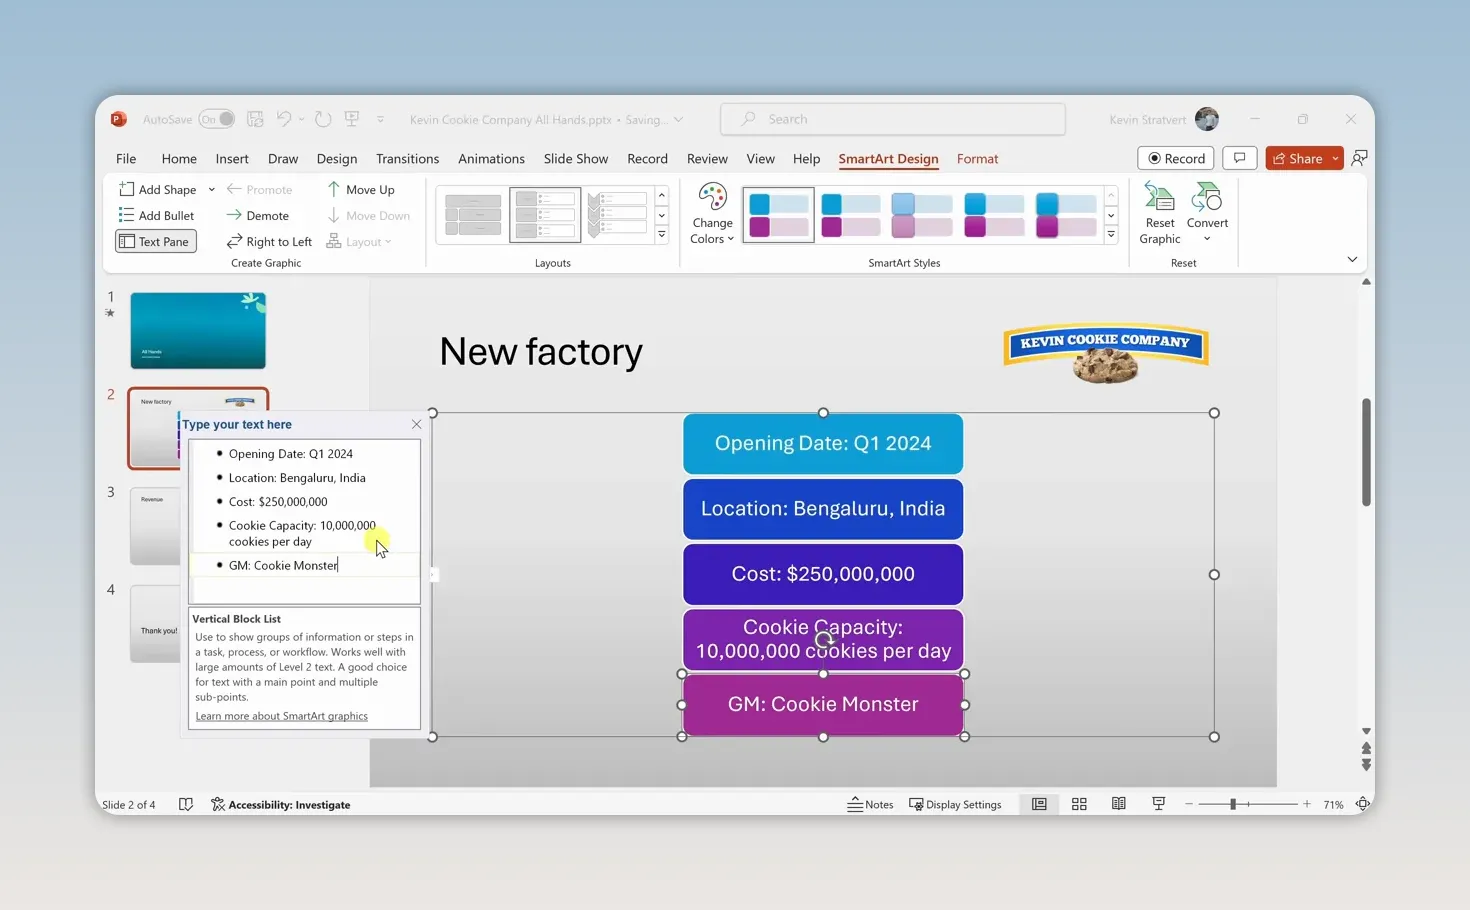
When you’re happy with the content, move the SmartArt object into position. I’ll place it on the left to leave space for photos on the right.
7. Insert and Customize Text
The Insert tab gives you access to text boxes, pictures, shapes, icons, charts, audio, video, and other slide content.
For our factory announcement, I want to add a large Confidential label.
- Select Insert > Text Box.
- Click on the slide and type your text.
- With the text selected, use the Home tab to change the font, font size, and color.
For a slightly questionable demonstration of corporate seriousness, I’ll use Comic Sans, increase the size to 72, and make the text red. The useful lesson here is that you can customize a text box independently of the slide’s placeholders.
For more controls, open Shape Format and expand the formatting pane. Under Text Options, you can adjust the text fill, including transparency. Increasing transparency makes the label less dominant over the main content.
Use the rotation handle to angle the label, then drag it into position. As you move objects, PowerPoint displays alignment guides to help you line them up with the center of the slide or other content.
8. Insert Pictures and Let Designer Arrange Them
A factory announcement could use a picture or two. Select Insert > Pictures, then choose your source:
- This Device: Insert an image stored on your computer.
- Stock Images: Search the built-in image library.
- Online Pictures: Find images online.
I’ll search Stock Images for a factory and choose an exterior image and a photo of people working. Select the pictures, then click Insert.
With a picture selected, the Picture Format tab provides controls for colors, artistic effects, and picture styles. You can also resize and reposition the pictures manually.
A useful Designer workaround
If you want Designer to focus on the pictures rather than everything else on a busy slide, try this:
- Select both pictures and press Ctrl + X to cut them.
- Create a temporary slide.
- Paste the pictures onto that slide.
- Open Designer and select a suggested arrangement.
- Cut the formatted pictures and paste them back onto the original slide.
- Delete the temporary slide when you no longer need it.
I’ll use a design that stacks the photos along the right side with a shaped edge. It gives the factory slide a more polished look without requiring me to build that arrangement from scratch.
Fix overlapping objects with layers
After adding the photos, the Confidential label may sit underneath them. That happens because slide objects are stacked in layers.
Right-click the label and choose Bring to Front to place it above the pictures.
For more control, open Shape Format > Selection Pane. This lists the objects on the slide:
- Objects at the top of the list appear in front of objects below them.
- Drag an item up or down to change its stacking order.
- Use the visibility icon beside an item to hide or show it without deleting it.
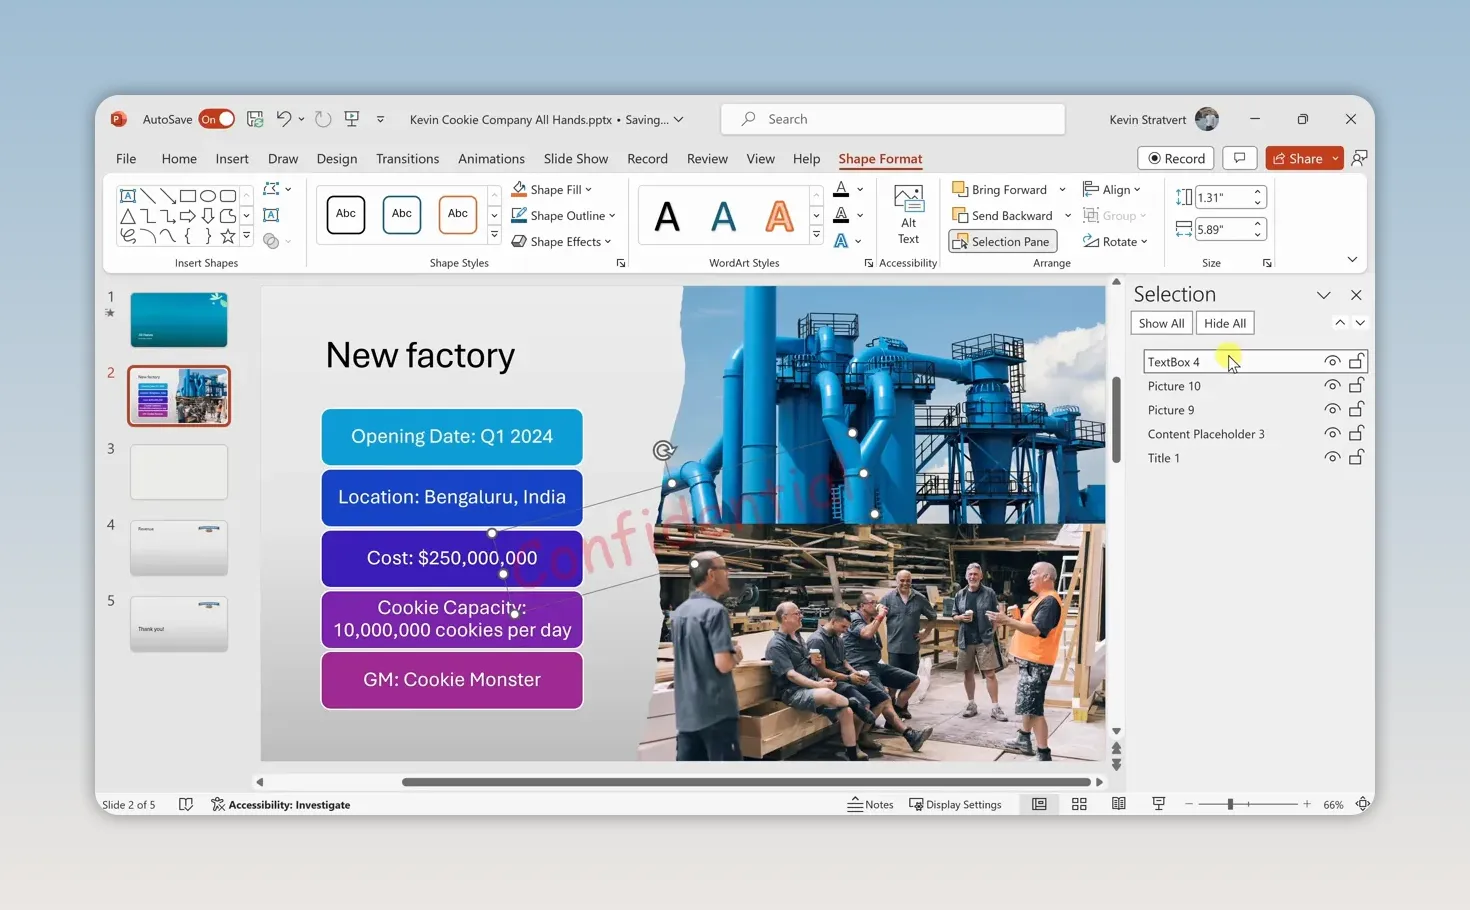
I’ll temporarily hide the label while I finish the slide. If you do the same, remember to turn it back on when you need it.
9. Animate Content One Item at a Time
The factory slide now has several points to discuss. Rather than revealing every point at once, I can introduce them one at a time.
- Select the SmartArt object.
- Open the Animations tab.
- Choose Fade.
- Open Effect Options.
- Select One by One.
Now, instead of the whole SmartArt fading in together, its items can appear individually on click. That lets you control the pace as you discuss each point.
A star beside the slide thumbnail indicates that the slide contains an animation or transition effect.
The key distinction is simple: animations affect objects on a slide; transitions control how you move between slides.
10. Insert a Chart and Highlight an Important Result
For our Revenue slide, a chart will make the quarterly results easier to compare.
- Select Insert > Chart.
- Choose a Column chart and click OK.
- Edit the sample data in the spreadsheet window that opens.
- Adjust the selected data range so it includes only the categories and series you need.
- Close the spreadsheet window when you’re finished.
You can also bring a chart in from Excel. Creating one directly in PowerPoint gives you a small spreadsheet interface for entering and editing its underlying data.
I’ll keep one series and change the chart title to Cookie Revenue in Millions. With the chart selected, the chart design controls let you add elements, change the layout, adjust colors, and choose a style.
Use a shape to call attention to the result
Q4 is our strongest quarter, and I want to make that clear.
- Select Insert > Shapes > Oval.
- Hold Shift while dragging to draw a perfect circle.
- Under Shape Fill, choose No Fill.
- Open Shape Outline > Eyedropper.
- Click the yellow in the company logo to match that color.
- Increase the outline weight to about 6 points.
- Position the circle around the top of the Q4 column.
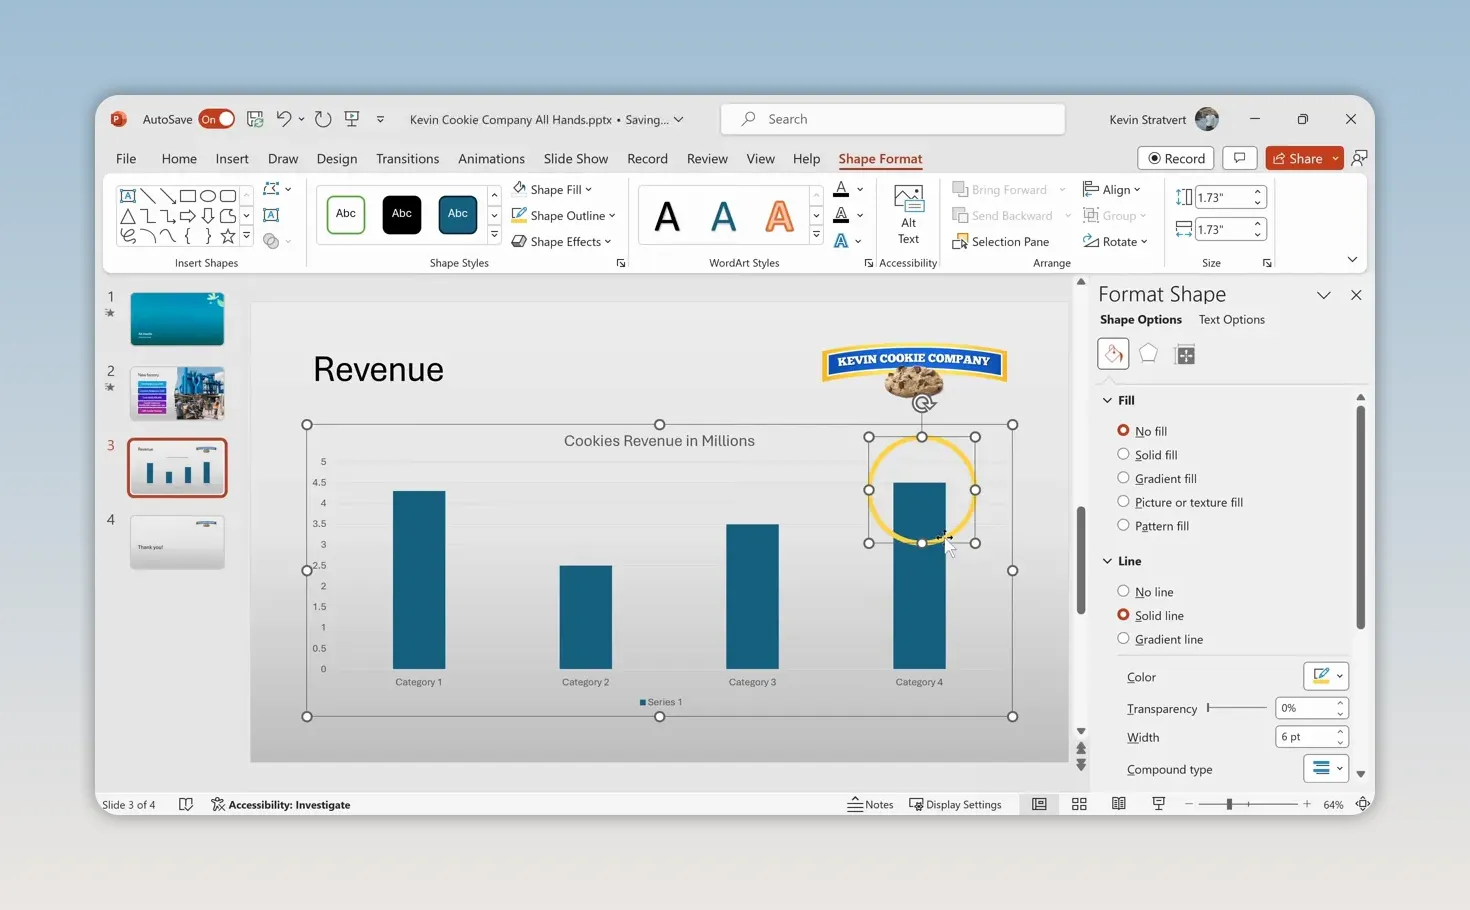
The eyedropper is a handy way to reuse an existing color from your slide, especially when you want a shape to match your branding.
11. Use Morph to Draw Attention Between Slides
The Morph transition can make our chart highlight more noticeable. It compares objects on consecutive slides and smoothly changes them from one state to the next.
For this example, the yellow circle will shrink from larger than the slide to a small ring around Q4.
- Right-click the Revenue slide thumbnail and select Duplicate Slide.
- On the first of the two Revenue slides, enlarge the yellow circle until it extends beyond the slide edges.
- Leave the circle small and positioned around Q4 on the second slide.
- Select the second slide.
- Open Transitions and choose Morph.
- Preview the transition.
To make the large circle easier to manage, zoom out using the control in the bottom-right corner. You can also hold Ctrl and scroll the mouse wheel. Hold Shift while resizing to keep the circle’s proportions.
When you advance to the second slide, Morph shrinks the large circle into the small highlight around the result. Use the Duration setting on the Transitions tab if you want the movement to take more time.
It’s a useful effect when the movement supports a specific point. Here, that point is making sure nobody misses our record cookie quarter.
12. Add Speaker Notes and Get Feedback
Add reminders without crowding the slide
Speaker notes give you a place for information you want to say but don’t need to put on the slide.
Click Notes along the bottom of the PowerPoint window to open the notes area. Drag its upper boundary upward if you need more room, then type your reminders.
On the Revenue slide, I’ll add a note to announce that the organization will celebrate this milestone. That’s an important detail, but it doesn’t need to compete with the chart.
You can hold Ctrl and scroll within the notes area to adjust the text’s zoom for easier reading. Click Notes again to hide the pane when you’re finished.
Share the presentation for review
Before presenting, I’d like my teammates to review the deck.
- Click Share in the upper-right corner.
- Select the sharing option.
- Enter the recipients’ email addresses.
- Review the link permissions.
- Click Send.
Sharing the cloud-saved presentation lets your teammates access the file according to the permissions you set.
To discuss a slide, select Insert > Comment. Enter your feedback or question, then post it. You can also use an @mention to direct a comment to someone in your organization.
13. Rehearse and Present Your Slides
Once the deck is ready, open the Slide Show tab.
Before the actual presentation, try Rehearse with Coach. You can practice your delivery, receive feedback, and review a report at the end. It’s well worth trying before you give the presentation for real.
To begin presenting, choose either:
- From Beginning: Start with the first slide.
- From Current Slide: Start with the selected slide.
On the desktop interface used here, F5 starts the slide show from the beginning.
During the slide show, move your mouse to reveal controls near the bottom, or right-click to open the presentation menu. For a laser pointer, choose Pointer Options > Laser Pointer. Press Esc to exit presentation mode.
Use Presenter View with two monitors
With a two-monitor setup, Presenter View gives you a private workspace while the audience sees the slide itself.
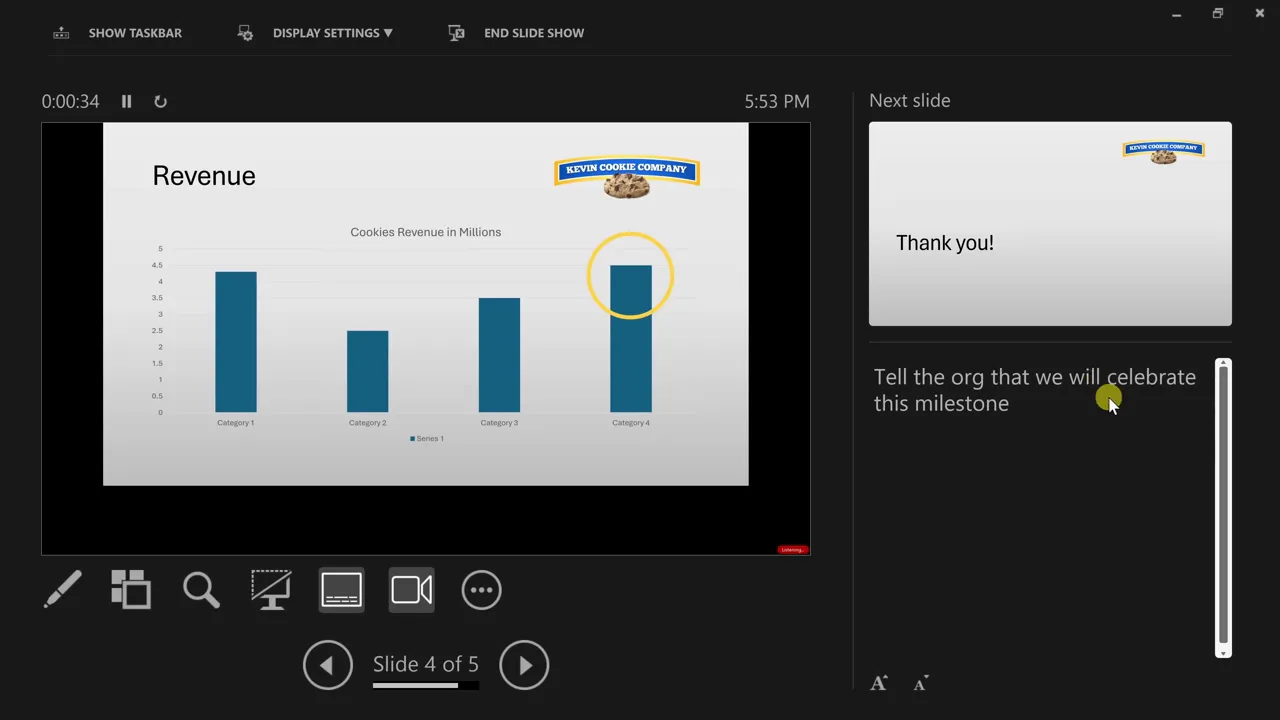
You can see the current slide, preview the next one, read your speaker notes, and access presentation controls such as the laser pointer. You can also end the slide show from this view.
14. Record Your Presentation and Export an MP4
You don’t have to deliver every presentation live. PowerPoint also lets you record it.
- Open the Record tab.
- Choose to record From Beginning.
- Review the recording interface and your notes.
- If helpful, turn on the teleprompter to scroll through your notes.
- Click the red Record button.
- Present your slides, using the annotation tools when needed.
- Stop the recording when you’re finished.
- Select Export and export the presentation as an MP4.
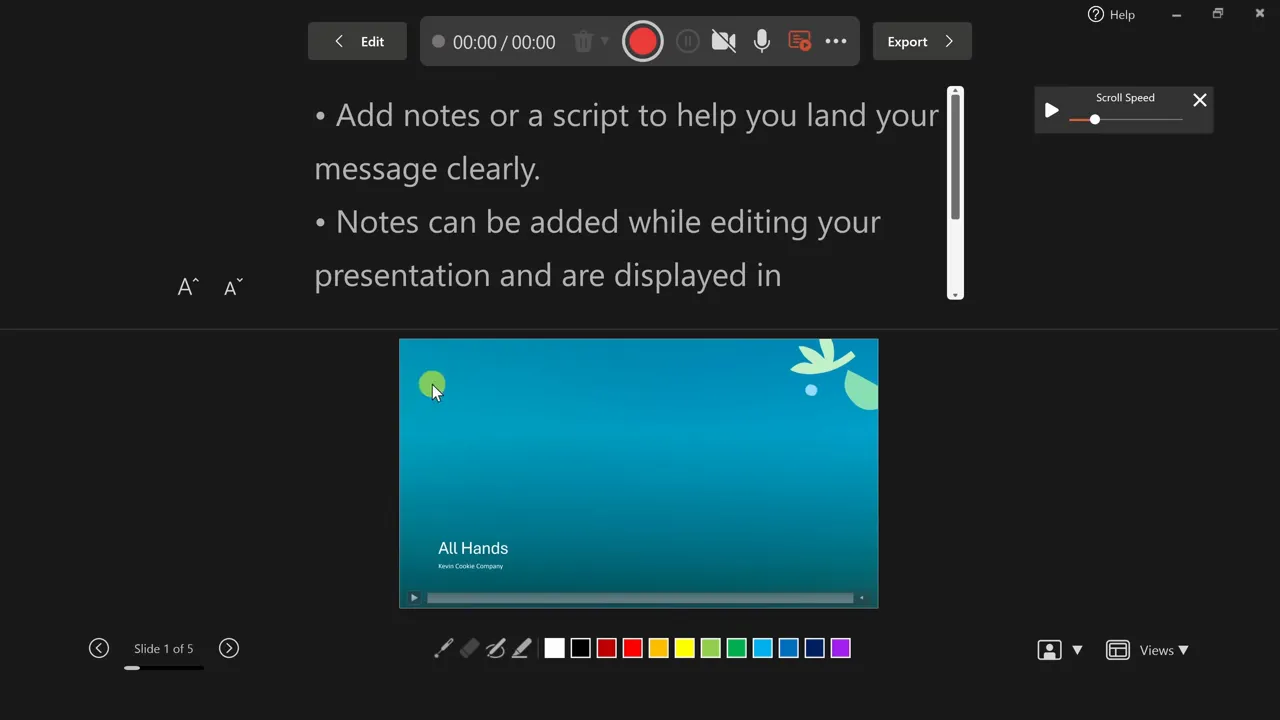
The recording workspace puts your notes above the current slide and provides annotation tools below it. That gives you a way to deliver the message and point out important details before exporting the finished presentation as a video.
Keep the Focus on Your Message
You now have the core workflow for creating a PowerPoint presentation: build an outline, apply a consistent design, add useful visuals, prepare your notes, collaborate, and then present or record.
For more practice with individual features, my PowerPoint tutorial collection includes deeper lessons.
The most important thing to remember is that your slides support your presentation; they are not the presentation itself. A chart, picture, or animation should help you convey your key message, not become the center of attention. Even when the message is excellent news about cookies.
Made with VideoToBlog using PowerPoint Tutorial for Beginners


