You can create a polished business intro, add animated graphics to existing footage, and turn sales data into an animated chart, all by describing what you want.
The combination is Remotion, ChatGPT, and Codex. Remotion creates the video using code, and Codex handles writing and running that code for you. Your job is to explain the idea, review the result, and ask for changes.
I’ll use the Kevin Cookie Company to walk through three examples: an animated introduction, a transparent lower third, and a six-month sales chart. Naturally, there will be cookies involved.
What You'll Learn
- Use Codex with the Remotion plugin to create animations from natural-language prompts.
- Preview animations in Remotion Studio and refine them with follow-up requests.
- Export H.264 MP4 files for finished videos and ProRes 4444 files for transparent overlays.
- Create animated sales charts and manage multiple compositions within the same project.
Table of Contents
- Set Up ChatGPT, Codex, and Remotion
- Create an Animated Business Intro
- Export the Animation as an MP4
- Create a Transparent Animated Lower Third
- Turn Sales Data Into an Animated Bar Chart
- What Else Can You Create?
Set Up ChatGPT, Codex, and Remotion
Remotion is a framework for creating videos programmatically. But don’t worry, you don’t need to write the code yourself for this workflow.
Instead, we’ll use Codex, ChatGPT’s coding agent. Unlike a regular ChatGPT conversation, Codex can create files, write code, and run projects directly on your computer.
- Open the ChatGPT app. If you don’t have it installed, get it from the ChatGPT download page.
- In the top-left corner, open Codex.
- In the left sidebar, click the plus icon next to Projects to create a project where Codex can work with your local files.
- Give the project a name. I’m using Kevin Cookie Company Animations.
- Click Create, then approve the folder by clicking Trust.
- Open Plugins, search for Remotion, and install the plugin.
The Remotion plugin gives Codex the tools and instructions it needs to work with Remotion. With that installed, you’re ready to create your first animation.
A quick note on cost: Remotion is free for individuals and companies of up to three people. ChatGPT plans and usage limits are separate. Check the Remotion licensing and pricing details to see which terms apply to your team.
Create an Animated Business Intro
Start a new chat inside your animation project using the new-chat icon next to the project name.
For the first example, I want a short animated introduction for the Kevin Cookie Company. The idea is straightforward: animated company text, cookie graphics, and smooth transitions.
Describe those elements in the prompt field. You can also use ChatGPT to help write the prompt. You don’t have to arrive with a perfectly polished creative brief.
Before sending the request, type the @ symbol, search for Remotion, and select it. This explicitly tells Codex to use the Remotion plugin for the animation rather than simply mentioning Remotion as ordinary text.
You can also choose an AI model from the model selector below the prompt. Pick one that offers a balance of speed and reasoning appropriate for your project, then click Send.
Codex will set up the Remotion project, write the code, and create the animation. In my example, the first version took a little over four minutes.
Preview the Animation in Remotion Studio
Once Codex finishes, Remotion Studio appears on the right. This is where you can preview your video and inspect the animation.
Use the full-screen control in the top-right corner to give the preview more room. Then use the playback controls beneath the canvas to play or pause.
There’s also a timeline with a playhead. Drag the playhead to scrub through the animation and inspect a particular moment without replaying the whole thing.
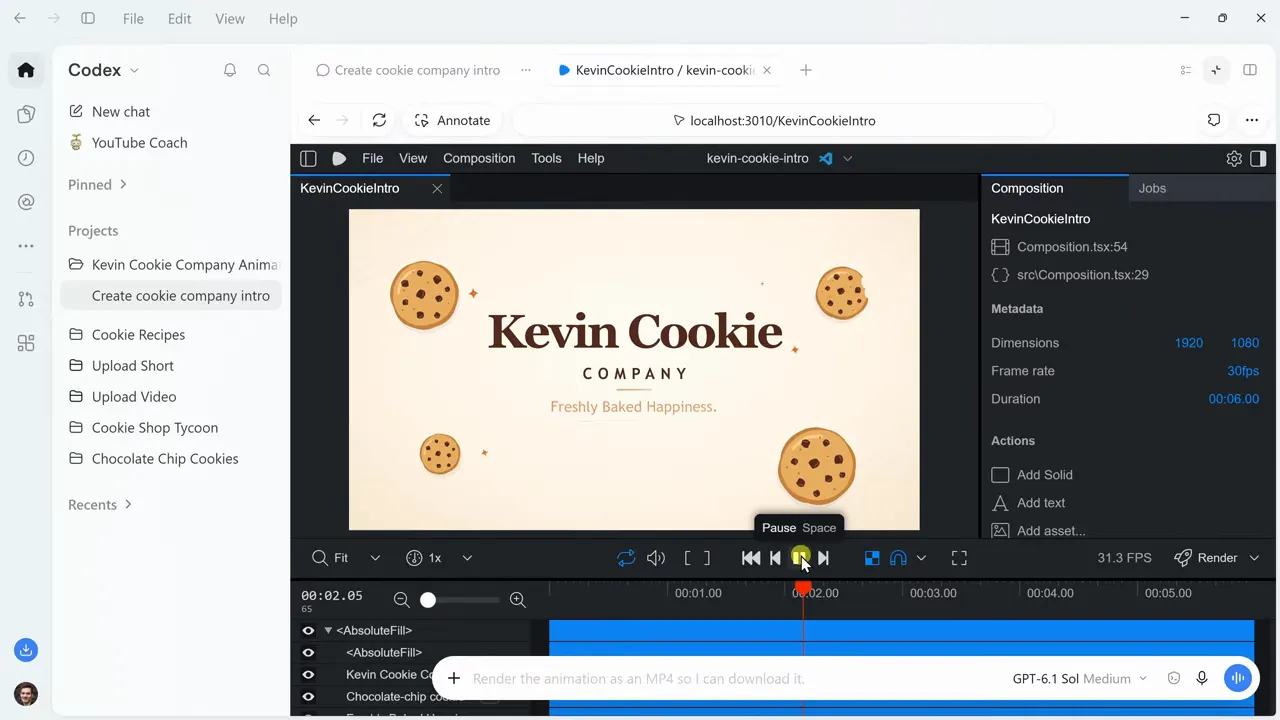
The first result includes animated text, cookie illustrations, and smooth transitions. That’s a pretty good starting point, but we can make it a little more interesting.
Revise the Animation With a Follow-up Prompt
You don’t need to edit the code to change the animation. Describe the revision in the chat.
For my next version, I ask Codex to make a giant cookie drop onto the screen, add a little screen shake, and then reveal the company name.
That revision took about two minutes. The updated animation includes the big cookie, crumbs, and the company-name reveal. Much more appropriate for a cookie company.
The workflow is iterative: create a first version, preview it, and then request specific changes. You don’t have to get every detail right in the initial prompt.
Export the Animation as an MP4
Once you’re happy with the result, render it into a video file:
- Open the Composition menu at the top of Remotion Studio.
- Select Render.
- Choose H.264 to export an MP4 file.
- Review the remaining settings, then click Render.
- After rendering finishes, use the file-opening control to access the finished video on your computer.
For this intro, I left the other render settings as they were. The resulting MP4 is ready to use.
How Much ChatGPT Usage Does This Consume?
In my case, creating the intro and making the revisions used less than 1% of my allocation.
That’s an example, not a fixed cost for every animation. Your usage will depend on the complexity of the project and the model you choose. You can review your own allocation in Codex’s Usage & billing settings.
Create a Transparent Animated Lower Third
A lower third is a graphic that typically sits near the bottom of a video to identify someone by name and title. Unlike the business intro, this needs to sit on top of existing footage.
Start another new chat in the same project and ask Codex to create an animated lower third with your name and title.
The important detail is to specify a transparent background. Otherwise, the graphic could cover the footage rather than blend into it.
In my example, Codex created the lower third in about two and a half minutes. It animates in, stays on screen, and then animates out.
When you preview it in Remotion Studio, the checkerboard behind the graphic indicates transparency. That pattern is a preview aid, not a background you want baked into the final video.
Export With ProRes 4444 to Preserve Transparency
For the intro, H.264 was the right choice. For this overlay, we need an export that preserves the transparent areas.
If Codex has already provided a ProRes file in the chat, right-click its file reference and choose Open in Explorer to locate it. You can then import it into Adobe Premiere Pro, DaVinci Resolve, or your preferred video editor.
If you haven’t received a ProRes file, ask Codex to generate one, or render it yourself:
- Expand Remotion Studio using the full-screen control.
- Open Composition, then Render.
- Select ProRes as the codec.
- Choose the 4444 profile.
- Render the file for use in your editing software.
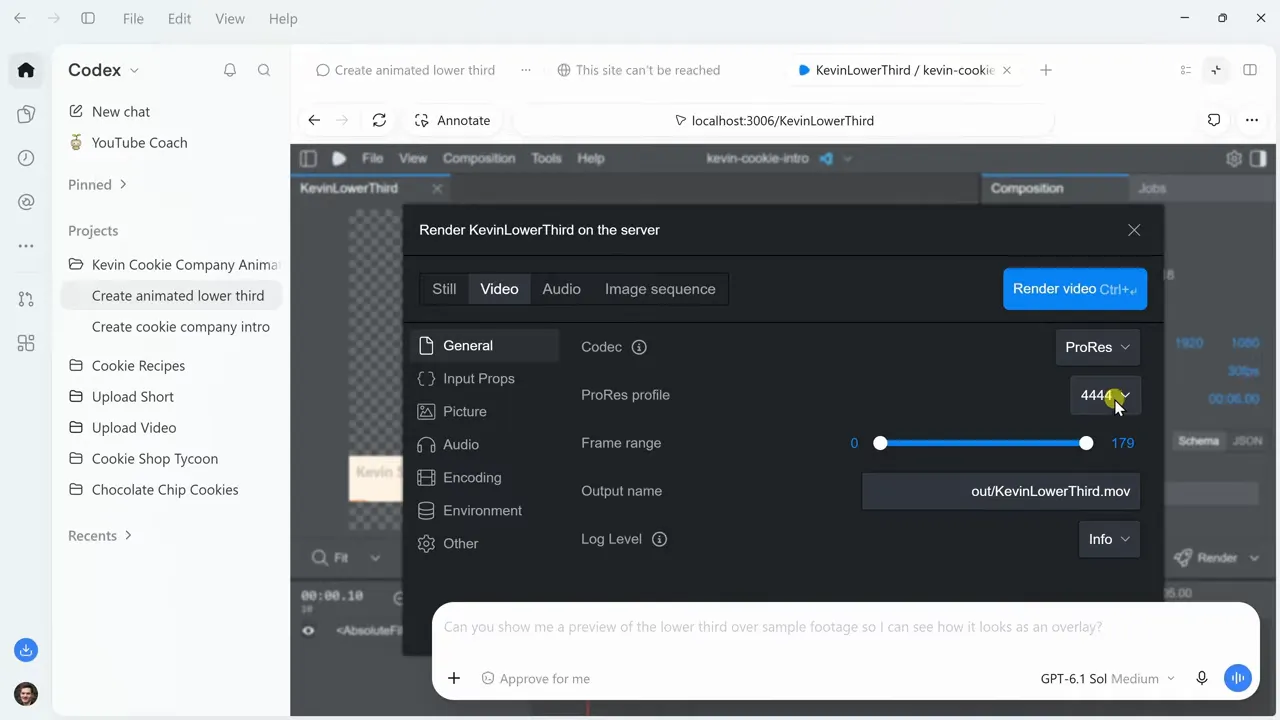
The export format matters just as much as the transparent design. A checkerboard in the preview tells you the composition has transparent areas, but the output must preserve them too. Remotion’s transparent-video documentation provides additional guidance.
Customize the Lower Third Directly in Remotion Studio
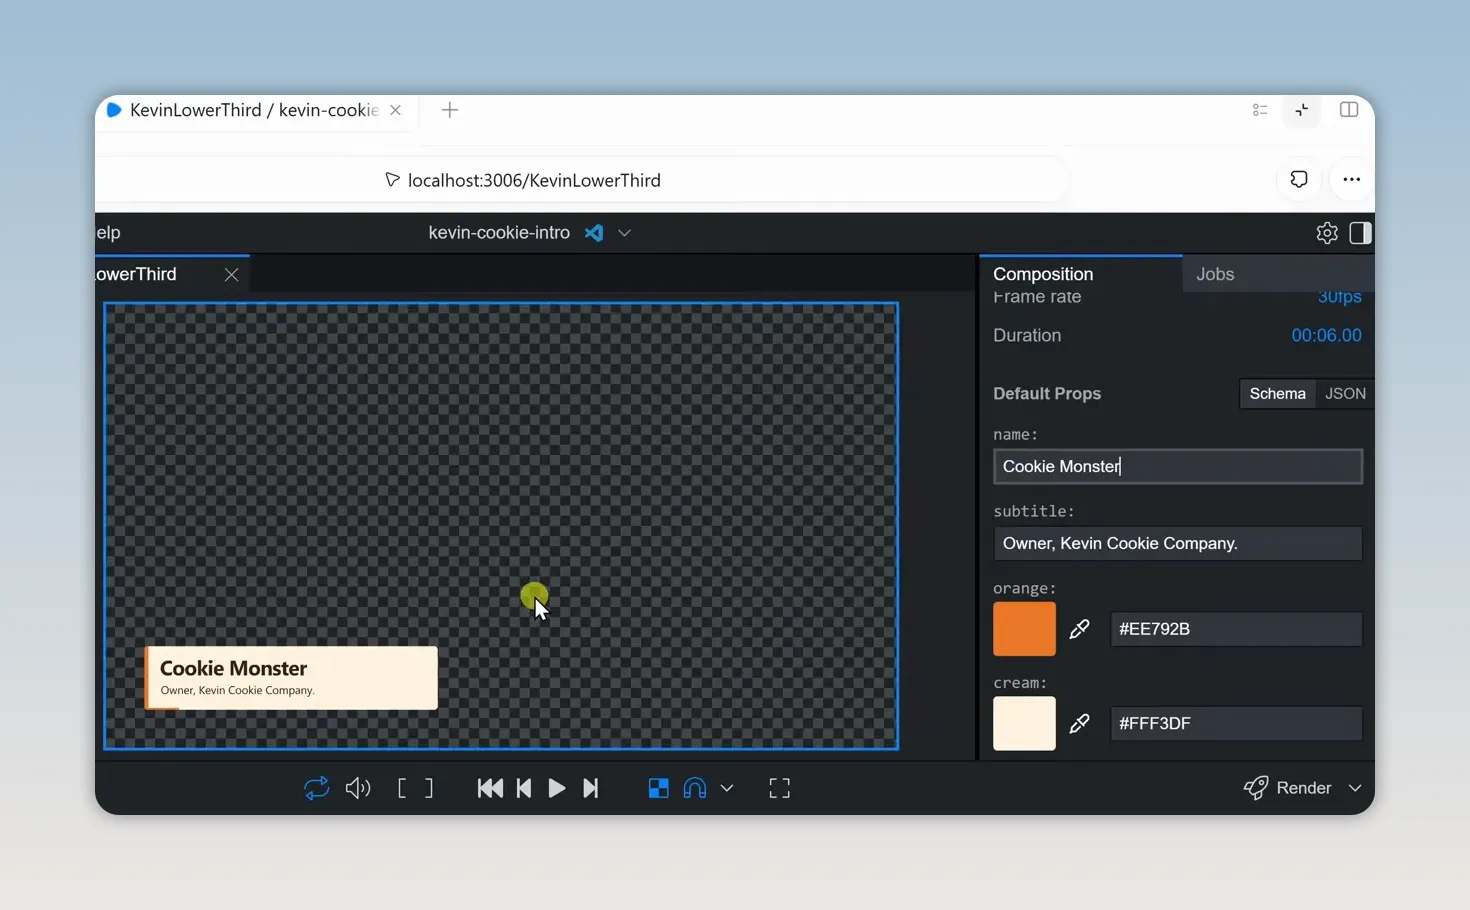
Not every change requires another prompt. In this lower-third composition, the right-hand panel includes controls for the name, subtitle, and colors.
I can replace my name with Cookie Monster, which feels much more appropriate, and the animation updates immediately.
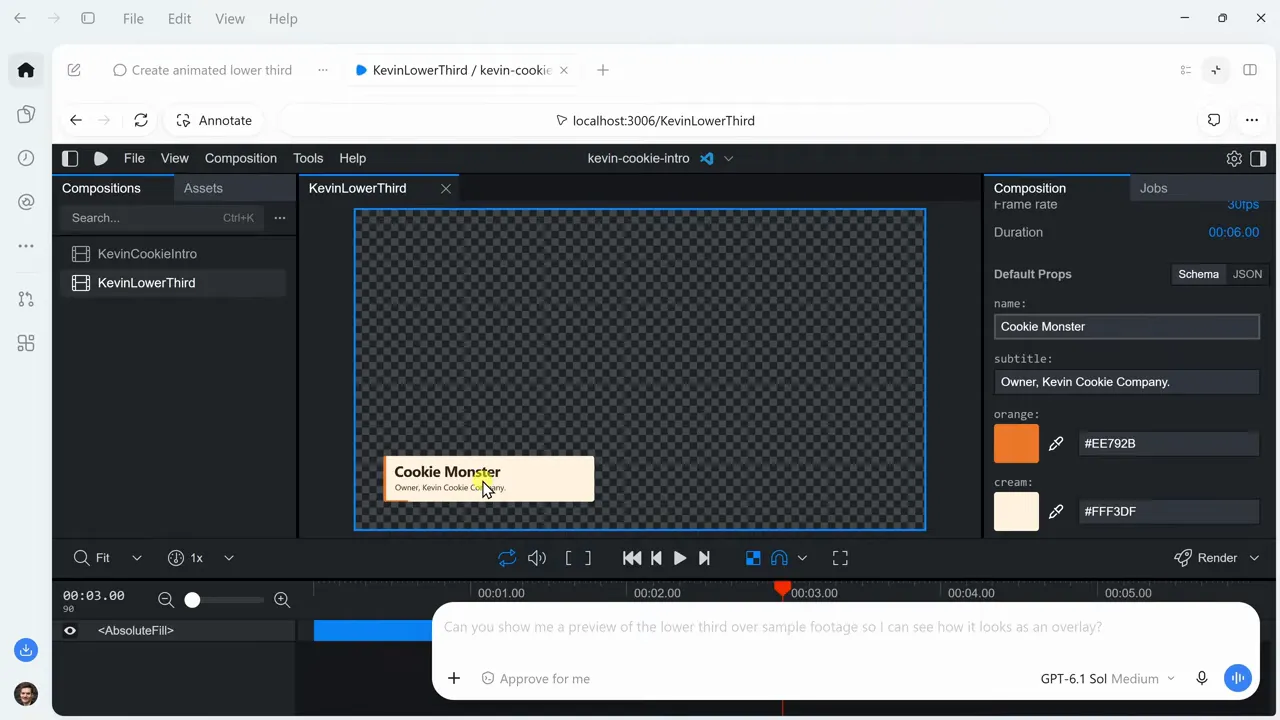
Use these controls for the properties available in your composition. For broader changes to the animation itself, return to Codex and describe what you want.
Add the Lower Third in DaVinci Resolve
With the transparent file ready, bringing it into an existing edit is simple:
- Drag the exported lower-third clip into the media pool in DaVinci Resolve.
- Drag the clip onto a video track above your existing footage.
- Play the timeline to check the result.
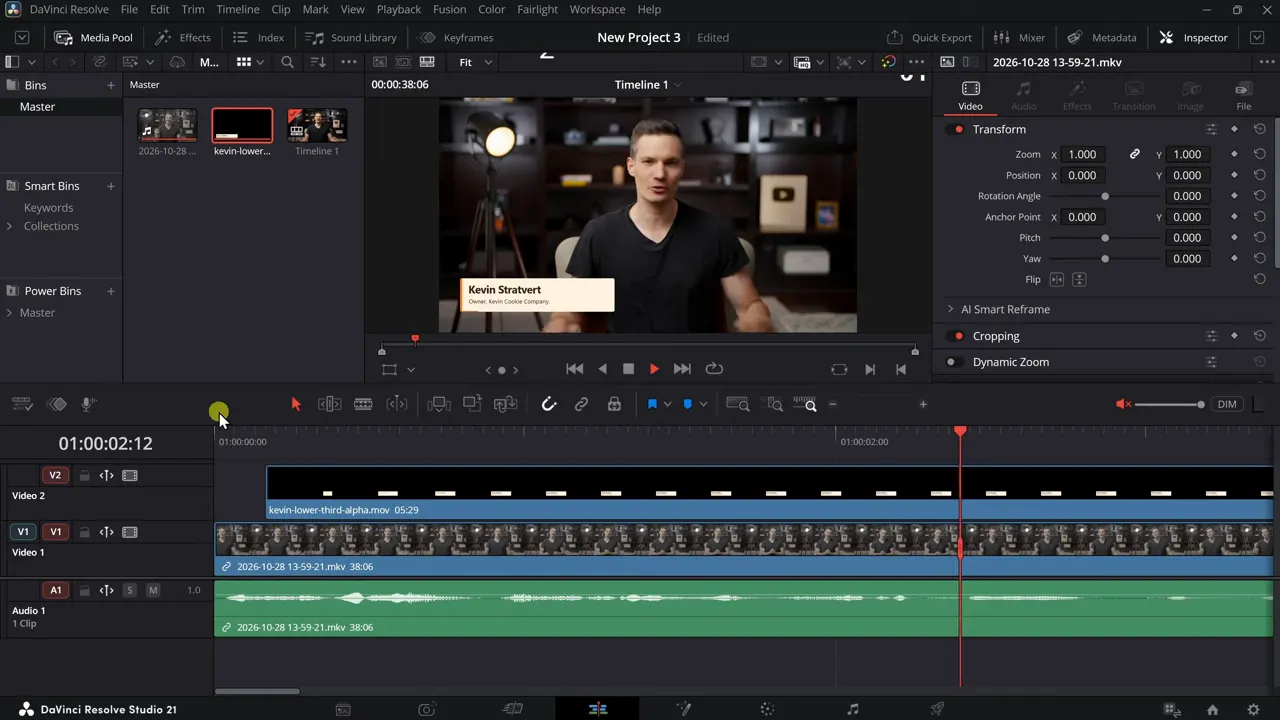
The lower third now appears over the original video. Because the export preserves transparency, the surrounding footage remains visible without needing to remove a solid background.
Turn Sales Data Into an Animated Bar Chart
Remotion isn’t limited to titles and overlays. You can also use it to turn data into animated graphics.
For this example, I’m using six months of sales data from the Kevin Cookie Company. Start another new chat in the same project, provide the monthly sales figures, and ask Codex to create an animated bar chart showing sales growth over those six months.
Codex generated this example in a little under two minutes. Open the result in Remotion Studio, expand the preview, and press play.
The chart introduces the monthly bars over time, turning the sales figures into a visual story rather than a static set of numbers.
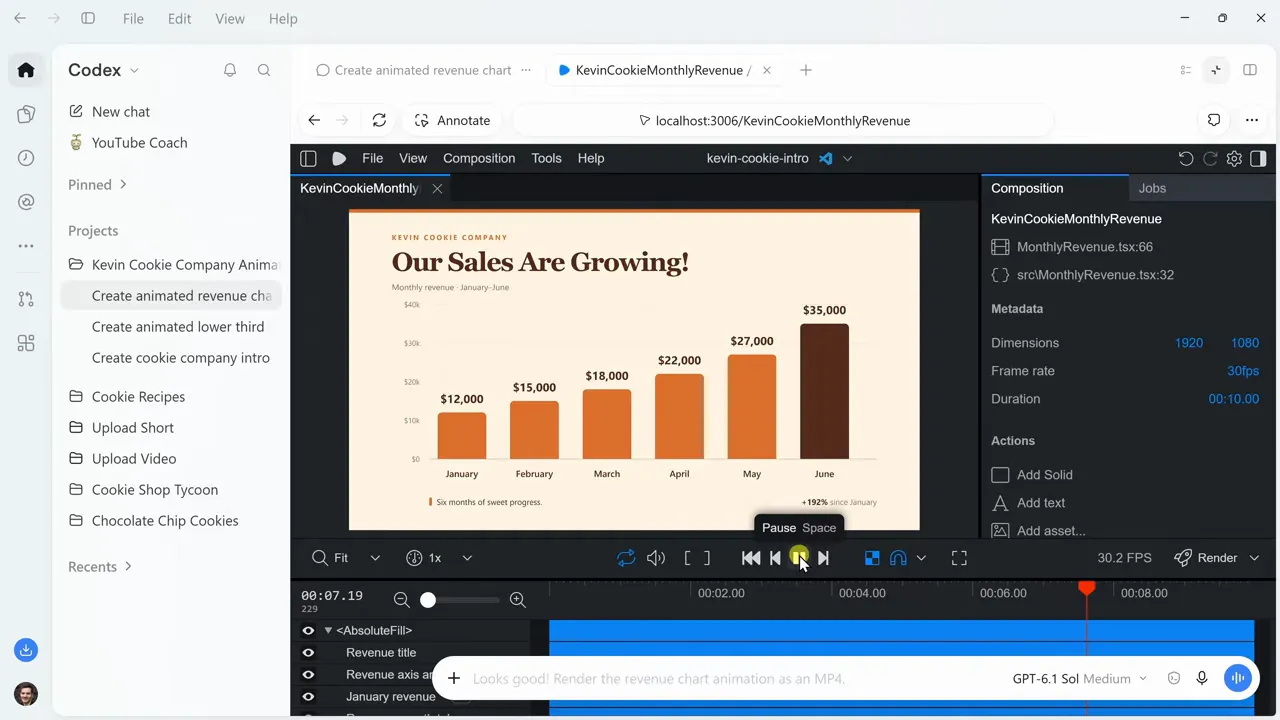
To export it, use the same process as the business intro: open Composition > Render and choose an MP4 export. You can then use the chart in a presentation, a social media post, or another video.
Switch Between Compositions
Because we created these examples in the same project, you can open the Remotion Studio sidebar to find the different compositions.
Select the intro, lower third, or sales chart to return to it. From there, you can review the animation or render another copy. You don’t need to recreate an earlier animation just because you’ve moved on to another one.
What Else Can You Create?
The same approach also works for animated captions, product demos, and social media videos.
The basic process stays the same: describe the animation, let Codex build it with Remotion, preview the result, and refine it. Then choose an export suited to its destination: H.264 MP4 for a finished video, or ProRes 4444 for a transparent overlay.
Remotion handles the video framework, Codex handles the coding, and you get to focus on the creative decisions. Even if the creative decision is simply to add a much bigger cookie.


