Getting photos and videos from your iPhone onto a Windows PC is pretty easy. You can import them with the Photos app, copy them directly using File Explorer, or transfer them wirelessly through Google Photos.
I’ll use photos from a trip to the Museum of Flight with my son as an example. Whether you have a few favorite pictures or a collection of videos, the same three techniques apply.
The first two methods use a cable connected to your computer. The third only needs an internet connection, so there’s no need to plug your phone into your PC.
What You'll Learn
- The Windows 10 Photos app lets you select and import iPhone photos and videos over a cable.
- File Explorer lets you copy iPhone media directly into a destination you choose.
- Google Photos provides wireless access through cloud backup, with optional downloads to your PC.
1. Import iPhone Photos with the Windows 10 Photos App
The Photos app comes included with Windows 10, making it a convenient place to start. It handles both photos and videos and gives you a visual way to choose what you want to import.
Connect your iPhone and open the import tool
- Connect your iPhone to a USB port on your computer using your Lightning cable.
- When Windows displays the Apple iPhone notification, select it to choose what happens with the device.
- Choose Import photos and videos using the Photos app.
- Wait while Photos searches your iPhone for pictures and videos.
Once the search finishes, you’ll see thumbnails of the items available to import. You don’t have to bring over everything on your phone.
Select the pictures and videos you want
If the app has already selected items, choose Unselect all to start with an empty selection. Then select just the photos and videos you want on your computer.
For my Museum of Flight trip, I selected the pictures from that outing rather than importing my entire photo collection.
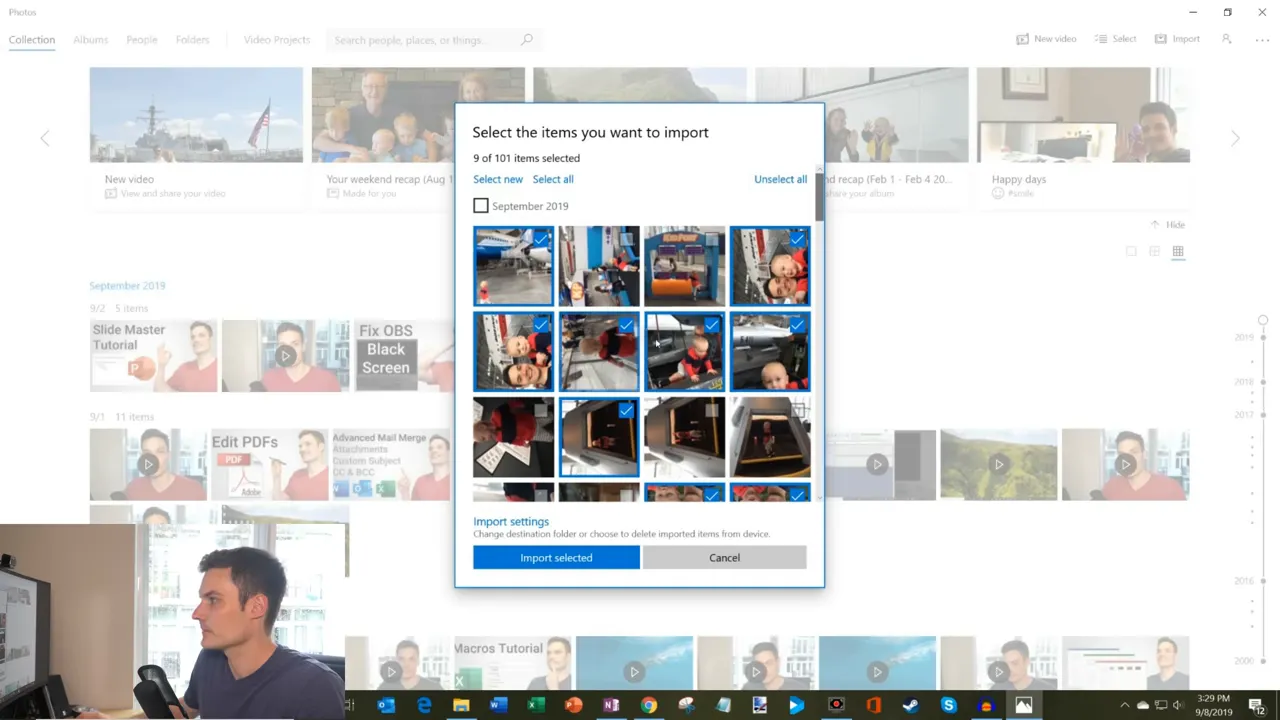
- Review your selection.
- Click Import selected.
- Wait for the import to finish, then open the pictures in Photos.
After importing, I could open the pictures of the Boeing 787, one of the original Boeing 747s, and the Space Shuttle loading bay right on my PC.
The nice thing about this method is that you can do more than transfer files. Once your pictures are in Photos, you can crop them, apply filters or effects, and share them. For a straightforward import followed by a little editing, Photos is probably the easiest option.
2. Copy iPhone Photos Using File Explorer
File Explorer gives you a more direct approach: find the files on your iPhone, copy them, and paste them into a location on your computer. It’s also an alternative for older versions of Windows that don’t have the Windows 10 Photos app.
You’ll still need the cable, but this time you’ll choose a different option when Windows detects your phone.
Find the photos on your iPhone
- Connect your iPhone to your computer.
- Select the Apple iPhone notification.
- Choose Open device to view files using File Explorer.
- In File Explorer, select your iPhone and open Internal Storage.
- Open the DCIM folder, then open the folder inside it to find your photos and videos.
The DCIM folder is where you’ll find the iPhone’s camera photos and videos exposed through this connection. Once you’re inside, you can browse the files and select the ones you want to copy.
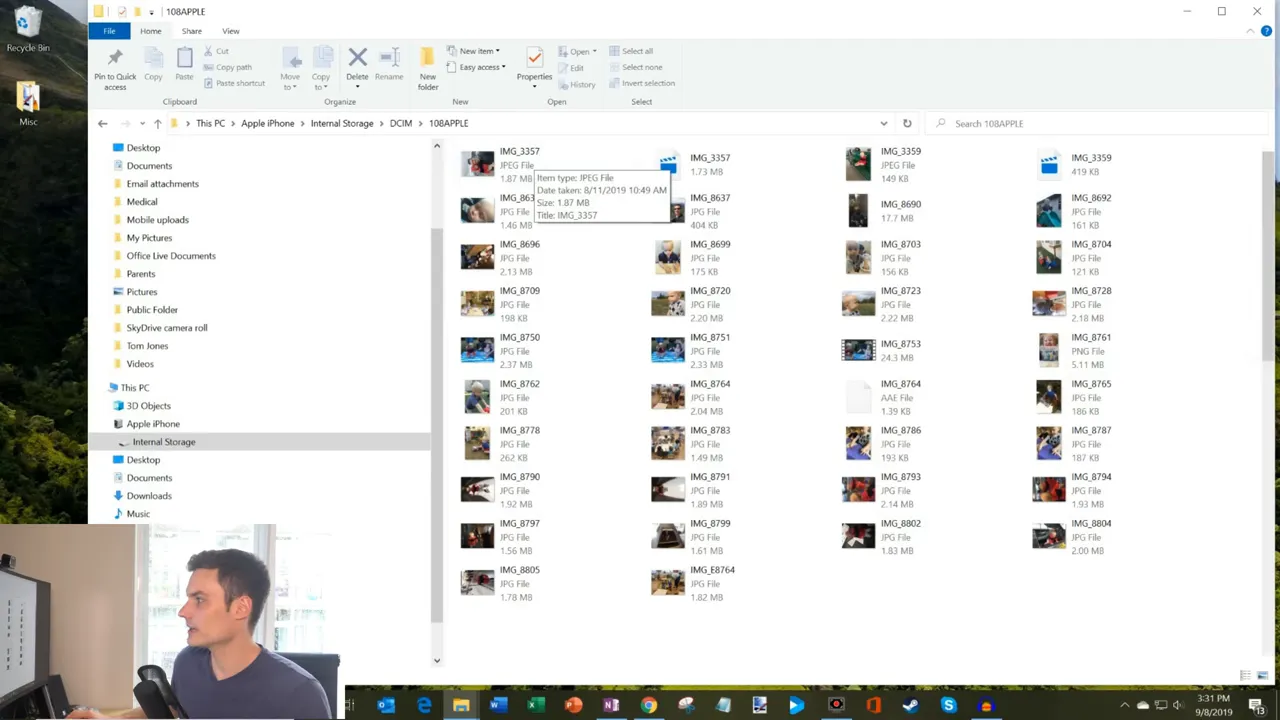
Copy and paste the files onto your PC
- Select the photos or videos you want to transfer.
- Right-click your selection and choose Copy.
- Open the destination on your computer. For example, you can use a folder or your desktop.
- Right-click in that location and choose Paste.
That’s it. The copied files are now on your PC, and you can open them from the destination you chose.
The main difference from the Photos app is that you decide exactly where to place the files. It takes a little more manual navigation, but if you’re already comfortable copying and pasting files, this method is very simple.
3. Transfer iPhone Photos Wirelessly with Google Photos
If you’d rather skip the cable, Google Photos provides a cloud-based route. Your iPhone uploads the photos and videos, and you can then access them in a browser on your computer.
This is my favorite of the three methods because it gives me a cloud backup and saves me from having to connect the phone to my PC.
Back up your iPhone photos
- Open the App Store on your iPhone.
- Search for Google Photos and install the app.
- Open Google Photos and set it up to back up your photos using your Google account.
- Allow the app to upload the photos and videos you want to access from your computer.
Google Photos identifies the pictures on your phone and shows the backup progress. In my example, it was backing up 20 photos from the museum trip.
You can upload through Wi-Fi or cellular data, depending on your settings. The important part is to let the items finish uploading before trying to download them on the PC.
Open Google Photos on your computer and download
- Open a browser on your PC and go to Google Photos.
- Sign in with the same Google account you used on your iPhone.
- Refresh the page if your newly uploaded pictures haven’t appeared yet.
- Use the checkmarks on the thumbnails to select one or more items.
- Open the three-dot menu in the upper-right corner and choose Download.
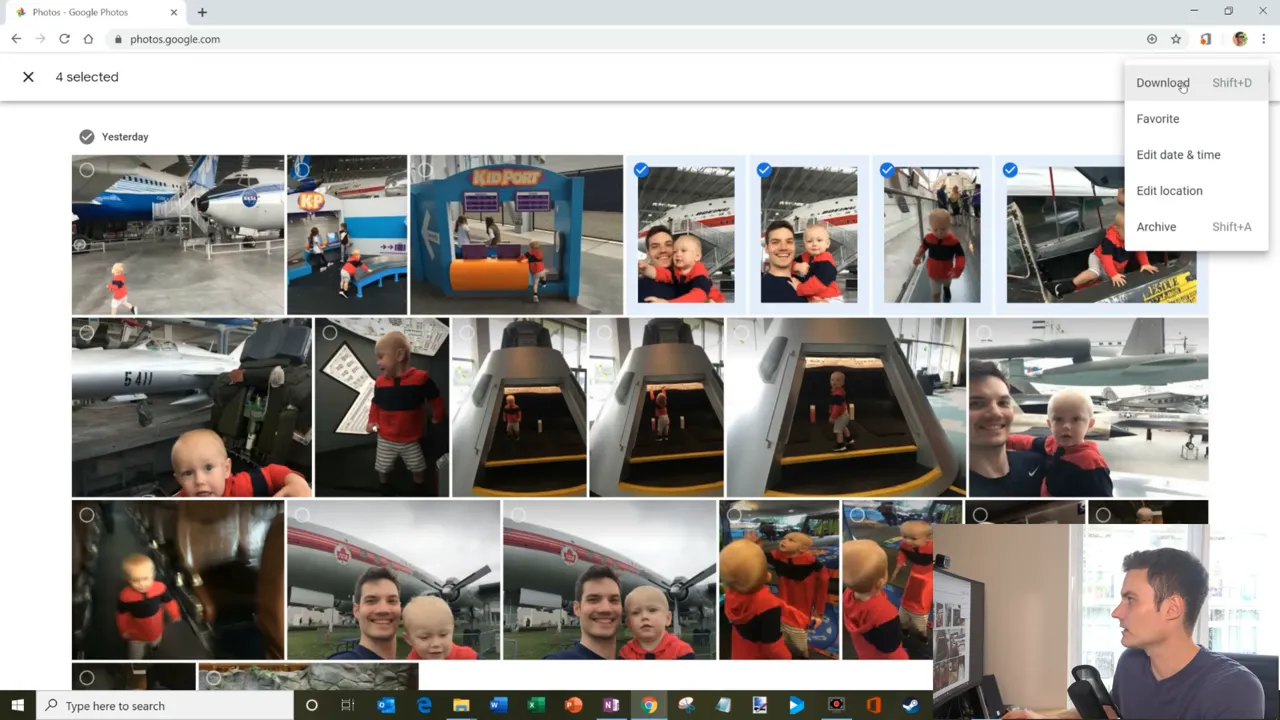
When I downloaded several pictures together, Google Photos packaged them into a ZIP file. You can extract that ZIP file to access the individual photos on your computer.
You also don’t have to download anything if you only want to access your pictures from the PC. You can leave them in Google Photos and open them through your browser whenever you need them.
Which Transfer Method Should You Use?
- Choose the Windows Photos app for an easy, visual import process with editing and sharing tools afterward.
- Choose File Explorer if you prefer copying files manually and choosing their destination yourself.
- Choose Google Photos if you want wireless access and a cloud backup, with the option to download local copies.
All three methods work for both photos and videos. The choice comes down to whether you want a guided import, direct control over your files, or the convenience of transferring without a cable.
Made with VideoToBlog using How to Transfer Photos from iPhone to Computer


