Windows 10 includes a free screen recorder, so you don’t need to download another app to capture what you’re doing. You can also record your microphone alongside the video, which is handy when you want to explain a process as you go.
The tool is called Xbox Game Bar. Although it was designed for recording games, it also works with apps such as your web browser or Microsoft Word. For a straightforward recording within one app window, it’s a pretty good place to start.
There is one important limitation: Game Bar records one app window at a time, rather than a workflow that moves between multiple apps. With that in mind, here’s how to set it up, capture a video, and find the finished recording.
What You'll Learn
- Xbox Game Bar records a single app window for free without an additional download.
- Use High video quality, 192 kbps audio, and an appropriate frame rate for clear recordings.
- Start or stop recording with Windows + Alt + R and toggle narration with Windows + Alt + M.
- Find saved recordings in the Captures folder inside your Videos folder.
1. Open Xbox Game Bar
Open the app you want to record, then press Windows + G on your keyboard. This brings up Xbox Game Bar over the app.
The bar includes several controls, including options to open the Xbox app, take a screenshot, and start a recording. The recording button is the one we’ll use, but it’s worth checking a few settings first so your video looks and sounds good.
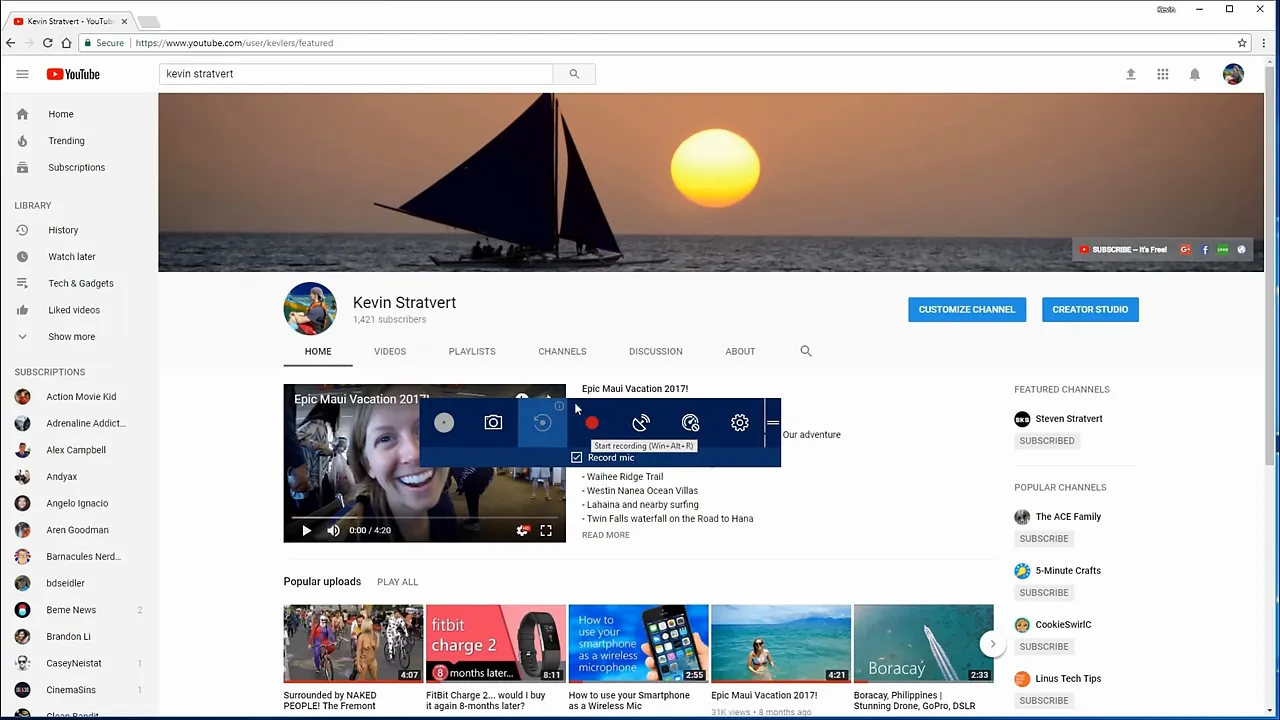
The interface shown here uses the older Game DVR terminology. The layout and labels can vary with your Windows 10 version, but the key recording shortcuts are useful to know either way.
2. Set Up Your Screen Recording Quality
Click the gear icon on Game Bar and open the Game DVR tab. From there, select the option to edit more preferences in Windows Settings.
Within Windows Settings, the Game Bar page lists the keyboard shortcuts. The Game DVR section contains the recording preferences, including the save location, microphone options, and video quality.
Turn on your microphone and choose audio quality
If you want to add your voice to the recording, enable the microphone recording option. I like to keep this on when I’m explaining something on screen, rather than ending up with a silent demonstration.
For audio quality, Windows recommends 128 kbps, but I prefer 192 kbps, the highest audio-quality option shown in these settings. You can set this in the Game Bar preferences or in the Windows recording settings.
You don’t have to leave the microphone on for the entire recording. You can toggle it while you work, either with the microphone control or a keyboard shortcut.
Choose 30 or 60 frames per second
The right frame rate depends on what you’re recording:
- 30 frames per second: A good choice for a browser window, a document, or a typical software demonstration.
- 60 frames per second: Worth considering for a game, where faster movement can benefit from smoother video.
For a simple browser recording, 30 frames per second looks great. You don’t need to use the higher setting just because it’s available.
Set video quality to High
The video quality setting offers Standard and High. I use High because it produces a crisper recording, particularly when there’s text on the screen.
If you’re demonstrating an app or walking through a document, readable text makes a big difference. This is one setting I’d change before starting.
Decide whether to include your mouse cursor
Enable Capture mouse cursor in recordings if you want the pointer to appear in the finished video.
I generally leave this on. When you’re explaining where to click, the pointer helps someone follow the steps. If the cursor would distract from what you’re capturing, turn it off instead.
Check the recording length and save location
The recording settings also let you choose a maximum recording length, with an option of up to four hours. You may not need a recording that long, but the option is there.
Take a look at the save location while you’re here. By default, recordings go into the Captures folder inside your Videos folder. Knowing that location now saves you from searching for the file later.
3. Start and Stop Your Screen Recording
Once the settings are ready, return to the app you want to capture.
- Press Windows + G to open Xbox Game Bar.
- Click Start recording.
- Use the app normally while the recording runs.
- Toggle the microphone if you need to turn narration on or off.
- Click Stop recording when you’re finished.
A small recording timer shows how long the capture has been running. For example, when recording a browser, you can move between pages, scroll, and demonstrate different parts of a website within that browser window.
You can also skip opening the bar each time and use these shortcuts:
- Windows + G: Open Xbox Game Bar.
- Windows + Alt + R: Start or stop a recording.
- Windows + Alt + M: Toggle the microphone on or off during recording.
The start-and-stop shortcut is especially convenient when you want to get straight to the task. Microsoft also maintains a Windows keyboard shortcut reference if you want to keep other useful combinations nearby.
4. Find and Play Your Recording
After you stop, your recording is saved to the capture location you checked earlier. The simplest way to get to it is to open File Explorer and go to Videos > Captures.
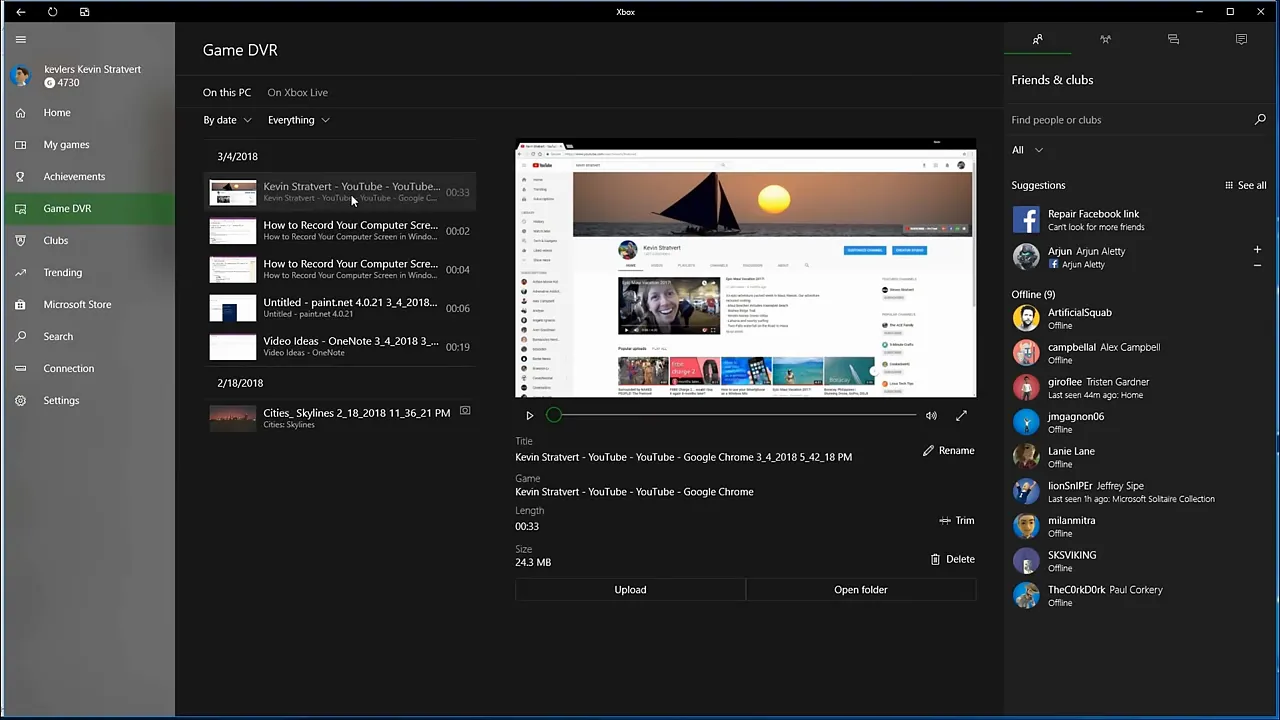
In the older Xbox app interface, you can also access recordings through the app:
- Open the Xbox app from Game Bar.
- Expand the navigation on the left and select Game DVR.
- Select your recording to preview it.
- Choose Open folder to locate the saved file in File Explorer.
Open the file to play it back and check the result. With High video quality selected, the browser text should look nice and crisp.
When Is Xbox Game Bar the Right Choice?
The main thing to remember is that this is a single-window recorder. It’s useful for demonstrating a website, working in Word, or capturing a game. It is not the right tool for recording a sequence that switches back and forth between separate apps, such as File Explorer and the Xbox app.
For more involved recordings, you’ll need a different tool. If you also want to include your camera, I have a separate tutorial on recording your screen and webcam simultaneously.
For a quick capture within one app, though, I’d start with Game Bar. It comes with Windows 10, requires no additional download, and lets you include your voice. Once your preferences are set, Windows + Alt + R is all it takes to start your next recording.
Made with VideoToBlog using How to Record Your Computer Screen in Windows 10


