Adding page numbers in Microsoft Word is easy. Getting them to start exactly where you want takes a little more work. You might want to leave your cover page unnumbered, or skip both the cover page and table of contents so your main text starts at page 1.
The right approach depends on where numbering should begin. Use Different First Page to skip just the cover page. Use a section break and turn off Link to Previous to start numbering on page 3, page 4, or any later page.
I’ll use a document with a cover page, a table of contents, and several pages of text. You can follow along with your own file or use the sample Word document.
What You'll Learn
- Use Different First Page and a starting value of 0 to number the second page as 1.
- Insert a Next Page section break before the content where page numbering should begin.
- Turn off Link to Previous so the new section’s footer can have independent page numbers.
Table of Contents
- Insert Page Numbers in Word
- Start Page Numbering on Page 2
- Start Page Numbering on Page 3 or Any Later Page
- Check the Finished Page Numbering
Insert Page Numbers in Word
First, here’s how to add page numbers throughout a document:
- Select the Insert tab.
- In the Header & Footer group, select Page Number.
- Choose where the numbers should appear. I’ll use Bottom of Page.
- Select a style. For this example, choose a plain number aligned to the right.
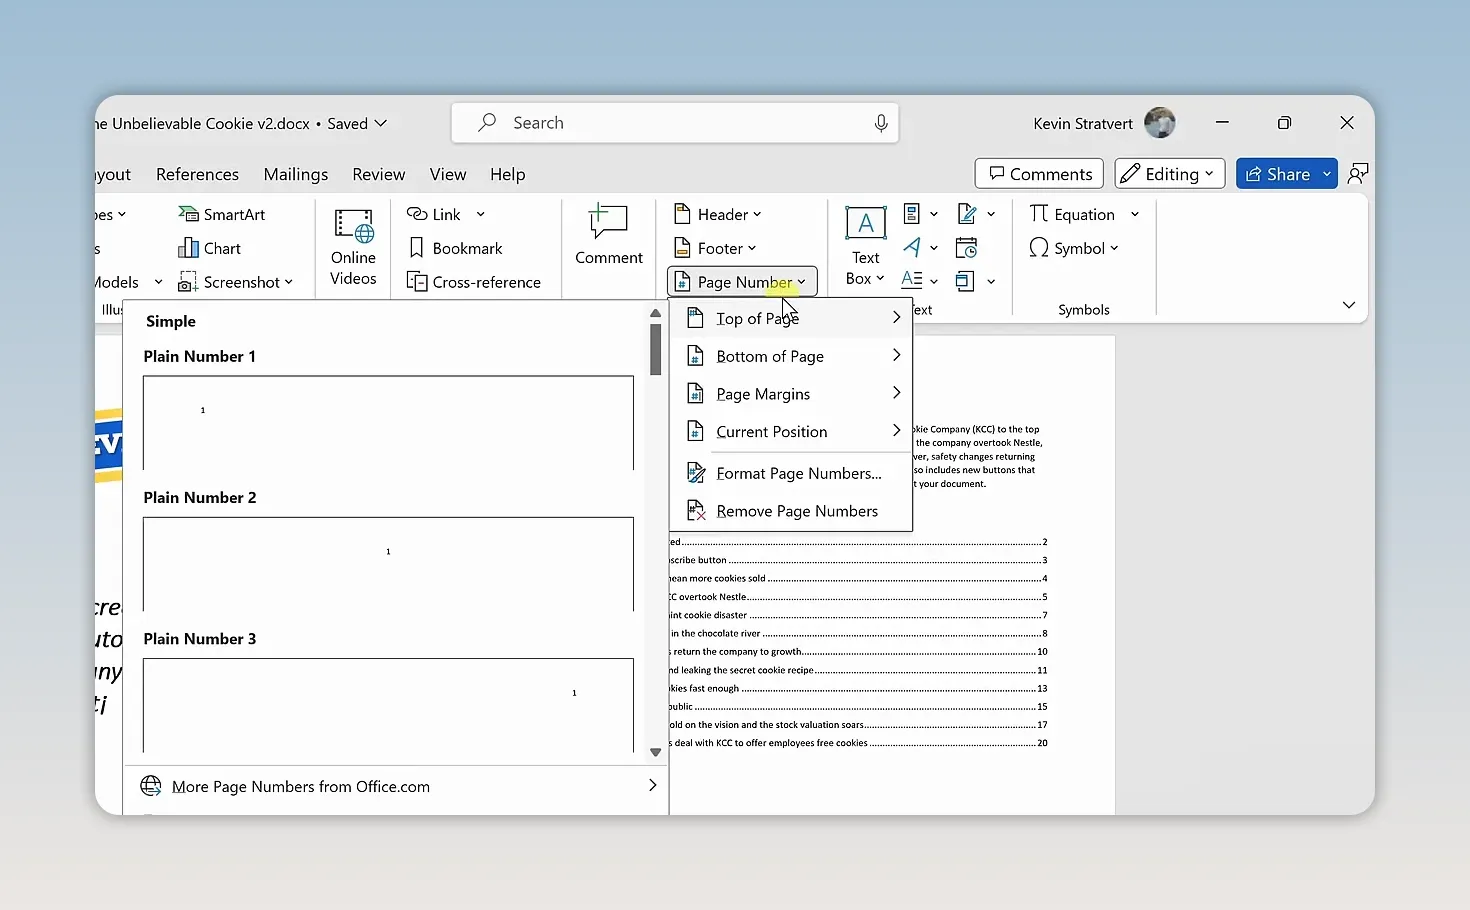
Word adds page numbers, including one on the cover page. That’s a good start, but a number on the cover probably isn’t what you had in mind.
Start Page Numbering on Page 2
If you only need to skip the cover page, you don’t need to divide your document into sections.
Hide the Number on the Cover Page
- With the footer active, select the Header & Footer tab. If the footer is not active, double-click near the bottom of a page.
- Check Different First Page.
The number disappears from the cover page. However, the second page still displays 2. Word is hiding the first number, not removing the cover page from its count.
Make the Second Page Display 1
- On the Header & Footer tab, select Page Number.
- Choose Format Page Numbers.
- Under Page numbering, set Start at to 0.
- Select OK.
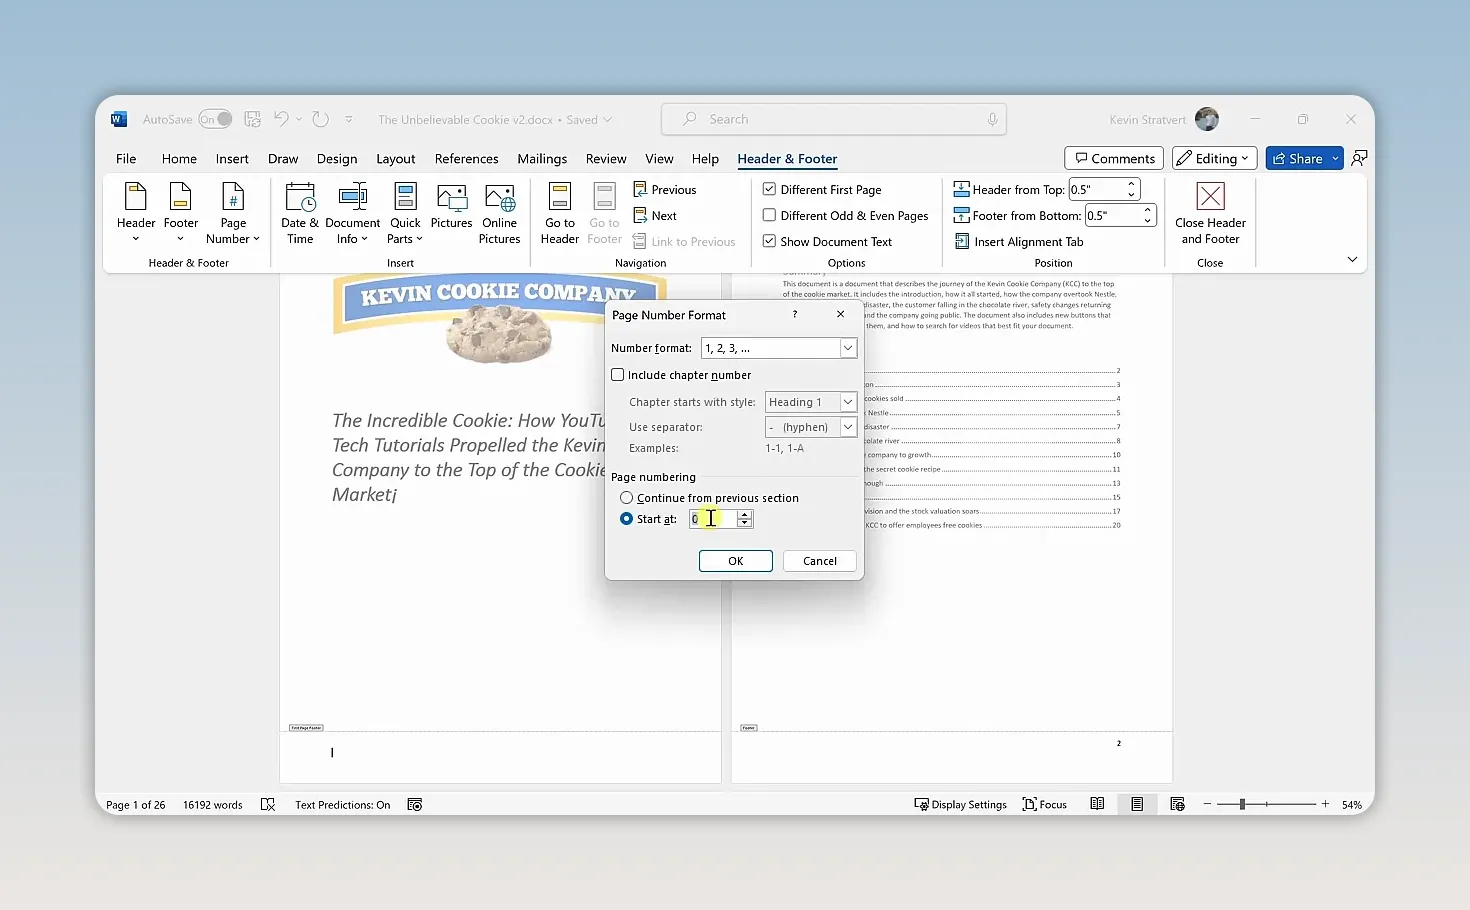
Now the cover page counts as page 0, but its number stays hidden. The second page displays 1, and numbering continues from there.
This shortcut works when you want numbering to begin on the second page. If you also want to leave the table of contents unnumbered, you need a section break.
Start Page Numbering on Page 3 or Any Later Page
For this example, the cover page and table of contents will stay unnumbered. The main text on the third physical page will display page 1.
The key is to split the document into two sections:
- Section 1: The introductory pages, with no page numbers.
- Section 2: The main text, with its own page numbers.
1. Reset the Earlier Numbering, If Needed
If you tried the cover-page shortcut above, reset it before continuing:
- Double-click in the footer and delete the existing page number.
- On the Header & Footer tab, clear Different First Page.
- Open Page Number > Format Page Numbers, set Start at back to 1, and select OK.
If you’re starting with an unnumbered document, skip this reset.
2. Show Hidden Formatting
Return to the document body. On the Home tab, select the Show/Hide ¶ button in the Paragraph group.
This reveals hidden formatting, including page breaks. In the sample document, a page break at the end of the table of contents pushes the main text onto page 3.
A regular page break starts a new page, but it does not create a separate section. To control the footer independently, we need a section break instead.
3. Replace the Page Break with a Next Page Section Break
- Find the page break immediately before the content where numbering should begin.
- If a page break is present, place the cursor immediately after it and press Backspace to remove it. The main text may temporarily move onto the preceding page.
- Keep the cursor at that boundary, immediately before the main text.
- Select Layout > Breaks.
- Under Section Breaks, choose Next Page.
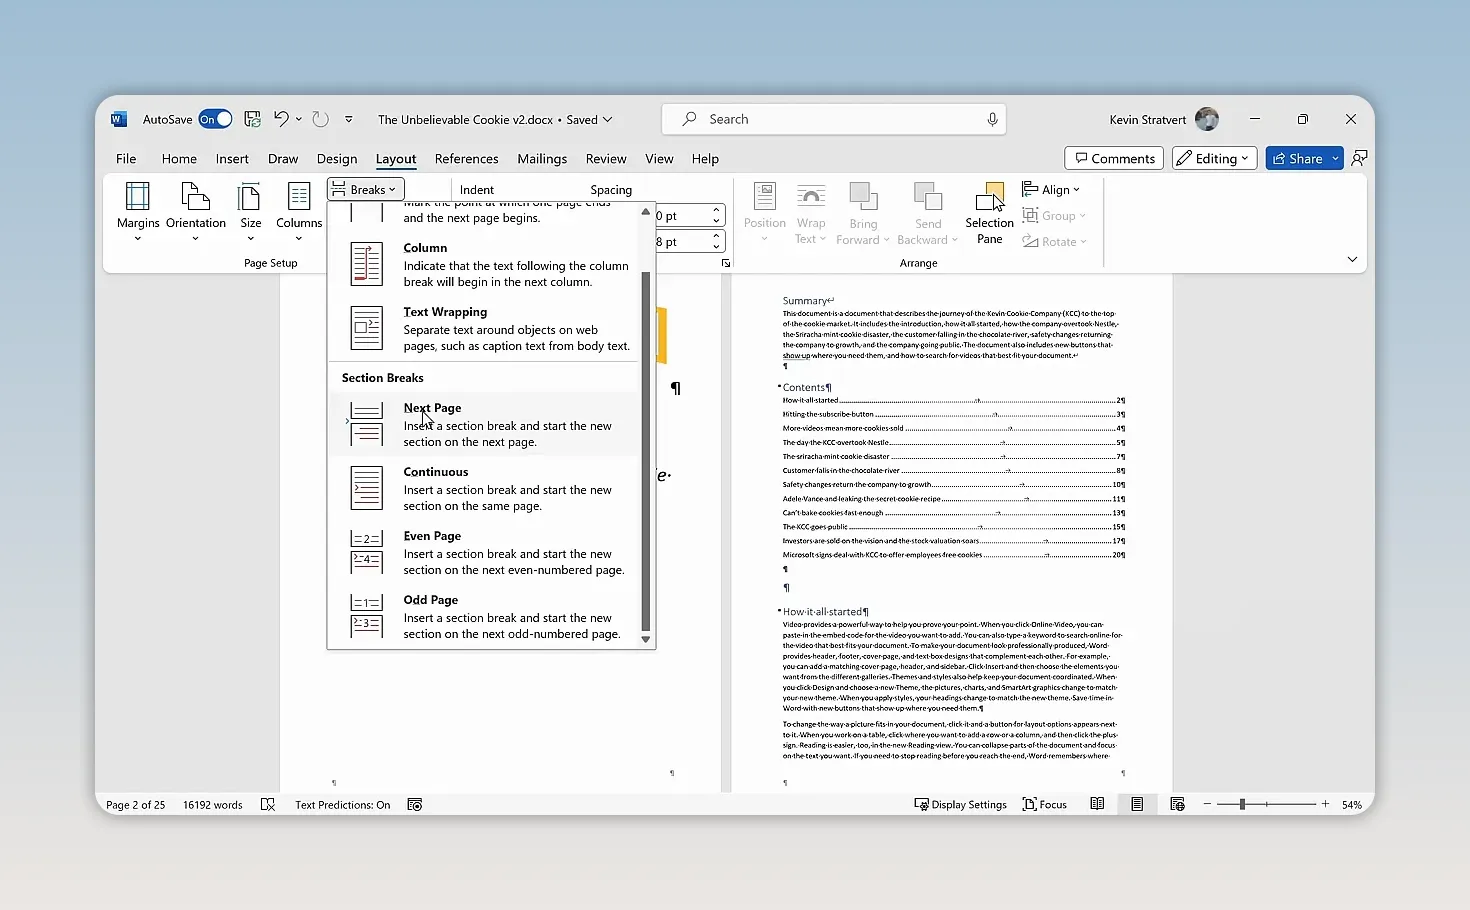
Word inserts a Section Break (Next Page) marker and moves the main text onto the next page. The cover and table of contents are now in section 1, while the remaining pages are in section 2.
For numbering that starts on page 4 or page 5, use the same approach. Place the section break immediately before the content that should receive the first number.
4. Turn Off Link to Previous
Double-click in the footer on the first page of the new section. In this example, that’s the third physical page. The footer label should identify it as Section 2.
Here’s the part that’s easy to miss: creating a section does not automatically make its footer independent. You may see Same as Previous beside the footer. That means edits still carry over between the linked sections.
For example, typing the word “Page” into the second section’s footer would also make it appear in the first section. Separate sections exist, but their footers are still connected.
- Keep the section 2 footer active.
- Select the Header & Footer tab.
- In the Navigation group, select Link to Previous to turn it off.
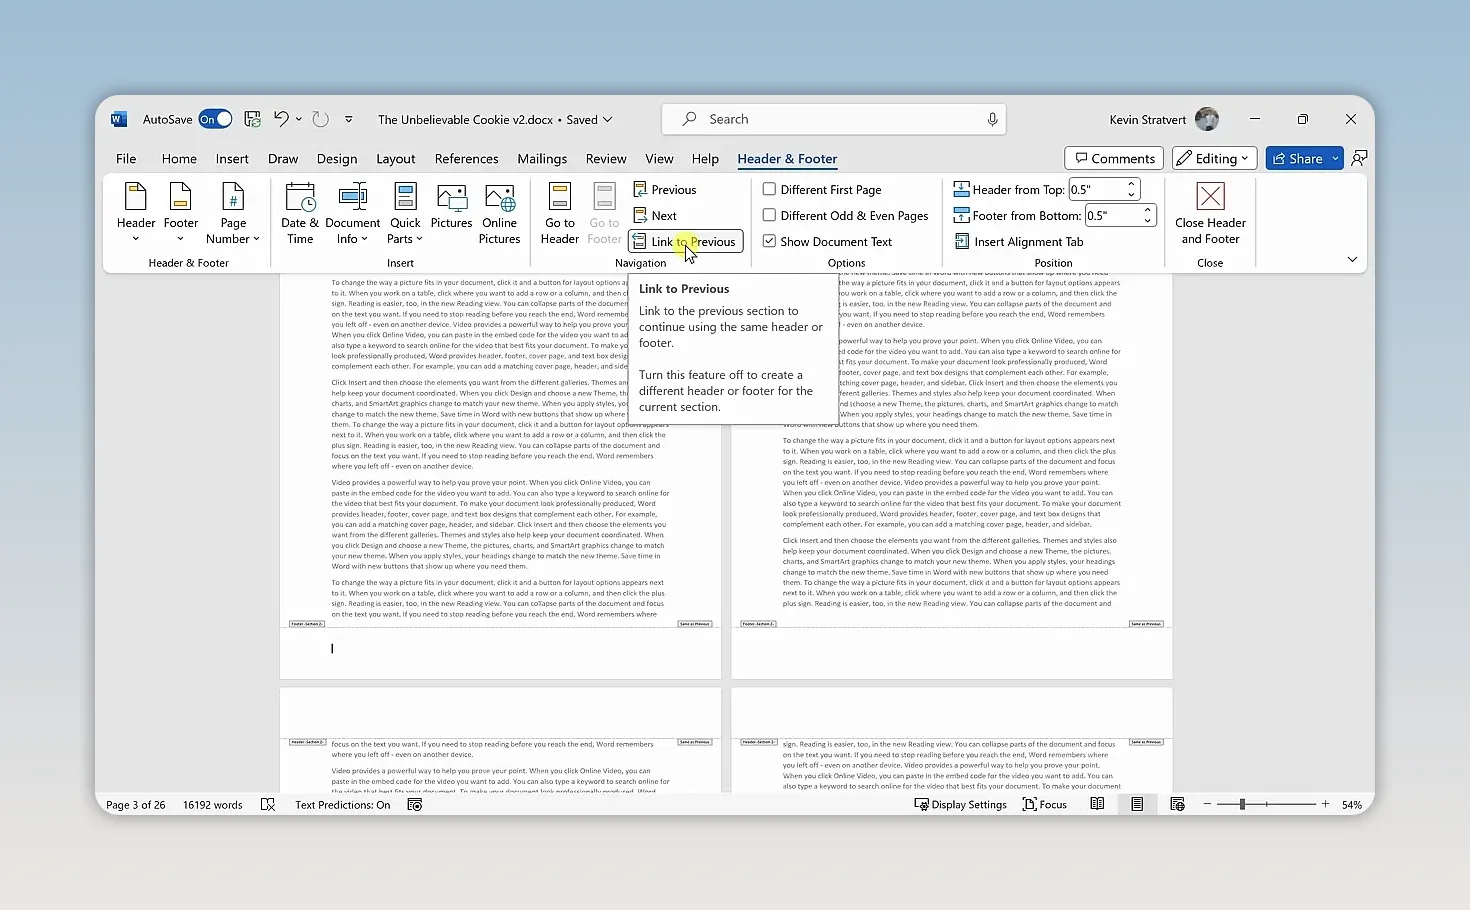
Now this footer can be edited independently of the earlier section. You can also turn off the formatting marks using Home > Show/Hide ¶ once you no longer need them.
5. Add Page Numbers to the New Section
- With the section 2 footer still active, select Page Number.
- Choose Bottom of Page and select your preferred style. I’ll use the bottom-right position again.
- Check the first number. If it does not display 1, open Page Number > Format Page Numbers, select Start at: 1, and select OK.
The third physical page now displays 1, the next page displays 2, and numbering continues through the main text. The cover page and table of contents remain unnumbered.
Check the Finished Page Numbering
Before calling it done, check three things:
- The introductory pages have no numbers. In this example, both the cover and table of contents should have blank footers.
- The first content page displays the intended number. If it should begin at 1, confirm that in Format Page Numbers.
- The following pages continue in sequence. Check at least the next page to confirm the result.
If numbers appear in the earlier section too, go back to the numbered section’s footer and check Link to Previous. That connection is the important detail.
Sections also let you give different parts of a document their own numbering sequences and number formats. For additional reference, Microsoft provides guidance on starting page numbering later in a document.
Once you understand section breaks and linked footers, starting page numbers anywhere in Word becomes much more manageable. Separate the content, unlink the footer, and add the numbering exactly where you need it.
Made with VideoToBlog using How to Insert Page Number in Word from Specific Page


